
INS-320 · Lesson 11 of 12 · 24 min
Finding and fixing wet insulation
▶ Video coming soon A video version of this lesson is on the way.
On Saturday morning, November 14, Marcel and Tessa went back to the ice arena where Coldstream had insulated the new refrigeration plant in July. The facility supervisor, Glen Kasprzak, had asked for an infrared survey before the busy winter season: the summer work, and an older brine return line in the ice resurfacer room that had not been part of the summer project. The summer work looked as it should, an even, slightly-below-room temperature along every header. The old return line did not. On the camera, a dark blue streak ran along the bottom of the jacket for most of its length, with darker rings at each butt joint and a dark patch at each hanger. When Marcel cut an inspection plug at the worst spot, the glass fiber insulation inside was soaked, with ice in the bottom few centimeters against the pipe and a rust stain on the steel.
Earlier lessons showed how cold systems get wet and how to keep them dry. This lesson covers what to do when they have already failed: how to find wet insulation, including with infrared cameras, what corrosion under cold insulation means and who decides what to do about it, and how wet sections are cut out and rebuilt so that the repair does not fail in turn.
Signs of trouble
Many failures can be found by looking and touching on a walk-down, as lesson 1 described. The common signs are:
- Sweating, dripping or frost on the jacket, often first at laps, butt joints, supports and fittings.
- Ice on or under the jacket, sometimes building into a sleeve or icicles on low-temperature lines.
- Rust staining running from laps, bands, supports or the ends of insulation, showing water inside reaching steel.
- Bulging, split or loose jacket, often pushed out by ice, and broken bands.
- A jacket colder than the rest of the line to the back of the hand, or soft, spongy insulation under the jacket.
- Stains, mold and wet ceiling tiles under chilled water lines, and drips onto floors and equipment.
- Rising energy use or falling capacity in a refrigeration plant, which operators may notice before anyone sees the pipe.
On a humid day, signs are easiest to see. On a dry winter day, a system with wet insulation may look perfectly dry, which is why surveys are best done in humid weather or with instruments.
Infrared thermography
An infrared camera shows the surface temperature of everything in its view as a color image. On cold systems, wet or iced insulation insulates poorly, so the jacket over it is colder than over dry insulation, and the camera shows it as a darker or colder color. Infrared surveys can cover long runs of pipe quickly, from the floor, without touching the system.
To get useful results:
- Understand emissivity. Every surface gives off infrared radiation according to its temperature and its emissivity, a number from 0 to 1 that describes how well it emits. Painted surfaces, mastics, PVC and most coatings have high emissivity, around 0.9, and read accurately. Shiny aluminum and stainless jackets have low emissivity and also reflect the radiation from things around them, so they can show the reflection of a light, a hot motor or a person instead of their own temperature.
- Measure low-emissivity jackets properly. Stick a small patch of black electrical tape or a dot of high-emissivity paint on the jacket where you want an accurate reading, set the camera's emissivity for the patch, and let the patch reach the jacket's temperature before reading it. For finding problems, comparing like with like is often enough: two jackets of the same material, side by side, in the same surroundings.
- Survey in stable conditions. The system should be at its normal operating temperature and have been there for some hours. Outdoor jackets in sunshine are warmed unevenly by the sun, so outdoor surveys are best done on overcast days or at night.
- Read the patterns. A cold streak along the bottom of a horizontal line means water has collected low. Cold rings at regular intervals point to open butt joints. Cold patches at supports point to crushed insulation or missing inserts. A cold zone that starts at a fitting and spreads one way points to a breach at the fitting and water traveling along the pipe.
- Record the conditions. Note the air temperature, humidity, the system's temperature and the time with every image.
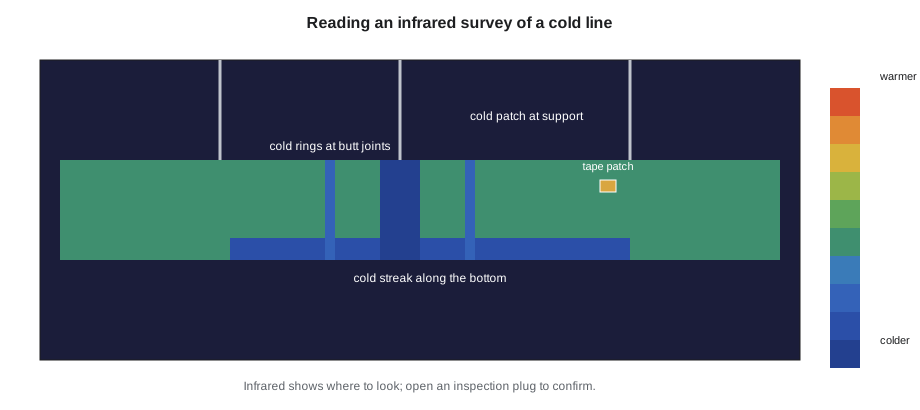
An infrared image shows a symptom, not a cause. It tells you where to look; it does not tell you how wet the insulation is, how far the water has gone or what has happened to the pipe. Every suspected area is confirmed by opening it.
Confirming what is inside
The usual way to confirm a problem is to open the insulation at a chosen spot.
- Inspection plugs are small, removable cut-outs through the jacket and insulation, sealed so they can be opened again. On new cold systems, some owners have plugs installed at low points and supports for future inspection; each must be sealed as carefully as any other part of the vapor retarder. On existing systems, a plug is cut, inspected and then sealed with a proper repair.
- Cutting a window in the jacket and insulation over a suspected area shows how far the damage goes, the condition of the vapor retarder and the pipe.
- Pressing and tapping. Wet insulation under a jacket often feels soft or squelches when pressed, and ice sounds different when tapped, but these are only clues.
Specialist inspection firms also use methods such as neutron backscatter, which detects hydrogen in water through the jacket, and radiography, to survey large plants without opening the insulation. These are arranged by the owner; insulators may be asked to remove and replace insulation at the spots they find.
Opening cold insulation is itself a breach. Every plug or window must be closed the same day with a complete vapor retarder repair, and on live refrigeration lines, as with any work near the system, the plant's permit and the refrigeration technician's agreement come first.
Corrosion under cold insulation
Water trapped against carbon steel under insulation causes corrosion under insulation (CUI). It is a serious problem in refrigeration plants because the pipe can thin unseen until it leaks, and a leaking ammonia line is a hazard to everyone in the plant. Corrosion of carbon steel under insulation is generally most active in a band from a few degrees below freezing up to well above room temperature, the range INS-220 described. Cold systems fall into that band in several ways: chilled water and brine lines run in it all the time, and low-temperature lines pass through it whenever they warm for defrost, cleaning or shutdown, when the ice inside melts and the water sits on the steel. Lines that cycle are often the worst.
When an insulator opens wet insulation and finds rust, pitting, scale or thinning on the pipe, the insulator's job is to stop, photograph and report it to the owner, not to judge whether the pipe is fit for service. The owner's inspector or engineer decides whether the pipe needs measuring, cleaning, coating or replacing, under the plant's mechanical integrity program, before it is reinsulated. At the arena, Marcel photographed the rust on the old brine return line, marked the spot on his sketch and left it to Glen and the refrigeration contractor to assess the pipe.
What wet insulation costs
Worked problem
The cost of a wet section
A 20 ft section of the Kellerton-type suction line (NPS 4 at −30 °F, 2 in insulation, 77 °F room) has become wet, and its effective conductivity has risen from 0.24 to about 0.83 Btu·in/h·ft²·°F. Using the cylinder method of lesson 6, the heat gain rises from 19.9 to about 60.0 Btu/h per foot, and the surface falls to about 57.9 °F. How much extra heat enters, how much extra electricity does the plant use in a year at 1 kW per 1.8 kW of heat, and will the section sweat in a 77 °F, 60 in 100 room (dew point 62.0 °F)?
Show solution
- Extra heat = (60.0 − 19.9) × 20 = 40.1 × 20 = 802 Btu/h, which is 802 ÷ 3,412 = 0.235 kW.
- Extra electricity = 0.235 ÷ 1.8 = 0.131 kW; over a year, 0.131 × 8,760 = 1,150 kWh.
- Surface 57.9 °F is below the 62.0 °F dew point, so the jacket sweats, and more water is driven in.
Answer: About 800 Btu/h more heat gain, about 1,150 kWh a year more electricity, and a sweating jacket that will keep getting worse.
The effective conductivity of wet insulation varies widely with how wet it is and whether the water is frozen; the value here is a typical round number for illustration. The important point is the feedback: once a section is wet enough for its surface to fall below the dew point, it collects water from the outside as well as the inside, and it gets worse faster.
Repairing a wet section
A repair must remove all the wet material and rebuild a complete, sealed system that joins the sound insulation on each side. The steps are:
- Plan with the owner. Agree the extent of the work, whether the line can be shut down or must stay live, the permits, and who will deal with the pipe if it is corroded.
- Find the extent. Open the insulation at the visible damage and work outward until the insulation is dry and sound. Water travels, so the wet zone is usually longer than the visible damage. A common rule is to cut back at least one full section length into dry insulation beyond the last wet material on each side, or to the nearest vapor stop.
- Remove the wet material. Remove jacket, vapor retarder and insulation from the whole wet length. Do not try to dry wet insulation in place, and do not reuse it.
- Report the pipe's condition and wait for the owner's decision if it is corroded.
- Dry the pipe surface. On a shut-down line, let it warm and dry. On a live line, work in short sections, clearing frost and moisture with clean rags and gentle warm air just before each section is insulated, as Marcel and Devon did on the Kellerton line.
- Build vapor stops at both ends of the repair, sealing the new insulation to the pipe and to the end of the existing insulation, so the repair and the old system are separate sections.
- Rebuild the system with the specified materials and thickness, in the same number of layers, with staggered and sealed joints, inserts at supports, contraction joints if needed, and a continuous vapor retarder lapped well onto the existing retarder at each end.
- Jacket and seal, lapping the new jacket over the old so laps shed water, and record what was done, where, and the conditions.
Worked problem
How far to cut back
On the arena's old brine return line, wet insulation is visible over 8 ft. The insulation is in 3 ft sections, and the rule is to cut back one full section into dry insulation beyond the last wet material on each side. If, as usual, the wet zone proves longer than what shows, and opening it finds wet material 2 ft past the visible damage at each end, how much insulation is removed?
Show solution
- Wet length = 8 + 2 × 2 = 12 ft.
- Add one 3 ft section of dry insulation at each end: 12 + 2 × 3 = 18 ft.
Answer: About 18 ft, more than twice the visible damage.
Repairs that fail
Marcel listed the repairs he had seen fail, most of them many times:
- Tape or mastic over a wet patch. The water stays in, the patch peels, and the damage spreads under it.
- Spray foam pumped into a void. It traps water, leaves voids, and is rarely compatible with the system.
- Drain holes in a cold jacket. Drain holes belong on hot systems; on cold work they let humid air in.
- A repair with no vapor stops at its ends. Water from the old system moves into the new section, or the other way.
- Patching a wet section on a system that is wet throughout. When the whole line is wet or the material is wrong for the service, as with the glass fiber on the arena's brine return, the right repair is to replace it.
At the arena, Marcel recommended replacing the whole old brine return line in the resurfacer room with the same cellular glass system as the summer work, with an insert at each hanger. Glen asked for a price, and Raj scheduled the work, pending the city's approval, for Monday, November 23 and Tuesday, November 24, with the line staying live and a dehumidifier running in the room.
Common mistakes
MistakeTaking an infrared image of a shiny jacket at face value.
InsteadUse a high-emissivity patch for readings and compare like surfaces.
MistakeCutting out only the visibly wet length.
InsteadOpen outward until the insulation is dry and cut back beyond it, or to the nearest vapor stop.
MistakeReinsulating over a corroded pipe without telling anyone.
InsteadPhotograph it, report it and wait for the owner's decision.
MistakeLeaving an inspection plug or window open overnight.
InsteadClose every opening the same day with a full vapor retarder repair.
MistakeDrilling drain holes in a cold jacket to let the water out.
InsteadRemove the wet insulation and rebuild; drain holes are for hot work.
Summary and key terms
- Wet cold insulation shows as sweating, drips, frost, ice, rust stains, bulging jacket, cold spots and rising energy use.
- Infrared cameras find cold areas quickly; low-emissivity jackets need high-emissivity patches and stable conditions, and patterns point to causes.
- Infrared shows symptoms; suspected areas are confirmed with inspection plugs or windows, closed the same day.
- Corrosion under cold insulation is serious, especially on lines that cycle; insulators report it and the owner decides.
- Wet insulation lets in much more heat, and once the surface falls below the dew point the damage accelerates.
- Repairs remove all wet material, cut back into dry insulation, add vapor stops at both ends and rebuild the full system.
- Patches, foam fills and drain holes fail; a line that is wet throughout or insulated with the wrong material should be replaced.
- Infrared camera
- An instrument that shows surface temperatures as a color image.
- Emissivity
- A number from 0 to 1 describing how well a surface gives off infrared radiation.
- Inspection plug
- A small, sealable cut-out through insulation used to inspect the material and pipe beneath.
- Corrosion under insulation
- Corrosion of piping or equipment caused by water trapped under insulation.
- Neutron backscatter
- An inspection method that detects water in insulation through the jacket.
- Cut back
- To remove insulation beyond a damaged area into sound material before repairing.
- Mechanical integrity program
- An owner's program of inspection and maintenance that keeps piping and equipment fit for service.
Practice problems
Work each problem on paper first, then reveal the answer to check.
Why can a shiny aluminum jacket give a false infrared reading?
Show answer
It has low emissivity and reflects radiation from its surroundings.
On an infrared image, what does a cold streak along the bottom of a horizontal line usually mean?
Show answer
Water has collected in the bottom of the insulation.
A wet section's heat gain rises from 20 to 55 Btu/h per foot over 25 ft. How much extra heat enters?
Show answer
(55 − 20) × 25 = 875 Btu/h.
Visible damage is 6 ft, wet material extends 1 1/2 ft beyond each end, and sections are 3 ft. How much is cut out?
Show answer
6 + 3 = 9 ft wet, plus 6 ft of sound insulation = 15 ft.
You find pitting on the pipe under wet insulation. What do you do?
Show answer
Stop, photograph it, report it to the owner and wait for their decision before reinsulating.
Lesson quiz · 5 questions
Score 60% or more to complete this lesson.
Create a free account to save your progress, take quizzes and earn a certificate.