
INS-210 · Lesson 11 of 12 · 23 min
Inspection of fitting work
▶ Video coming soon A video version of this lesson is on the way.
On Thursday, October 29, Hollis Brandt, the engineer's field reviewer, walked the Mountview penthouse with two lists: one for Devon and Tessa's pipe, which had two items, and one for Marcel's valves, strainers and pump connections, which had four. Marcel read the second list on the spot and nodded at each item. "Fair," he said. Afterward, he told Devon that the list was not the point. "Fittings are where reviewers look first, because fittings are where we cut corners. If you inspect your own fittings like Hollis does, before Hollis does, his list is short." From then on, Devon carried a checklist for fittings in the back of his notebook.
Inspection is the last step of fitting work, and on most jobs it happens at three levels: the insulator checks their own work as they go, the foreperson checks before the work is offered for review, and the owner, the engineer or an inspector reviews it before it is accepted. This lesson covers what to look for on fitting insulation, how to check thickness and surface temperature on finished work, the defects that appear again and again on fittings and how to record and close them.
When to inspect
The best time to find a defect is before it is covered. Fitting insulation hides its own faults: a void inside a cold valve box is invisible once the mastic is on, and a missing vapor stop cannot be seen under a sealed jacket. So inspection happens in stages:
- Before insulating: the fitting is tested, the system released for insulation, the stem extension and clearances are right, and nothing that must stay accessible will be buried.
- After the insulation and before the finish: full thickness, no voids, joints tight, vapor stops in place, cutbacks correct, specialties clear.
- After the finish: seams sealed, laps shedding water, finish thickness correct, covers tagged, nothing pierced, everything operable.
- After start-up: on hot systems, hot spots; on cold systems, sweating or frost; on all systems, damage from other trades.
At Mountview, the steam line was released for insulation only after it was tested, the lesson of the unannounced start-up in INS-110, and the same release applied to fittings. A fitting insulated before its joints were tested may have to be torn off when a joint leaks.
A checklist for fittings
Coldstream's fitting checklist, which Devon copied into his notebook, follows the jobs fitting insulation must do from lesson 1:
| Check | What good looks like |
|---|---|
| Thickness | Same as the adjoining pipe insulation, or as the specification requires, everywhere on the fitting |
| Fit | Joints tight, heel and throat closed, no gaps between pieces or at the pipe insulation |
| Voids | None; fitting firm all round when pressed |
| Vapor retarder (cold) | Continuous, sealed at every seam, end, stem and penetration, lapped onto the pipe jacket |
| Vapor stops (cold) | At each side of fittings that may be opened and at the specified spacing |
| Cutbacks | Pipe insulation stopped back from flanges by the specified distance, ends finished |
| Access | Packing glands, stems, operators, strainer caps, blowdowns, traps, vents, gauges and test ports clear and usable |
| Removable covers | Fit, closed fully, overlap the pipe insulation, tagged, fasteners secure |
| Finish | Correct product, sealed, smooth, laps shedding water, no fasteners through a vapor retarder |
| Identification | Nameplates readable, valve tags in place, pipe markers at fittings where required |
| Safety | No sharp edges, no loose wire ends, touch temperature within limits |
Checking thickness on finished work
INS-130 showed how to check pipe insulation thickness from its circumference. The same method works on fittings: wrap a tape around the finished insulation, divide by π to get the outside diameter, subtract the pipe or fitting diameter and halve the result. On a fitting, measure at more than one point: at the middle of an elbow, at the body and bonnet of a valve and at each end of a cover, where thickness is most often short.
Worked problem
A thin elbow
The specification calls for 2 in on the NPS 4 heating water at Mountview. Devon wraps a tape around the middle of a finished elbow on a branch and reads 24 in. NPS 4 pipe is 4.5 in across. Is the thickness right?
Show solution
- Expected outside diameter: 4.5 + 2 × 2 = 8.5 in; expected circumference: π × 8.5 ≈ 26.7 in.
- Measured outside diameter: 24 ÷ π ≈ 7.64 in.
- Measured thickness: (7.64 − 4.5) ÷ 2 ≈ 1.57 in.
- Shortfall: 2 − 1.57 ≈ 0.43 in, about 7/16 in.
Answer: About 1 9/16 in instead of 2 in: the elbow was built with 1 1/2 in covering, probably from a carton meant for the condensate. Devon checks the other elbows on that branch, finds two more, and they are rebuilt before Hollis sees them.
A quick check without arithmetic is to compare the circumference of the fitting insulation with the circumference of the pipe insulation beside it. On most fittings with the same thickness, the fitting insulation should be the same or a little larger around; if it is noticeably smaller, the thickness is short or the insulation is compressed.
Checking surface temperatures
On hot systems in service, a surface thermometer or an infrared thermometer shows where heat is getting out. Point it along the pipe, then at each fitting: a fitting that reads much hotter than the pipe insulation beside it has a gap, a void, thin insulation or a missing cover. On personnel protection work, check that surfaces people can touch are within the limit the specification sets; INS-110 explained the touch limit of about 140 °F for short contact that comes from ASTM C1055.
Infrared thermometers have one trap that catches almost everyone once. They measure the heat radiated by a surface, and shiny metal radiates very little, so a bare aluminum or stainless jacket reads far cooler than it is. Set the instrument to the surface's emissivity if it allows, or put a small patch of black electrical tape or flat paint on the jacket, let it reach temperature and read the patch. PVC, painted surfaces, mastic and fabric read close to their true temperature.
On cold systems, the signs are moisture and frost. Sweating, drips, stains on the jacket or the ceiling below, frost on refrigeration lines and soft or wet spots in the insulation all point to a gap in the vapor retarder or a thin spot. Check after the system has been running cold for a while, ideally on a humid day; a cold system inspected only in winter can look perfect until July.
Common defects on fittings
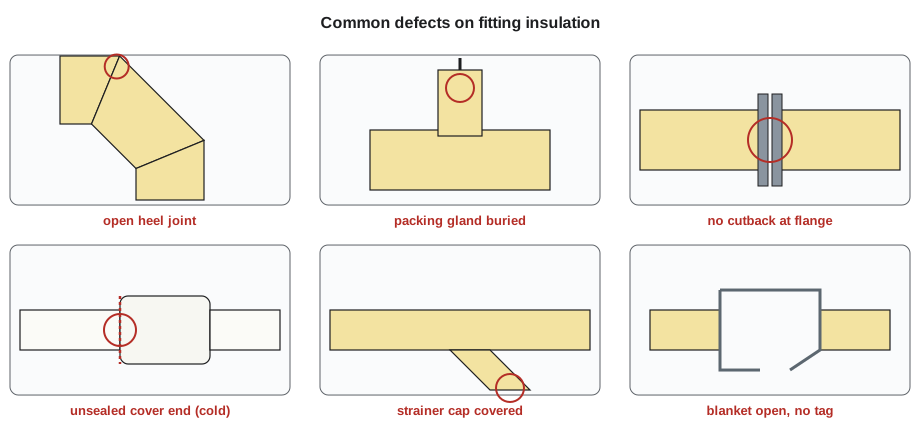
Reviewers find the same defects on fittings over and over. Knowing them is the fastest way to keep your own lists short:
- Open heel joints on elbows, from too few pieces or forced segments.
- Thin insulation on elbows, valves and covers, from the wrong carton or from squeezing to fit.
- Voids inside valve boxes and fitting covers, especially on cold work.
- Unsealed seams and ends on PVC covers and unsealed tacks on cold work.
- Missing or short cutbacks at flanges, and raw ends on the pipe insulation.
- Buried packing glands, strainer caps, blowdowns, test ports or nameplates.
- Insulated traps or cooling legs where the maker requires them bare.
- Removable covers left open, unfastened, untagged or missing after other trades have worked.
- Metal jacket screwed through a cold vapor retarder.
- Laps facing the wrong way outdoors or in washdown areas, so water runs in.
- Damage from other trades: crushed covers, ladder dents, insulation cut back for a pipe change and not repaired.
Recording and closing deficiencies
A deficiency that is found but not recorded is a deficiency that will be found again. On most jobs, inspection findings go on a punch list or deficiency list, a numbered list with the location, the item, the defect, who is to fix it and when it was closed. Good practice for fitting deficiencies:
- Locate each item exactly, by tag number where the fitting has one, or by line, room and a description such as "NPS 4 HHW butterfly valve, pump P-3 discharge".
- Describe the defect and what is needed to fix it, not just "redo".
- Photograph the defect, and photograph it again when it is fixed.
- Fix it with the same materials and methods as the original work, then have the item checked and signed off.
- Note the cause where it helps the next job: wrong carton, another trade's damage, a valve installed without an extended stem.
Hollis's four items on Marcel's penthouse fittings were typical. A Y-strainer cap on the chilled water had been covered with the permanent insulation instead of a removable section. One PVC tee cover on chilled water had an unsealed end behind a hanger rod, where it was hard to reach. A test port on a heating water balancing valve was buried. And one butterfly valve's gear operator rubbed on its neck insulation through the last quarter of its travel. All four were closed in a day and a half, and Hollis signed them off on Friday, October 30.
Worked problem
How did the fittings do?
Marcel's crew insulated 34 valves, strainers and specialties in the penthouse, and Hollis's list had 4 items on them. How many deficiencies is that per 100 items, and what does it suggest?
Show solution
- Deficiencies per item: 4 ÷ 34 ≈ 0.118.
- Per 100 items: 0.118 × 100 ≈ 12.
- Three of the four were access problems: a covered cap, a buried test port and a rubbing operator.
Answer: About 12 deficiencies per 100 items, most of them about access rather than thermal performance. Marcel added two lines to the crew checklist: "Work every operator through full travel" and "Find every cap and port before closing the cover."
Handover
When the fitting work is accepted, the owner needs to be able to keep it working. A good handover for fitting insulation includes the list of removable covers with their tag numbers and locations, any instructions for refitting and resealing them, the product data for the materials used, notes on items deliberately left bare, such as traps and cooling legs, and the closed deficiency list. At Kellerton, Lou Brisebois asked for exactly that list for the boiler house, so his mechanics would know which covers to put back after each job and which bare items were meant to stay bare.
Inspecting removable covers
Removable covers need their own check, because they are the part of a fitting job most likely to be disturbed after it is accepted. For each cover, check that:
- The tag on the cover matches the tag wired to the fitting and the number on the handover list.
- The cover closes fully, with no gap at the seams, at the stem or bonnet opening, or at the ends.
- The ends overlap the pipe insulation by the specified amount, and the pipe insulation ends under them are capped or beveled, not raw.
- Every strap, buckle, lacing hook or hook-and-loop fastener is done up, and none is cutting into the cover's fabric.
- Flaps over strainer chambers, test ports and gauges open and close without the whole cover coming off.
- Drain or weep openings, where they are part of the design, are at the bottom and not blocked.
- On outdoor and washdown fittings, the outer fabric and its seams shed water and the cover sits so water runs off, not into it.
A cover that passes all of these checks on handover day may still be found open or on the floor a month later. That is a maintenance problem, not an installation one, but the handover list and a short talk with the owner's mechanics about how to refit the covers are the best way to prevent it. At Kellerton, Lou planned to add the boiler house blankets to the plant's maintenance checklist, so the mechanics would sign that each cover was back on after every job.
Photographs as records
Photographs are part of the record on most jobs now, and they are most useful on fittings. A good set shows each fitting before it is insulated, with the tag in view; after insulation and before the finish, showing full thickness and filled voids; and after the finish, from far enough away to see where it is. On cold work, a photograph of each vapor stop before it is covered is the only proof it is there. Name or caption photographs with the tag number and the date, so they can be found when a question comes up months later.
Common mistakes
MistakeInspecting fitting work only after the finish is on.
InsteadInspect in stages: before insulating, before finishing, after finishing and after start-up.
MistakeJudging thickness by eye.
InsteadMeasure the circumference at several points and work out the thickness.
MistakeTrusting an infrared reading on shiny metal jacket.
InsteadSet the emissivity or read a patch of tape or flat paint.
MistakeChecking cold fittings only in dry weather.
InsteadCheck for sweating after the system has run cold, ideally on a humid day.
MistakeRecording a deficiency as "redo" with no location.
InsteadRecord the exact location, the defect, the fix, photos and the sign-off.
MistakeLeaving the owner no list of removable covers.
InsteadHand over a tagged list of covers, refitting instructions and items left bare on purpose.
Summary and key terms
- Fitting defects hide under the finish, so inspection happens in stages, before and after each step.
- A fitting checklist covers thickness, fit, voids, vapor retarder and stops, cutbacks, access, covers, finish, identification and safety.
- Check thickness from the circumference at several points; compare fitting and pipe insulation circumferences for a quick check.
- Use surface or infrared thermometers on hot work, allowing for shiny jackets; look for sweating and frost on cold work.
- Common defects include open heels, thin spots, voids, unsealed seams, missing cutbacks, buried access points and open or untagged covers.
- Record each deficiency with location, defect, fix, photos and sign-off, and hand over a list of covers and items left bare.
- Punch list
- A numbered list of deficiencies to be fixed before work is accepted.
- Deficiency
- A part of the work that does not meet the specification or good practice.
- Field reviewer
- The engineer's representative who reviews work on site.
- Infrared thermometer
- An instrument that reads surface temperature from the heat a surface radiates.
- Emissivity
- How well a surface radiates heat, compared with a perfect radiator; shiny metal is low.
- Handover
- Passing finished work to the owner with the information needed to maintain it.
Practice problems
Work each problem on paper first, then reveal the answer to check.
Why is fitting work inspected before the finish goes on?
Show answer
Voids, missing vapor stops and thin spots cannot be seen once the finish is on.
A finished NPS 2 elbow (2.375 in) should have 1 1/2 in. What circumference should it measure?
Show answer
π × (2.375 + 3) ≈ 16.9 in.
Why does a shiny aluminum jacket read low on an infrared thermometer?
Show answer
Shiny metal has low emissivity and radiates little heat.
Name three access defects reviewers often find on fittings.
Show answer
Buried glands, covered strainer caps, buried test ports, buried nameplates, operators that rub.
What should an owner receive about removable covers at handover?
Show answer
A tagged list with locations and refitting instructions.
Lesson quiz · 5 questions
Score 60% or more to complete this lesson.
Create a free account to save your progress, take quizzes and earn a certificate.