
HSE-210 · Lesson 7 of 12 · 28 min
Verifying zero energy and controlling stored energy
Locks prove that someone operated an isolating device and secured it. They do not prove that the energy is gone. Disconnects fail, breakers are mislabeled, valves leak, a second feed was missed, a capacitor is still charged or a part is held up only by hydraulic pressure. Verification is the step that turns an assumption into a fact. This lesson explains how to verify a zero energy state and how to control the stored energy that remains after isolation.
Why verification matters
Investigations of hazardous energy incidents often find that the worker did lock something out, but the wrong thing, or not everything. Common findings include a breaker that was labeled for the wrong machine, a disconnect whose handle moved to off but whose internal blades stayed closed, a separate control circuit or heater supply that was never isolated, and a pneumatic valve that was closed but left air trapped downstream. In each case, a proper verification step would have revealed the problem before anyone was exposed.
The try step
For machines, the first verification is usually the try step: attempting to start the equipment with its normal controls after isolation and lockout. Done properly, it looks like this:
- make sure everyone is clear of the machine and its danger zones, and tell them you are about to try it;
- check that no one else is working on connected equipment that the try could affect;
- press the start button, operate the controls or call for the cycle, including any secondary or remote controls;
- watch and listen for any movement, sound, indicator light or pressure change;
- return all controls to the off or neutral position, so that the equipment will not start unexpectedly when the locks are later removed.
If anything moves or energizes, stop. Something has been missed. Recheck the procedure and the isolation before going further, and report the finding. A try step only tests the circuits the controls use; it does not prove that every conductor or line is dead, so it is combined with other checks.
Verifying electrical isolation
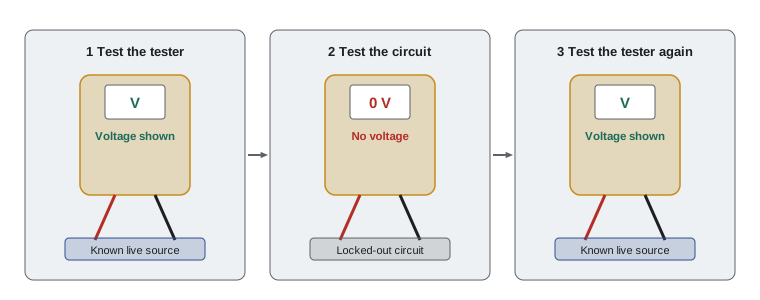
For electrical work, the verification must be done by a qualified person with a properly rated voltage tester. The widely used method is often called live-dead-live:
- test the tester on a known live source of similar voltage to prove it works;
- test the circuit you will work on, phase to phase and phase to ground on every conductor, to confirm there is no voltage;
- test the tester again on the known live source, to prove it did not fail during the test.
The tester must be rated for the voltage and measurement category of the installation; meters listed to UL 61010-1 and marked with an appropriate category (CAT III or CAT IV) are used for industrial distribution equipment. OSHA 1910.333(b)(2)(iv)(B) requires a qualified person to verify de-energization with test equipment and to check the tester before and after where the voltage is over 600 volts. NFPA 70E sets out the full process for an electrically safe work condition, including PPE during testing, covered in HSE-214. Some installations have permanently mounted absence-of-voltage testers listed to UL 1436.
Unqualified persons should never open electrical enclosures to test. In many workplaces the electrician performs the electrical verification while the mechanical trades verify their own sources.
Controlling stored energy by type
Stored energy must be released or restrained, and the result verified, before work. The method depends on the type:
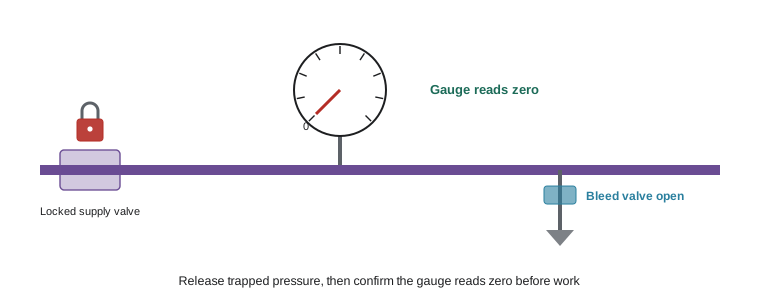
- Pneumatic: close and lock the supply valve, then open a bleed or exhaust valve to vent the system to atmosphere; watch the gauge fall to zero. Remember that air can be trapped in cylinders between closed valves; some systems need bleeding at several points.
- Hydraulic: stop the pump, isolate it, then open the accumulator dump valve or bleed valve and confirm the gauge reads zero. Lower or block anything held up by hydraulic pressure before releasing it.
- Gravity: lower raised parts to their mechanical rest position or install rated blocks, pins or props, then lock or tag the blocks.
- Springs: release tension or compression using the manufacturer's method, or restrain the spring so it cannot move.
- Rotating parts: wait for a complete stop, apply a brake or block, and confirm by observation or with a tachometer.
- Capacitors: wait the time stated by the manufacturer, then verify with a suitable meter that the voltage has fallen to a safe level; some equipment has discharge points or grounding devices.
- Thermal: isolate heat sources and allow the equipment to cool or warm to a safe temperature, confirmed by measurement.
- Chemical and process: drain, vent, purge and flush lines and vessels; where people will enter, test the atmosphere under confined space rules (HSE-211).
Where stored energy could build up again, for example pressure from a leaking valve, gas from a reaction or charge from induced voltage, verification must continue at intervals during the work, or the system must be kept open to atmosphere or grounded.
| Energy | Release or restraint | How to verify |
|---|---|---|
| Pneumatic | Vent through bleed valves | Gauge at zero; try the cylinder control |
| Hydraulic | Open dump or bleed valve; lower or block loads | Gauge at zero; no movement |
| Gravity | Lower to rest; insert rated blocks or pins | Visual check of blocks and position |
| Spring | Release or restrain tension | Visual check; no movement when tested |
| Rotational | Wait, brake or block | Observation or tachometer reads zero |
| Capacitor | Wait stated time; discharge | Meter reads safe voltage |
| Thermal | Isolate and cool | Thermometer reads safe temperature |
Worked problem
How long until a capacitor discharges?
A drive's DC bus capacitance is 2,000 µF, charged to 650 V. Its bleed resistor is 300 kΩ. The voltage falls as \( V(t) = V_0 e^{-t/RC} \). How long until the voltage falls below 50 V?
Show solution
- Time constant \( \tau = RC = 300\,000 \times 0.002 = 600 \) s.
- Solve \( 50 = 650\, e^{-t/600} \): \( t = 600 \ln(650/50) = 600 \ln 13 \).
- \( \ln 13 \approx 2.565 \), so \( t \approx 1\,539 \) s, about 26 minutes.
- If the bleed resistor has failed, the capacitor may stay charged for much longer, which is why the voltage must be measured, not assumed.
Answer: About 26 minutes, and only if the bleed resistor is working. Always verify with a meter.
Worked problem
Force from trapped air
A pneumatic clamp cylinder has a 3 in bore. Air at 90 psig is trapped in it after the supply valve is closed. What force could it exert if a fitting is loosened or a valve is operated?
Show solution
- Piston area \( A = \pi r^{2} = \pi \times 1.5^{2} \approx 7.07 \) in².
- Force \( F = pA = 90 \times 7.07 \approx 636 \) lb.
- That is enough to crush fingers or a hand.
Answer: About 636 lb. Bleed the trapped air and confirm the gauge reads zero.
Worked problem
Waiting for a hot platen to cool
A heated platen is at 356 °F in a room at 68 °F. It cools roughly as \( T(t) = T_a + (T_0 - T_a) e^{-kt} \), with \( k = 0.02 \) per minute. How long until it is at a safe touch temperature of 113 °F?
Show solution
- Set \( 113 = 68 + 288 e^{-0.02t} \), so \( e^{-0.02t} = 45/288 = 0.156 \).
- \( t = \ln(288/45) / 0.02 = \ln 6.4 / 0.02 \approx 1.856 / 0.02 \approx 93 \) minutes.
- Check the actual temperature with a thermometer before touching; the cooling constant is only an estimate.
Answer: About an hour and a half. Plan the job around cooling time, and measure before touching.
Who verifies, and how it is recorded
Each authorized person is responsible for satisfying themselves that the equipment is safe before they start work. In a group lockout, the person in charge usually performs or witnesses verification, and each worker may also verify or confirm it before applying their lock to the group box. Many procedures include a verification column where each check is initialed, and some sites use a lockout permit or tag that records the verification. Records do not replace the act of verifying, but they help prevent the step from being skipped.
When verification fails
If the try step causes movement, a gauge does not fall to zero, or a tester shows voltage, treat it as a near miss. Stop, keep everyone clear, recheck all isolation points, and report it. Find out why: was a source missing from the procedure, was a device mislabeled, did an isolating device fail? Fix the cause, update the procedure if needed, and repeat the full verification before starting work.
Verification for process systems
Pipes and vessels need their own kind of verification. After isolating and draining a line, the authorized person typically opens a vent or drain valve between the isolation and the work point to confirm there is no pressure and no flow, checks pressure gauges, and, where hazardous chemicals were present, confirms that the line has been flushed or purged. For entry into tanks and vessels, atmospheric testing for oxygen, flammable gases and toxic substances is required before and during entry. If a valve leaks through, the vent will show it, and stronger isolation such as a blank may be needed.
Verification and new technology
Modern equipment brings new challenges and new tools. Programmable controllers can hold a machine in a stopped state while still energized, and network connections can allow remote commands, so verification must confirm that energy, not just the control signal, has been removed. On the other hand, permanently mounted voltage indicators, pressure transmitters visible at the isolation point and absence-of-voltage testers can make verification faster and safer, because the worker can confirm isolation without opening enclosures. These devices support verification but do not replace the procedure: each one must itself be checked and maintained.
If you are not qualified to perform a particular verification, such as an electrical test, you still have a role: confirm with the qualified person that the test was done and what it showed, look for the verification record, and do not start until you are satisfied. Never accept 'it should be dead' as verification.
Common mistakes
MistakeAssuming the lock proves the equipment is safe.
InsteadVerify zero energy with a try step, gauges and testing.
MistakeLeaving the start controls in the on position after the try step.
InsteadReturn all controls to off or neutral after trying.
MistakeTesting with a meter without checking it on a known live source.
InsteadUse live-dead-live with a properly rated tester, done by a qualified person.
MistakeOpening a drive immediately because the display went dark.
InsteadWait the stated time and measure the DC bus voltage.
MistakeBleeding the main line but not air trapped in cylinders.
InsteadVent every point where pressure can be trapped and check each gauge.
Summary and key terms
- Locks show that devices were operated; verification proves that energy is gone.
- The try step uses normal controls after clearing everyone, then returns controls to off.
- Electrical verification uses a rated tester and the live-dead-live method, performed by a qualified person.
- Each type of stored energy has its own release method and verification check.
- Capacitor voltage decays over minutes and must be measured, not assumed.
- Where energy can re-accumulate, verification continues during the work.
- A failed verification is a near miss: stop, recheck, report and fix the cause.
- Verification
- Proving that isolation has worked and equipment is at a zero energy state.
- Live-dead-live
- Testing a tester on a live source, then the circuit, then the live source again.
- Measurement category
- A rating (CAT II, III or IV) showing where a meter may be used safely.
- Qualified person
- A person with the skills and knowledge to work safely on electrical equipment.
- Bleed resistor
- A resistor that slowly discharges a capacitor when power is removed.
- Time constant
- For a capacitor, the product RC; the voltage falls to about 37 percent in one time constant.
- Dump valve
- A valve that releases hydraulic pressure from an accumulator.
- Tachometer
- An instrument that measures rotational speed.
- Re-accumulation
- Stored energy building up again after it was released.
- Absence-of-voltage tester
- A permanently installed device that automatically verifies that a circuit is de-energized.
Practice problems
Work each problem on paper first, then reveal the answer to check.
What must you do before the try step?
Show answer
Make sure everyone is clear and warned.
What must you do after the try step?
Show answer
Return all controls to off or neutral.
Describe live-dead-live.
Show answer
Test the tester on a known live source, test the circuit, then test the tester on the live source again.
Who should perform electrical verification?
Show answer
A qualified person with a properly rated tester.
How do you verify pneumatic stored energy is released?
Show answer
Vent through bleed valves and confirm gauges read zero.
A capacitor has τ = 120 s. Roughly what fraction of its voltage remains after 120 s?
Show answer
About 37 percent.
Calculate the force from 500 kPa on a piston of area 0.002 m².
Show answer
1,000 N.
Why might verification continue during the work?
Show answer
Energy such as pressure or charge could build up again.
What should you do if a gauge does not fall to zero?
Show answer
Stop, keep clear, recheck isolation, report and fix the cause before work.
Why is the try step alone not enough for electrical work?
Show answer
It only tests the control circuits, not every conductor.
Lesson quiz · 5 questions
Score 60% or more to complete this lesson.
Create a free account to save your progress, take quizzes and earn a certificate.