
HSE-210 · Lesson 6 of 12 · 28 min
The lockout sequence step by step
Lockout follows a fixed sequence. The order matters: each step depends on the one before it, and skipping or reversing steps creates gaps. Shutting a machine off at the disconnect while it is running under load can damage equipment and create an arc. Locking out before notifying operators can leave someone in a dangerous position. Starting work before verifying can leave a missed energy source live. This lesson walks through the sequence step by step, explaining what happens at each stage and why.
OSHA's 1910.147(d) lists six steps for applying energy control: preparation for shutdown, machine or equipment shutdown, isolation, application of lockout or tagout devices, control of stored energy, and verification of isolation. Paragraph (c)(9) adds that affected employees must be notified before controls are applied. Many programs present the sequence as eight steps, as below, by making notification and doing the work explicit.
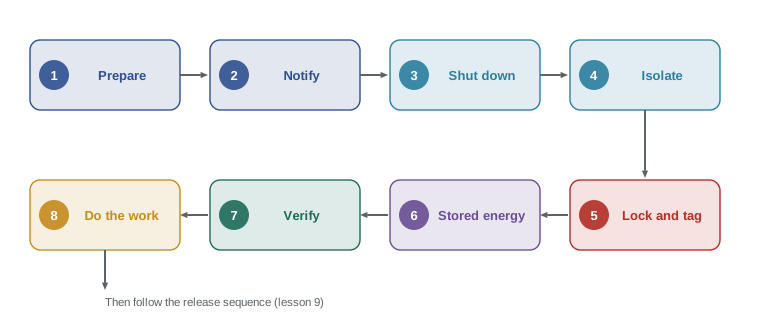
Step 1: Prepare
Preparation starts before anyone touches the equipment. The authorized person:
- identifies the job and the equipment, including anything connected upstream or downstream;
- gets the current machine-specific procedure and reads it, checking that it matches the equipment as it is today;
- identifies every energy source, its type and magnitude, and its isolating device, using the procedure's energy source inventory;
- identifies stored energy and how it will be released or restrained;
- gathers the locks, tags, devices, blocks and test instruments needed;
- considers other hazards, such as confined spaces, hot work, working at heights or chemicals, that need separate permits or controls;
- decides whether this is an individual lockout or a group lockout (lesson 8).
If there is no procedure, or the procedure does not match the equipment, stop and get it resolved before going further. A procedure that lists one disconnect for a machine that now has two is worse than useless, because it creates false confidence.
Step 2: Notify affected persons
Tell the operators and anyone else working with or near the equipment that it is being shut down and locked out, why, and roughly for how long. This prevents surprises: an operator may be partway through a cycle, may have material in the machine, or may be about to restart it. In large areas, notification may include signs, barriers or a radio announcement. Notification also helps ensure no one is inside the machine or its danger zone when it is shut down.
Step 3: Shut down
Stop the equipment using its normal stopping procedure: the stop button, the operator controls or the shutdown sequence in the operating instructions. Bring moving parts to rest and complete or abort any process cycle safely. Using the normal stop first avoids two problems: interrupting a running process abruptly can create its own hazards, such as material jams, pressure spikes or product spills, and opening an electrical disconnect under heavy load can cause arcing and damage. The control system is the right tool for stopping; the isolating device is the right tool for keeping the equipment stopped.
Step 4: Isolate
Operate each energy-isolating device to the safe position: open the disconnect switch, switch off and isolate the breaker, close the valve, disconnect the plug, insert the blank. Isolate every source on the inventory, not just the main one. Make sure the device is fully in the off or closed position; a disconnect handle that looks open may not be if the linkage is broken. Where possible, visually confirm the isolation, for example by seeing the open blades of a visible-break disconnect or the closed position indicator on a valve.
Step 5: Apply locks and tags
Place your personal lock on each isolating device, using the correct lockout device where the isolating device does not accept a lock directly, and attach your tag. Each authorized person who will be exposed applies their own lock. For a group lockout, follow the group procedure (lesson 8). The lock must hold the device in the safe position so it cannot be operated. Check by trying to move the handle gently; it should not move.
Step 6: Control stored energy
Release, restrain or otherwise make safe all stored energy. Bleed trapped air and hydraulic pressure through bleed valves; lower raised parts to their rest position or block them; release spring tension; wait for flywheels and rotors to stop; allow hot parts to cool; discharge capacitors following the manufacturer's procedure; drain and vent lines. If stored energy could build up again, such as pressure from a leaking valve or heat from a reaction, keep checking it until the work is finished. Lesson 7 covers stored energy control in more detail.
Step 7: Verify
Before any work starts, verify that isolation has worked and the equipment is at a zero energy state. First make sure everyone is clear of the equipment. Then try to start it using the normal controls (the 'try' step), check gauges, and, for electrical work, have a qualified person test for the absence of voltage with a properly rated tester, testing the tester before and after. Return the controls to the off or neutral position after the try. Verification catches missed sources, failed isolating devices and mislabeled breakers. Lesson 7 is devoted to it.
Step 8: Do the work, keeping control
Only now does the servicing or maintenance start. Keep your key with you at all times. If the job changes, for example because you discover another energy source or need to work on a different part of the machine, stop and update the lockout before continuing. If you leave the area for a break, your lock stays on. If the job continues past your shift, follow the shift change procedure (lesson 8). If you need to energize the equipment temporarily for testing or positioning, follow the testing procedure in lesson 9, which requires clearing everyone and following specific steps.
| Step | Key question | What can go wrong if skipped |
|---|---|---|
| 1 Prepare | Do I know every energy source and have the right devices? | Missed source; wrong device; no plan for stored energy |
| 2 Notify | Does everyone affected know what is happening? | Operator restarts or is caught in the machine |
| 3 Shut down | Has the machine stopped normally? | Arcing at the disconnect; process upset |
| 4 Isolate | Is every source at its isolating device in the safe position? | Secondary feed left live |
| 5 Lock and tag | Is my lock on every isolating device? | Someone re-energizes the equipment |
| 6 Stored energy | Is all stored energy released or restrained? | Spring, pressure, gravity or capacitor injury |
| 7 Verify | Have I proved zero energy? | Mislabeled breaker or failed disconnect undetected |
| 8 Work | Do I still have control of my key and the job? | Scope change without updated lockout |
Worked problem
Planning lockout time
A conveyor has four isolation points: the main disconnect, a separate control power breaker, the main air valve and a gravity take-up that must be pinned. Estimate the time for: preparation 5 minutes; notification 2 minutes; shutdown 3 minutes; isolating each point 2 minutes; applying each lock and tag 1 minute; controlling stored energy 6 minutes; verification 4 minutes. What is the total, and how does it compare with a 45-minute repair?
Show solution
- Isolation: \( 4 \times 2 = 8 \) minutes.
- Locks and tags: \( 4 \times 1 = 4 \) minutes.
- Total: \( 5 + 2 + 3 + 8 + 4 + 6 + 4 = 32 \) minutes.
- Compared with the 45-minute repair, lockout adds about 70 percent to the job time. Release (lesson 9) will add more.
Answer: About 32 minutes. It is a real cost, which is why supervisors must plan lockout time into maintenance schedules instead of treating it as a delay.
Worked problem
Why shut down before isolating
A worker proposes to save time by opening the main disconnect of a running 75 kW mixer instead of using the stop button first. Give two reasons this is poor practice.
Show solution
- Opening a disconnect under full load can cause arcing at the switch, damaging it and exposing the worker to arc flash; many disconnects are not rated to interrupt full load current.
- Stopping the mixer abruptly mid-batch can leave material in an unsafe condition, such as a heavy load in the bowl that shifts or a process that over-pressurizes.
- The normal stop brings the machine to a controlled rest; isolation then keeps it there.
Answer: Use the normal stop first to avoid arcing and process upsets, then isolate.
Worked problem
Counting lock points
Two millwrights will work together on the conveyor in the first example, using hasps on each of its four isolation points rather than a group lock box. How many personal locks will be applied in total? If a third person joins later, how many more locks are needed?
Show solution
- Each millwright locks all four points: \( 2 \times 4 = 8 \) locks.
- A third person must also lock all four points: 4 more locks.
- With many people or many points, the lock count grows quickly, which is when a group lock box becomes practical.
Answer: 8 locks for two people; 4 more for a third.
Checking the sequence on the job
Experienced authorized persons talk through the steps as they go, and many workplaces use a checklist on the back of the procedure or placard. A quick self-check before starting work is: have I notified, isolated every source on the list, locked and tagged each one, controlled stored energy and verified? If the answer to any part is uncertain, go back. The few minutes this takes are the cheapest insurance in maintenance.
When the procedure does not fit
Sometimes the equipment in front of you does not match the procedure: there is an extra valve, a breaker is labeled differently, a disconnect has been moved. Do not improvise. Stop, tell your supervisor, and have the procedure corrected or a temporary procedure approved before continuing. Report the mismatch so the procedure can be updated. Many serious incidents start with an authorized person adapting a procedure on the spot because the job was urgent.
Communicating during the job
Lockout is also communication. A visible lock and tag at each isolation point tells others the equipment is out of service; a sign or barrier at the machine reinforces it. Many sites record active lockouts on a board or in a log at the control room, so that operators and supervisors know which equipment is unavailable and who to contact. When the work is finished, the same channels are used to tell people the equipment is back in service.
Common mistakes
MistakeStarting to isolate before reading the procedure.
InsteadPrepare first: read the procedure, check it against the equipment and gather devices.
MistakeNot telling the operator before locking out.
InsteadNotify affected persons before shutdown so no one is surprised or caught in the machine.
MistakeOpening the disconnect while the machine is running under load.
InsteadUse the normal stop first, then isolate.
MistakeGoing straight from locking to working.
InsteadControl stored energy and verify the zero energy state before work.
MistakeAdapting the procedure on the spot when the equipment does not match.
InsteadStop, report the mismatch and get the procedure corrected or a temporary procedure approved.
Summary and key terms
- Lockout follows a fixed sequence, and the order of steps matters.
- Prepare by reading the procedure, identifying every source and gathering devices.
- Notify affected persons before shutting down.
- Shut down using normal controls, then isolate every source at its isolating device.
- Apply personal locks and tags to every isolating device.
- Control stored energy, then verify the zero energy state before work.
- Keep control of your key and stop to update the lockout if the job changes or the procedure does not fit.
- Preparation for shutdown
- Identifying sources, reading the procedure and gathering devices before shutdown.
- Notification
- Telling affected persons that equipment will be locked out and later restarted.
- Normal stopping procedure
- The usual way of stopping a machine using its controls.
- Isolation
- Operating energy-isolating devices to prevent energy from reaching the equipment.
- Visible break
- A disconnect design that lets you see the open contacts.
- Try step
- Attempting to start equipment with normal controls to confirm isolation.
- Zero energy state
- The condition in which all energy is isolated, released or restrained and verified.
- Scope change
- A change in the job that may require additional isolation.
- Checklist
- A list of steps used to confirm each part of the sequence was completed.
- Temporary procedure
- An approved procedure for a one-off situation not covered by the standard procedure.
Practice problems
Work each problem on paper first, then reveal the answer to check.
List the eight steps in order.
Show answer
Prepare, notify, shut down, isolate, lock and tag, control stored energy, verify, do the work.
Why notify affected persons before shutdown?
Show answer
So no one is surprised, caught in the machine or tempted to restart it.
Why use the normal stop before isolating?
Show answer
To avoid arcing at the disconnect and process upsets.
What should you do after the try step?
Show answer
Return the controls to off or neutral.
A machine has 3 isolation points and 3 workers using hasps. How many locks?
Show answer
9.
What should you do if you find an energy source not on the procedure?
Show answer
Stop, isolate it if safe under supervision, report it and have the procedure updated.
When does work start?
Show answer
Only after stored energy is controlled and the zero energy state is verified.
What happens to your lock during a break?
Show answer
It stays on.
Estimate lockout time for 2 points at 2 minutes each plus 15 minutes of other steps.
Show answer
19 minutes.
Why visually confirm isolation where possible?
Show answer
A handle can look off while the switch or valve is not, if the linkage is broken.
Lesson quiz · 5 questions
Score 60% or more to complete this lesson.
Create a free account to save your progress, take quizzes and earn a certificate.