
HSE-210 · Lesson 12 of 12 · 27 min
Incident case studies and capstone: writing a machine-specific procedure
This final lesson brings the course together. First we look at several incidents, one drawn from a public court record and the others composite cases that combine features common to many investigations, and ask what failed and which part of the lockout system would have prevented the injury. Then, in a capstone exercise, you work through drafting a machine-specific procedure for a fictional machine, using everything from the earlier lessons.
Case 1: a sensor restarts a machine
In October 2022, at a plant in Mississauga, Ontario, Canada, a worker was troubleshooting a malfunctioning door-jamb processing center. The machine was in automatic mode, its safety device had been disabled and its moving parts were not blocked. The worker leaned into the cutting area to clear debris with compressed air. Clearing the debris cleared an obstruction from a sensor, the machine started its cycle, and the moving carriage struck and injured him. The regulator found that the employer had failed to ensure the machine was locked out and blocked during maintenance; the employer pleaded guilty and was fined CAD 100,000 plus a surcharge, as reported in June 2025. The same failure would be a violation of 1910.147 in the United States.
What failed: the machine was not isolated at all; it was waiting for a sensor signal, which is one of the classic automatic restart pathways from lesson 1. Troubleshooting is servicing, not normal production. What would have prevented it: shutting the machine down, isolating electrical and pneumatic energy, applying locks, blocking moving parts and verifying before reaching in. If troubleshooting genuinely required power, a documented alternative method with safety-rated controls would have been needed, not a disabled safety device.
Case 2: a coworker starts the conveyor
A composite case: a sanitation worker climbed onto a conveyor to clean under a guard, after pressing the stop button. A second worker at the other end of the line, who could not see the first, saw the conveyor stopped, assumed it had faulted, and pressed start. The first worker's arm was drawn into a nip point between the belt and a roller.
What failed: reliance on a control device instead of isolation; no notification of affected persons; no personal lock. What would have prevented it: lockout of the conveyor drive at its disconnect by the sanitation worker, with a personal lock and tag, and notification of the line operators. The case shows why the personal lock matters: it puts control in the hands of the person exposed, regardless of what anyone else can see.
Case 3: the platen that drifted
A composite case: a maintenance technician locked out the electrical disconnect of a hydraulic press to replace a die. The hydraulic pump stopped, but the platen was held up by pressure in the cylinder. Over about 20 minutes, oil leaked past a worn valve and the platen drifted down while the technician's hand was under it.
What failed: stored gravitational and hydraulic energy was not controlled. The procedure listed the electrical disconnect only. What would have prevented it: an energy source inventory that included the hydraulic accumulator and the raised platen (lesson 2), lowering the platen or inserting rated die blocks, dumping hydraulic pressure and verifying with the gauge (lesson 7).
Case 4: the second feed
A composite case: an electrician locked out the main disconnect of a packaging machine and started replacing a heater element. The heaters were fed from a separate panel installed during a modification two years earlier, and the procedure had never been updated. The electrician did not test before touching and received a shock.
What failed: management of change did not trigger a procedure review; labels did not show the second feed; verification was skipped. What would have prevented it: updating the procedure and labels when the heater supply was added (lesson 11) and a live-dead-live test before touching (lesson 7).
Case 5: the lock that was cut off
A composite case: at the start of a night shift, a supervisor found a lock on a mixer and assumed the day-shift mechanic had forgotten it. Under production pressure, he had the lock cut off and the mixer restarted. The mechanic was still inside the mixer bowl, finishing a repair that had run late. He was seriously injured.
What failed: the abandoned lock procedure was ignored. What would have prevented it: searching the equipment and site, attempting to contact the owner, getting authorization and inspecting the equipment before removal (lesson 9).
| Case | Main failure | Lesson that prevents it |
|---|---|---|
| 1 Sensor restart | No isolation; automatic restart | Lessons 1, 6 and 10 |
| 2 Coworker start | Stop button relied on; no personal lock | Lessons 1, 5 and 6 |
| 3 Drifting platen | Stored energy not controlled | Lessons 2 and 7 |
| 4 Second feed | Procedure out of date; no test | Lessons 7 and 11 |
| 5 Cut lock | Abandoned lock procedure ignored | Lesson 9 |
Capstone: the bottle capper
Now apply the course. Imagine a bottle capping machine on a beverage line. It has: a 3-phase main motor drive fed from disconnect DS-31; a separate 120 V control and heater circuit fed from breaker 12 in panel LP-5; a pneumatic system fed through ball valve V-40, with an air receiver of about 20 L on the machine and a bleed valve V-41; a capping head weighing about 60 kg that rises on a pneumatic cylinder and is normally parked in its raised position; a spring-loaded star wheel tensioner; and an induction cap heater with a capacitor bank in its power supply. Operators clear jammed bottles about 10 times a shift through an interlocked access door. Maintenance changes the capping head chucks monthly and rebuilds the head yearly.
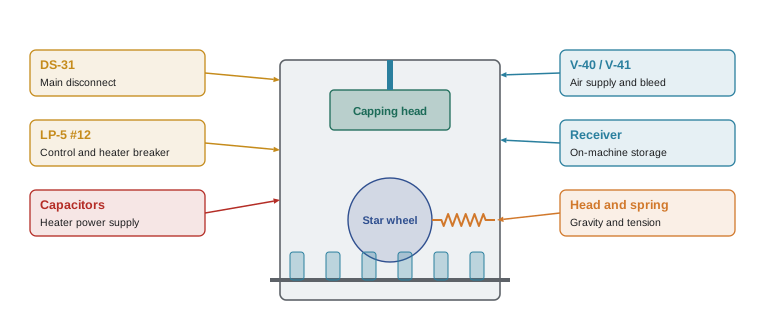
Step 1: build the energy source inventory
List each source with an identifier, its type and magnitude, the isolating device and the stored energy. A good inventory for the capper would be:
| ID | Source | Isolation | Stored energy and control | Verification |
|---|---|---|---|---|
| E-1 | Main drive, 480 V 3-phase | DS-31 to OFF, lock | Drive capacitors: wait stated time | Try start; qualified person tests |
| E-2 | Control and heater circuit, 120 V | LP-5 breaker 12 OFF, breaker lockout | Heater capacitor bank: wait and test | Control lights off; test |
| P-1 | Plant air, 90 psi | V-40 closed, ball valve lockout | Receiver and cylinders: open V-41 | Gauge at zero |
| G-1 | Raised capping head, about 130 lb | Not isolable | Lower to rest before bleeding air, or pin with rated pin | Visual check |
| M-1 | Star wheel spring tensioner | Not isolable | Release tension or pin | Visual check; no movement |
Worked problem
How much energy is in the capper?
Estimate (a) the gravitational energy of the 130 lb capping head raised 16 in, (b) the order of magnitude of energy in the 5.3 gal receiver at 90 psig using pressure times volume, and (c) the energy in the heater capacitor bank of 1,500 µF at 340 V.
Show solution
- (a) Weight times height: \( 130 \times 16 = 2\,080 \) in·lb, about 173 ft·lb (roughly 235 J).
- (b) 5.3 gal × 231 in³/gal ≈ 1,224 in³; \( pV = 90 \times 1\,224 \approx 110\,000 \) in·lb, about 9,200 ft·lb (roughly 12 kJ).
- (c) \( \tfrac{1}{2} C V^{2} = 0.5 \times 0.0015 \times 340^{2} \approx 87 \) J.
- Every one of these can injure or kill; each needs a line in the procedure.
Answer: About 173 ft·lb, 9,200 ft·lb and 87 J.
Step 2: write the lockout steps
A draft sequence for the monthly chuck change might read:
- 1. Get this procedure and confirm it matches the machine. Gather 3 personal locks, a breaker lockout, a ball valve lockout, a head pin and tags.
- 2. Tell the line operator and lead hand that the capper is being locked out and for how long.
- 3. Stop the capper with the normal STOP button at the operator panel. Lower the capping head to its rest position using the HEAD DOWN control while air is still on.
- 4. Turn disconnect DS-31 to OFF. Switch breaker 12 in panel LP-5 to OFF. Close air valve V-40.
- 5. Apply your lock and tag to DS-31, a breaker lockout with your lock and tag to breaker 12, and a ball valve lockout with your lock and tag to V-40.
- 6. Open bleed valve V-41 and leave it open. Insert the head pin as an extra safeguard. Release or pin the star wheel tensioner if the job requires access to it. Wait at least the drive manufacturer's stated time before opening any drive or heater enclosure.
- 7. Make sure everyone is clear. Press START and HEAD UP: nothing must move. Return controls to OFF. Check the air gauge reads zero. If electrical enclosures will be opened, a qualified person tests for absence of voltage using live-dead-live.
- 8. Do the work. Keep your keys with you.
Step 3: write the release steps
- 1. Check that all tools and parts are removed and the chucks are secured. Replace guards and close the access door.
- 2. Confirm everyone is clear. Put controls in OFF. Remove the head pin and release any star wheel pin.
- 3. Tell the operator the capper is about to be restarted.
- 4. Close bleed valve V-41. Remove your locks and tags. Open V-40, then switch breaker 12 ON, then turn DS-31 ON.
- 5. Start the capper with normal controls and watch the first cycles.
Step 4: decide on related arrangements
Three further decisions complete the package:
- the yearly head rebuild involves two mechanics and an electrician over two shifts, so it should use a group lockout with a lock box and the shift change procedure (lesson 8);
- jam clearing through the interlocked access door, 10 times a shift, may be handled as an alternative method if a documented risk assessment confirms the interlock is safety-rated, stops and holds the machine including the capping head, and is tested regularly; the jams themselves should be investigated and reduced (lesson 10);
- the procedure needs a field test by an authorized person who did not write it, a placard with photographs, labels on DS-31, LP-5 breaker 12, V-40 and V-41 that match the identifiers, and a place on the annual inspection schedule (lesson 11).
Worked problem
Group lock count for the rebuild
For the yearly rebuild, the person in charge locks the three isolation points (DS-31, breaker 12, V-40) with job locks. Two mechanics, one electrician and the person in charge lock on to the group box on day shift. At the shift change, two night-shift mechanics and a night person in charge take over. What is the maximum number of personal locks on the box at one time during a correct shift change?
Show solution
- Day shift on the box: \( 2 + 1 + 1 = 4 \) personal locks.
- Night shift adds its locks before day shift removes theirs: \( 2 + 1 = 3 \).
- Maximum during the overlap: \( 4 + 3 = 7 \) personal locks, plus the 3 job locks on the isolation points.
Answer: Seven personal locks on the box during the overlap, plus three job locks.
Where to go from here
This course has given you the concepts behind hazardous energy control. To lock out equipment yourself, you need training and authorization from your employer on the specific machines, procedures and devices at your workplace. Related courses in this program include HSE-211 Confined Space Awareness, HSE-212 Working at Heights and Fall Protection, HSE-214 Electrical Safety Awareness and HSE-215 Machine Guarding. Whatever your role, the core habit is simple: before you put any part of your body where energy could hurt you, make sure that energy is isolated, locked, released and verified, and that the key is in your pocket.
Common mistakes
MistakeListing only electrical sources in a procedure.
InsteadInclude air, hydraulics, gravity, springs, heat and capacitors in the inventory.
MistakeBleeding air before lowering a pneumatically raised part.
InsteadLower or pin the part first, then bleed, so it does not drop.
MistakeWriting a procedure without release steps.
InsteadInclude inspection, clearing, notification, lock removal and the order of restoring energy.
MistakeTreating frequent jam clearing as a training problem only.
InsteadInvestigate the cause of jams and use engineered alternatives backed by a risk assessment.
MistakePosting a procedure without field-testing it.
InsteadHave an authorized person who did not write it test it on the machine.
Summary and key terms
- Real incidents usually involve no isolation, reliance on control devices, uncontrolled stored energy, outdated procedures or improper lock removal.
- Each failure maps to a specific part of the lockout system.
- A machine-specific procedure starts with a complete energy source inventory, including stored energy.
- Lockout steps follow the eight-step sequence, with named devices and locations.
- Release steps include inspection, clearing people, notification, removing your own locks and the order of restoring energy.
- Group lockout, alternative methods, field testing, placards, labels and inspections complete the package.
- Awareness is the start; authorization requires site-specific training.
- Composite case
- An example built from features common to many real incidents.
- Root cause
- The underlying reason an incident happened, such as an outdated procedure.
- Capping head
- The part of a capper that applies and tightens caps.
- Star wheel
- A rotating wheel that indexes containers through a machine.
- Head pin
- A rated pin that mechanically holds a raised head in place.
- Induction heater
- A heater that uses electromagnetic induction, powered through electronic circuits.
- Field test
- Trying a procedure on the equipment to find gaps.
- Lead hand
- A worker who coordinates a crew on a line.
- Overlap
- The period at a shift change when both crews' locks are on the group box.
- Authorization
- Formal permission from the employer to lock out specific equipment.
Practice problems
Work each problem on paper first, then reveal the answer to check.
In case 1, what restarted the machine?
Show answer
Clearing debris cleared a sensor, and the machine in automatic mode started its cycle.
What would have prevented case 2?
Show answer
Isolating and locking the conveyor drive with a personal lock and notifying operators.
What energy was missed in case 3?
Show answer
Stored gravitational and hydraulic energy in the raised platen.
Which program element failed in case 4?
Show answer
Management of change and procedure review, plus verification.
What should the supervisor have done in case 5?
Show answer
Followed the abandoned lock procedure: search, contact, authorize, inspect.
List the capper energy sources.
Show answer
Main drive, control and heater circuit, plant air, raised head (gravity), spring tensioner and heater capacitors.
Why lower the head before bleeding air?
Show answer
If air is bled first, the head could drop.
Calculate the energy of a 40 kg part raised 0.5 m.
Show answer
40 × 9.81 × 0.5 ≈ 196 J.
What does the jam-clearing task need before it can use an alternative method?
Show answer
A documented risk assessment confirming a safety-rated interlock that stops and holds the machine.
What must you have before locking out equipment at work?
Show answer
Site-specific training and authorization from your employer.
Lesson quiz · 5 questions
Score 60% or more to complete this lesson.
Create a free account to save your progress, take quizzes and earn a certificate.