
ARCH-310 · Lesson 12 of 12 · 22 min
Envelope commissioning
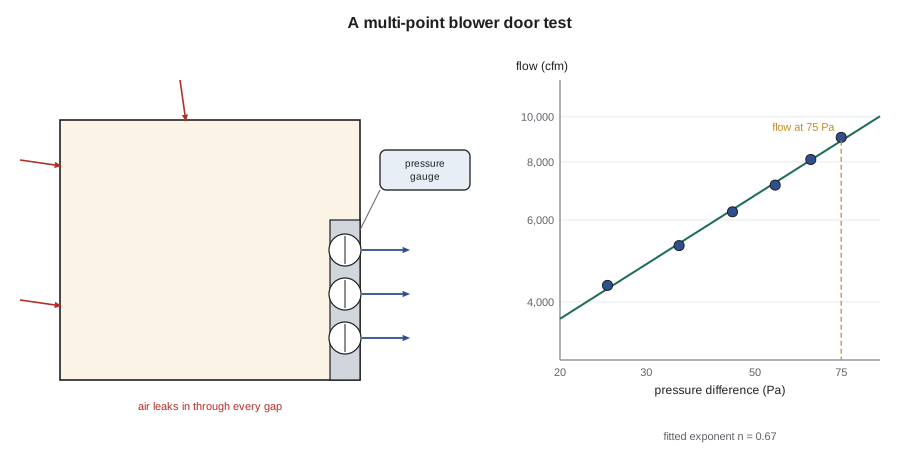
The last lesson of the term takes place at the community hub, now enclosed and heated, with the windows in and the drywall not yet started. A testing crew has fitted three large fans into a frame across the main entrance and taped plastic over the ventilation openings. A technician with a tablet reads pressures from tubes run through the frame to the outdoors. 'We are holding the building at 75 pascals below the outdoors,' she says. 'The fans are pulling about nine thousand cubic feet per minute out of it. Everything leaking in is coming through holes in your envelope.' Inside, Wren and Joon-ho walk the walls with a thermal camera and a smoke pencil, finding the leaks: a stream of cold air at the joint between the timber wing and the hall, a draft around a duct and, to Wren's satisfaction, nothing at all along the slab edge she redetailed in Lesson 3. Envelope commissioning is the process that makes sure an envelope is built as designed and performs as intended. This lesson describes the process, its tests and what to do with the results.
What envelope commissioning is
Commissioning is a quality assurance process that runs through the whole life of a project, from the owner's first requirements to the first year of operation. It began with mechanical and electrical systems, where it is now routine, and has spread to the building envelope, because envelope failures are just as costly and even harder to fix after the fact. In the United States, the ASTM standard practice for building enclosure commissioning and the National Institute of Building Sciences guideline for the building enclosure commissioning process set out the method, and many owners, including governments, universities and the City of Minneapolis for the hub, require it on their larger projects.
The process has several phases. In pre-design, the owner and the commissioning team write the owner's project requirements for the envelope: performance targets for energy, airtightness, water penetration resistance, condensation resistance, durability and maintenance. In design, an envelope commissioning authority, often the envelope consultant or an independent engineer, reviews the drawings and specifications against those requirements, checking the critical details with the methods of the detailing workshop and the calculations of earlier lessons, and writes the testing requirements into the specifications. In construction, the authority reviews submittals and shop drawings, attends pre-installation meetings with each trade, inspects the work as it proceeds and witnesses tests. At completion, it compiles the results, the as-built details and maintenance instructions. And about ten months after occupancy, before the warranties expire, it returns to check for problems that appeared in the first winter.
Mock-ups
The most valuable single step in envelope commissioning is often the mock-up: a full-scale sample of the wall, typically several yards wide and a story high, with at least one window, a floor line, a change of cladding and any other critical junction, built by the trades who will build the building, with the actual materials, early in construction. The mock-up shows whether the details can be built as drawn and in what order, settles questions of appearance and workmanship, and is tested for air and water leakage before the rest of the work proceeds. Problems found in the mock-up are cheap to fix; the same problems found after a hundred windows are installed are not. Many projects build the mock-up as part of the building itself, an in-place mock-up, so that it becomes part of the finished wall once approved.
Field tests of air leakage
Whole-building airtightness is measured by pressurizing or depressurizing the building with calibrated fans while all intentional openings, ventilation intakes and exhausts, are sealed or taped. The test is run at several pressures, typically from about 25 to 75 pascals, and the flow is measured at each. Because flow through cracks rises less than linearly with pressure, the results are fitted to a power law, with a flow coefficient and an exponent that is usually between 0.5 for large holes and 1.0 for very fine cracks. The fitted curve gives the flow at the reference pressure, 50 pascals for houses and 75 pascals for large buildings, which is then divided by the building's volume to give air changes per hour or by its envelope area to give a normalized leakage rate. Large buildings are tested to ASTM E3158 or ASTM E779, and houses to the protocols of the energy code.
# Fitting a multi-point blower door test of the community hub
import math
pressures = [25, 35, 45, 55, 65, 75]                    # Pa, building depressurized
flows = [4340, 5285, 6249, 7130, 8094, 9033]                                             # measured fan flow (cfm)
xs = [math.log(p) for p in pressures]; ys = [math.log(q) for q in flows]
n_pts = len(xs); mx = sum(xs) / n_pts; my = sum(ys) / n_pts
n = sum((x - mx) * (y - my) for x, y in zip(xs, ys)) / sum((x - mx) ** 2 for x in xs)
C = math.exp(my - n * mx)
volume = 388500                                            # heated volume (ft3)
envelope = 55970                                          # envelope area including the floor (ft2)
q50, q75 = C * 50 ** n, C * 75 ** n
print(f"flow exponent n = {n:.2f}, coefficient C = {C:.1f}")
print(f"flow at 50 Pa {q50:,.0f} cfm, at 75 Pa {q75:,.0f} cfm")
print(f"air changes per hour at 50 Pa: {q50 * 60 / volume:.2f}")
print(f"leakage at 75 Pa per unit of envelope: {q75 / envelope:.3f} cfm per ft2")
target = 0.2
met = q75 / envelope <= target
print(f"city target {target} cfm per ft2: {'met' if met else 'not met'}")flow exponent n = 0.67, coefficient C = 499.2 flow at 50 Pa 6,779 cfm, at 75 Pa 8,883 cfm air changes per hour at 50 Pa: 1.05 leakage at 75 Pa per unit of envelope: 0.159 cfm per ft2 city target 0.2 cfm per ft2: met
The hub's envelope leaks less than the city's target at 75 pascals, and its flow exponent of about two thirds is typical of a building whose leakage is spread across many small cracks rather than a few large holes. The air change rate at 50 pascals is well under the default of the code's energy calculations. The test results are not the end of the matter: the crew's thermal camera and smoke pencil located the remaining leaks while the building was under pressure, the joint between the timber wing and the hall and the duct penetration, and the contractor will seal them before the drywall closes the walls. Testing at this stage, while the air barrier is still accessible, is far more useful than testing only at completion.
Large buildings can also be tested floor by floor or zone by zone, and multi-unit residential buildings apartment by apartment, to check compartmentalization, as Greenway Homes requires. Guarded tests, in which neighboring units are pressurized at the same time so that only the leakage to the outdoors is measured, separate exterior leakage from leakage between units.
Field tests of water penetration
Windows, curtain walls and other glazed assemblies are tested in the field for water penetration, usually on the mock-up and on a sample of installed units. In the most rigorous test, a chamber is sealed to the inside face of the window and depressurized to a set pressure while a calibrated spray rack wets the outside, and the inside is watched for leaks; this simulates rain driven by wind and tests the window and its perimeter together. A simpler test, used especially for curtain wall joints, sprays a calibrated nozzle along each joint at a set pressure and distance while an observer watches inside. Both tests follow published standards, and their test pressures are tied to the performance grade of the window. A failed test is followed by a search for the leak path, a repair and a retest, and the lessons are applied to every similar window before the work continues.
Roofs are tested in other ways. A flood test, in which a section of roof is dammed and flooded for a day or two, checks small areas such as terraces and drains before their topping is installed. Electronic leak detection, which applies a low voltage between the wet surface of the membrane and the grounded deck below and finds the current flowing through any hole, can locate pinholes across a whole roof, including protected membrane roofs before their insulation and ballast are installed. Adhesion tests of self-adhered and fluid-applied membranes check that they are bonded to their substrates as the manufacturers require.
Infrared thermography
A thermal camera shows the temperature of surfaces. It is the quickest way to find missing insulation, thermal bridges and air leaks over a whole building, but only under the right conditions. The temperature difference between inside and outside should be at least about 18 to 27 °F, which in practice means a winter evening, night or early morning, without sun on the walls for several hours and with little wind. Under depressurization by a blower door, air leaks show up from the inside as cold streaks spreading from joints and outlets, which makes thermography the natural partner of the airtightness test. From the outside, warm patches show where heat escapes. Images must be interpreted by someone who understands the assemblies: a reflective metal surface, a wet area or a heating pipe can look like a defect, and emissivity and reflected temperature must be set correctly. The thermal camera image at the start of Lesson 8 is an example of what a skilled thermographer can read from a façade.
When tests fail
Tests fail often, especially early in a project, and that is their purpose. A failed mock-up test can reveal a detail that cannot be built, a sequence that does not work, a product incompatible with its neighbors or a trade that needs instruction. The response should be to find the cause, not only the leak: was the design wrong, was the product wrong or was the installation wrong? The design team revises the detail if needed, the contractor repairs the work, the test is repeated and the findings are applied to the rest of the building. A good commissioning process records every failure, its cause and its fix, so that the owner has a history of the envelope and later projects can learn from it. In Lavoie's experience, the envelopes of buildings that went through a few failed tests during construction are usually the most reliable, because their problems were found while they were still cheap to fix.
Looking after the envelope
No envelope is maintenance free. Sealant joints need inspection every few years and replacement every ten to twenty; roof drains need clearing each spring and autumn; flashings, copings and gutters need checking after storms; cladding needs cleaning and, for some materials, recoating; and windows need their weeps kept clear, their hardware adjusted and their seals replaced. A good set of envelope documents gives the owner a maintenance manual with a schedule, the products and warranties, and the as-built details. It also tells the owner what not to do: not to penetrate the air barrier when mounting signs and satellite dishes, not to humidify beyond the levels the envelope was designed for, not to block the cavity vents with landscaping, and not to seal the drained joints that the designers deliberately left open. Many envelope failures are caused not by the original construction but by later alterations made without understanding how the envelope works.
Worked problem
Commissioning plan for the mixed-use building
Ingrid's mixed-use building has a brick base, metal panels above, punched windows, a protected membrane roof terrace and a basement with waterproofing. Prepare a commissioning plan for its envelope.
Show solution
- Owner's requirements: effective wall and roof resistances, an airtightness target at 75 pascals for the whole building and for each apartment, window performance grades, condensation resistance for the gallery and an expected service life for each assembly.
- Design review: check the critical details with the four-line test, the thermal bridging calculation and the condensation checks, and write the test requirements into the specifications.
- Mock-up: a two-story in-place mock-up at a corner, with a window in brick and a window in metal panels, a shelf angle, the change of cladding and a balcony door, tested for air and water before the rest of the walls proceed.
- Construction tests: an early blower door test of the whole building before drywall, with thermography and smoke tracing; water tests of a sample of windows on each elevation; electronic leak detection of the roof terrace membrane before the insulation and pavers; inspection of the basement waterproofing before backfill.
- Close-out: as-built details, maintenance manual and a return visit after the first winter.
Answer: The plan ties each performance target to a test, schedules the tests while the work is still accessible and closes with a review after the first winter.
Exercise 12: commissioning plan
This exercise completes the term's work and takes about one week.
- Write the owner's project requirements for the envelope of your mixed-use building, with a measurable target for each requirement.
- Prepare a commissioning plan listing the design reviews, mock-ups, inspections and tests, when each happens and who performs it.
- Specify the airtightness test for the building, with its standard, test pressures, target and the stage at which it is carried out.
- Draw the mock-up, showing the junctions it contains and where the tests are applied.
- Prepare a one-page maintenance schedule for the owner.
Common mistakes
MistakeTesting only at completion.
InsteadTest the mock-up early and the whole building before the air barrier is covered.
MistakeTreating a failed test as a nuisance.
InsteadFind the cause, revise the design or the installation and apply the lesson to the whole building.
MistakeRunning thermography on a sunny afternoon.
InsteadRun it with a large indoor-outdoor temperature difference and no sun on the walls, ideally under depressurization.
MistakeWriting targets that cannot be measured.
InsteadTie every requirement to a test or calculation.
MistakeHanding over a building without maintenance instructions.
InsteadGive the owner a schedule, products, warranties and as-built details, and explain what not to alter.
Summary and key terms
- Envelope commissioning is a quality process from the owner's requirements through design review, construction, testing and the first year of operation.
- Mock-ups built and tested early by the real trades find most problems while they are cheap to fix.
- Multi-point blower door tests, fitted to a power law, measure airtightness; thermography and smoke tracing find the leaks.
- Windows and curtain walls are water tested in the field; roofs are flood tested or checked by electronic leak detection.
- Failed tests are opportunities; maintenance and informed alterations keep the envelope working for its life.
- Envelope commissioning
- A quality assurance process that verifies the envelope is designed, built and performs as the owner requires.
- Owner's project requirements
- The documented performance targets for a building, against which it is commissioned.
- Mock-up
- A full-scale sample of construction built and tested before the work proceeds.
- Flow exponent
- The exponent of the power law relating leakage flow to pressure difference.
- Normalized leakage rate
- Air leakage at a reference pressure divided by the envelope area.
- Electronic leak detection
- A method that finds holes in a roof membrane by the electric current passing through them.
- Infrared thermography
- Imaging of surface temperatures to find thermal bridges, missing insulation and air leaks.
Practice problems
Work each problem on paper first, then reveal the answer to check.
Why test airtightness before the drywall is installed?
Show answer
The air barrier is still accessible, so leaks found can be sealed.
What does a flow exponent of about two thirds indicate?
Show answer
Leakage spread across many small cracks rather than a few large holes.
Under what conditions should thermography be done?
Show answer
With a large indoor-outdoor temperature difference, no sun on the walls for several hours and little wind, ideally under depressurization.
Name two ways of testing a low-slope roof membrane for leaks.
Show answer
A flood test of a dammed area, and electronic leak detection.
Why return to the building about ten months after occupancy?
Show answer
To find problems that appeared in the first winter before the warranties expire.
Lesson quiz · 5 questions
Score 60% or more to complete this lesson.
Create a free account to save your progress, take quizzes and earn a certificate.