
ROOF-320 · Lesson 8 of 12 · 24 min
Walls and chimneys on steep roofs
▶ Video coming soon A video version of this lesson is on the way.
Theo keeps a mock-up chimney in the corner of the shop: a stub of real brick, 1,000 mm wide, built on a short section of 8 in 12 roof framing with plywood sheathing, so apprentices can practise flashing it and tearing it off again. On the Thursday evening of the Ferncliff week he had Rory and Keisha flash it from scratch, the way Wes and Crew 5 had reflashed the chimney at 41 Linden in August, but this time with a sheet metal cricket behind it and stepped counterflashing cut into the mortar joints, the way a heritage mason would want it. "At Linden you put the counterflashing in a sawn reglet," Theo told Rory. "Today you're going to lay out steps. Every one of them has to sit in a joint and lap the one below it. Measure twice."
ROOF-130 lesson 11 covered the basics of step, apron and chimney flashing on a shingle roof. This lesson goes further: how wall flashing has to work with different wall claddings, stepped and reglet counterflashings on masonry, headwalls and changes of pitch, dormers, chimney crickets and how they are built, the water that comes through masonry itself, and kickout flashings at the bottom of a wall.
The rules in brief
The 2024 Ontario Building Code sets minimums for flashing where a sloped roof meets a wall or a masonry chimney. In its own words, the code requires the junction of a roof with a wall to be flashed with pieces that run up the wall and onto the roof by at least 75 mm each, lapped in the direction of water flow; requires masonry chimneys and walls to be counterflashed with metal built into the mortar joints and lapping down over the base flashing; and requires a saddle (cricket) on the upper side of a chimney more than 750 mm wide, unless the chimney is protected by sheet metal flashing carried up the chimney and up the roof by set amounts (9.26.4).
Makers of shingles, siding, stucco and windows add their own requirements, and where theirs are stricter they usually govern the warranty. The rest of this lesson explains how the pieces fit together so that the minimums actually work.
Sidewalls and different claddings
Step flashing at a sidewall works by turning each course of shingles up the wall with its own L-shaped piece, so that water running down the wall and along the roof is handed from piece to piece and onto the shingle below. What covers the top of the step flashing depends on the wall.
| Wall cladding | What covers the step flashing | Typical points to watch |
|---|---|---|
| Vinyl or metal siding | The siding, over a wall underlayment lapped over the step flashing | Leave the siding's J-channel or trim clear of the roof surface so it does not sit in water |
| Fibre cement or wood siding | The siding and wall underlayment | Siding makers typically want a gap of 25 to 50 mm above the roof; seal and paint cut ends |
| Stucco | Stucco over the wall underlayment, ending at a weep screed or casing bead | Never bury stucco into the shingles; it wicks water |
| Brick or stone veneer | Metal counterflashing in the mortar joints, and a through-wall flashing in the veneer above | The veneer cavity must drain out above the roof |
| Solid masonry or chimney | Stepped or reglet counterflashing in the joints | The masonry itself absorbs water; see below |
| Exterior insulation and finish | The system's own flashing and trim, ending above the roof | Follow the system maker's roof-to-wall detail exactly |
On framed walls, the most important layer is the one you cannot see: the wall's water-resistive barrier, the housewrap or building paper. It must lap over the vertical leg of each step flashing, so water running down behind the siding comes out on top of the flashing, not behind it. When re-roofing against a wall with siding that will stay, the siding's bottom course is lifted or removed so the new step flashing can go under the existing barrier. Tucking new step flashing behind the siding but in front of the barrier, or sealing it to the face of the siding, puts the water behind the flashing.
Worked problem
Counting step flashing
A dormer cheek wall at an 8 in 12 slope is 3.6 m long measured along the slope. The shingles are laid at a 143 mm exposure, and each step flashing is 254 mm long. How many pieces are needed for one cheek wall, and how much does each piece lap the one below?
Show solution
- Courses along the wall = 3,600 ÷ 143 = 25.2, so 26 courses (round up for the starter and the top).
- One step flashing per course = 26 pieces, plus one at the bottom with the kickout if the wall runs past the eave.
- Lap = piece length − exposure = 254 − 143 = 111 mm.
Answer: 26 pieces for each cheek wall, each lapping the one below by about 111 mm. Two cheek walls take 52 pieces; order a bundle of 100 to allow for the apron corners and waste.
Stepped and reglet counterflashing on masonry
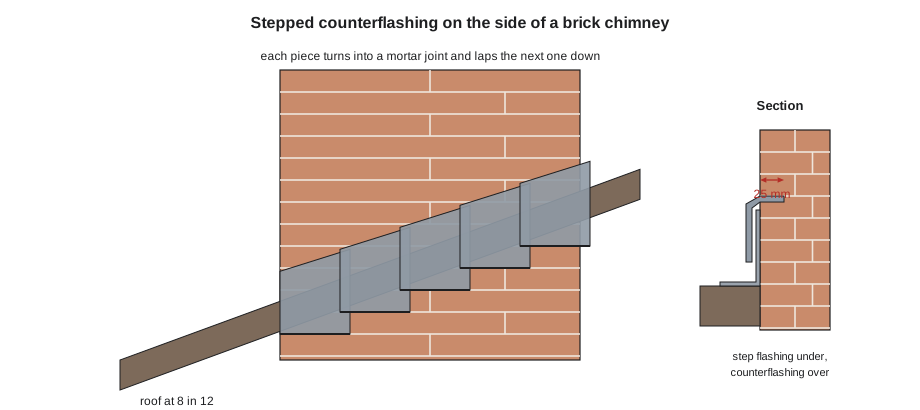
On a brick chimney or wall, the step flashings are covered by a metal counterflashing that is let into the masonry. There are two ways to do it. A reglet counterflashing is a straight strip, set in a continuous slot sawn into the masonry parallel to the roof, folded into the slot, wedged and sealed. It is quick, but sawing across the brick faces leaves a visible line and cuts through the hard outer skin of each brick. A stepped counterflashing follows the mortar joints instead: each piece is cut with a top edge that turns into one horizontal joint, its bottom edge parallel to the roof, and the pieces lap one another going down the slope. It takes longer, keeps the brick whole and looks right on older buildings.
Worked problem
Laying out stepped counterflashing
The side of Theo's mock-up chimney is 1.2 m long, measured horizontally, where it meets an 8 in 12 roof. The brick courses are 67 mm high. How much does the roof rise along the side of the chimney, and how many brick courses does the counterflashing step through?
Show solution
- Slope = 8 ÷ 12 = 0.667.
- Rise along the chimney side = 1,200 × 0.667 = 800 mm.
- Courses = 800 ÷ 67 = 11.9, so the flashing steps through about 12 courses.
- Horizontal length of each step = 67 ÷ 0.667 = 100 mm, so 12 pieces each covering about 100 mm along the chimney, plus laps.
Answer: About 12 steps on each side. Rory cut 12 pieces from a pattern, each with a 25 mm turn-in at the top and a 75 mm lap onto the next piece down, and Theo checked that every bottom edge stopped above the shingles so it would not trap debris.
Headwalls and changes in pitch
Where a roof runs up into a wall across its slope, at the bottom of a dormer front or under a second-storey wall, an apron or headwall flashing turns up the wall and lies down over the top course of shingles. Its roof leg must be wide enough to cover the top course and extend onto the shingles below; its wall leg runs up behind the wall barrier or under the counterflashing. At each end, where the headwall meets a sidewall, the apron is cut and folded around the corner, and the first step flashing laps over it.
Where the slope changes, from a steep upper roof to a flatter lower one, as on a mansard or a porch roof, the change of pitch is flashed with a bent metal strip that laps under the upper shingles and over the lower ones. On roofs flatter than the shingle maker's minimum, the lower part must be a low-slope roof, not shingles, with its own flashing up under the steep shingles.
Chimney crickets
A cricket, also called a saddle, is a small roof built behind a chimney to divide water running down the slope and send it around both sides. Without one, water and snow dam against the uphill face of the chimney, debris gathers, and the back pan of the flashing sits wet. The codes call for a cricket on chimneys wider than about 750 mm across the slope, and many roofers build one on narrower chimneys too.
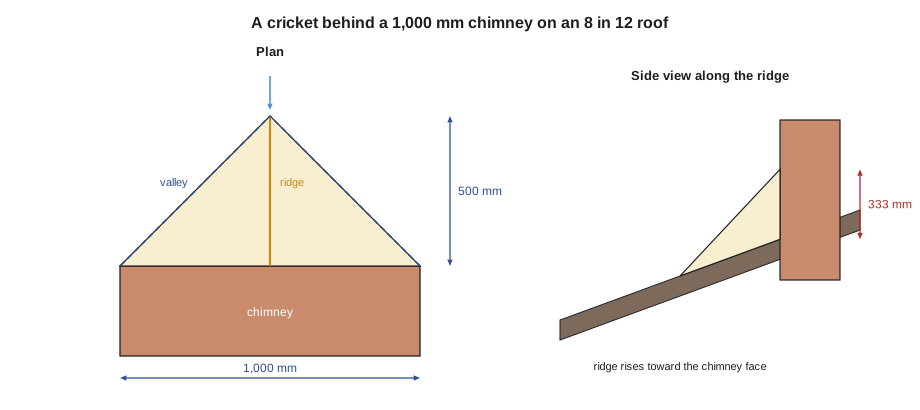
Crickets are framed with a ridge board running straight up the slope from the middle of the chimney, two valley boards running from the chimney corners to the ridge, and sheathing between. The ridge is usually set at the same slope as the main roof or flatter. The cricket is covered with metal, often a single piece of soldered copper or painted steel on a heritage or quality job, or with underlayment and shingles with metal valleys on an ordinary house. Its back edge is flashed and counterflashed to the chimney like the rest.
Worked problem
Sizing a chimney cricket
Theo's mock-up chimney is 1,000 mm wide. The cricket ridge will run up the roof from the middle of the chimney for half the chimney width, and the cricket faces will slope at the same 8 in 12 as the roof. How long is the ridge measured horizontally, how high is the ridge above the roof at the chimney face, and how long is each valley in plan?
Show solution
- Ridge length in plan = 1,000 ÷ 2 = 500 mm.
- Height at the chimney face: the faces fall from the ridge to the chimney corners, 500 mm away, at 8 in 12: 500 × 0.667 = 333 mm.
- Each valley runs from a chimney corner to the top of the ridge: in plan, √(500² + 500²) = 707 mm.
Answer: A ridge 500 mm long in plan, 333 mm high at the chimney, and valleys about 707 mm in plan. The back flashing of the chimney must now rise 333 mm higher at the middle, so the counterflashing on the uphill face is set in a higher joint at the centre.
Water that comes through the masonry
A brick chimney absorbs rain. Water soaks into the brick and mortar above the roof, runs down inside the masonry, and comes out below the flashing, in the attic or on a ceiling, even when every piece of flashing is perfect. Old chimneys with soft brick, open joints or a cracked cement crown at the top are the worst. When a chimney leak will not stop, check the crown and the cap, the mortar joints above the roof, and whether the chimney is soaking up water through its faces. The fixes are a mason's: a new crown with a drip, repointing, a water-repellent treatment that lets the masonry breathe, or, on a rebuild, a through-wall flashing or pan built into the chimney just above the roof that catches the water inside the brick and sends it out over the counterflashing.
Kickouts
At the bottom of a sidewall that continues past the eave, the last step flashing hands its water to nothing, and the water runs down the wall behind the gutter end. A kickout flashing, also called a diverter, is a one-piece formed flashing that turns that water out into the gutter. Kickouts must be one piece or soldered, with no open seam at the bend, set under the wall barrier and siding, and the gutter end must be capped with an end cap a short way back from the wall so the kickout can discharge into it. Missing kickouts are one of the most common causes of rotted sheathing and framing below roof-to-wall intersections.
Common mistakes
MistakeTucking new step flashing in front of the wall barrier.
InsteadLift the siding and lap the existing barrier over the vertical leg of each step flashing.
MistakeBurying the bottom of stucco or siding in the shingles.
InsteadKeep the cladding clear of the roof as its maker requires.
MistakeSealing counterflashing to the brick face with a bead of caulk.
InsteadTurn it into a mortar joint or a reglet, then wedge and seal.
MistakeLeaving a wide chimney without a cricket.
InsteadBuild a cricket on any chimney wider than about 750 mm.
MistakeBlaming the flashing for every chimney leak.
InsteadCheck the crown, joints and masonry absorption too.
Summary and key terms
- The Ontario code sets minimum sizes for wall flashing, requires counterflashing at masonry and requires saddles on chimneys wider than 750 mm.
- The wall barrier must lap over every step flashing; the cladding covers the top and stays clear of the roof.
- Masonry counterflashing is set in a sawn reglet or stepped along the mortar joints, each piece lapping the next.
- Headwalls use apron flashings; changes in pitch use bent flashings, and too-flat sections must be low-slope roofing.
- Crickets are framed with a ridge and two valleys, covered with metal or shingles, and raise the back flashing at the chimney.
- Masonry absorbs water; leaks through brick need a mason's repair, not more flashing.
- Step flashing
- L-shaped pieces laid with each shingle course where a roof meets a sidewall.
- Apron flashing
- A flashing across the top of a roof slope where it meets a wall.
- Stepped counterflashing
- Counterflashing pieces set into successive mortar joints, each lapping the one below.
- Reglet
- A slot sawn or cast into masonry to receive counterflashing.
- Saddle
- Another name for a chimney cricket.
- Kickout flashing
- A one-piece diverter at the bottom of a sidewall that turns water into the gutter.
- Water-resistive barrier
- The housewrap or building paper behind siding that sheds water reaching it.
- Crown
- The concrete or mortar cap on top of a chimney.
Practice problems
Work each problem on paper first, then reveal the answer to check.
A cheek wall is 2.9 m along the slope and the exposure is 143 mm. How many courses and step flashings?
Show answer
2,900 ÷ 143 = 20.3, so 21 courses and 21 pieces.
Above what chimney width does the Ontario code call for a saddle?
Show answer
More than 750 mm.
A cricket behind an 800 mm chimney slopes at 6 in 12. How high is it at the chimney?
Show answer
400 × 0.5 = 200 mm.
Which layer must lap over the vertical leg of each step flashing?
Show answer
The wall's water-resistive barrier.
Name one mason's repair for a chimney that leaks through its brick.
Show answer
A new crown, repointing, a breathable water repellent or a through-wall flashing.
Lesson quiz · 5 questions
Score 60% or more to complete this lesson.
Create a free account to save your progress, take quizzes and earn a certificate.