
ROOF-320 · Lesson 12 of 12 · 24 min
Case study: tracking down a leak
▶ Video coming soon A video version of this lesson is on the way.
The call came in on the morning of Wednesday, November 4, while rain was keeping Crew 2 off the Ferncliff roof. Corinne Abara, the facility manager at Harbourside Distribution, phoned the Ridgecap office: the packing line was dripping again, in the same place as in July and September, and this time there were three drips, not one. She had moved the line's conveyor belt and put out buckets. "You sealed that skylight twice," she said. "It's still leaking." Glen promised her a proper investigation, not another tube of sealant, and asked Theo to lead it on the Saturday, with Dana and Rory. This lesson follows that investigation from the first phone call to the written report, and brings together almost every detail in this course.
The building and the history
Harbourside Distribution is a single-storey steel warehouse about 148 m by 61 m, built in two parts: the western block in 1999 and the eastern addition in 2011, separated by the raised expansion joint that Rory had photographed on October 31 (lesson 6). The roof is a mechanically attached white TPO membrane over polyiso on a steel deck, re-roofed in 2011 when the addition was built. The structure slopes at 1 in 50 from east to west in each block, with drains along the west side of each block. The deck flutes run east to west, down the slope. There are 24 skylights over the packing area in the western block, six exhaust fans and eleven rooftop units. Ridgecap has had the service contract since 2019.
| Date | What happened |
|---|---|
| July 14, 2026 | Drip at the packing line during a thunderstorm. A Ridgecap service technician found sealant failing at skylight 2-6, about 2 m north of the drip, and resealed the frame joint. |
| September 22, 2026 | Drip at the same place in a long rain. The technician added more sealant at skylight 2-6. |
| October 31, 2026 | Twice-yearly inspection: crushed section of the expansion joint; skylight 2-6 flagged for sealant across the frame joint, a blocked weep and a stained curb wall. |
| November 4, 2026 | Three drips at the packing line during steady rain; buckets out; investigation booked for Saturday. |
| November 7, 2026 | Investigation and water testing; source found; temporary repair. |
| November 10, 2026 | Permanent repair. |
| November 13, 2026 | Report sent to the owner. |
Theo read the service file twice before Saturday. The two earlier visits had both assumed the nearest roof feature was the source. Neither had tested it. Both times the drips had stopped within a day, which looked like success, but the rain had stopped too.
Step 1: listen and look inside
An investigation starts with the people who see the leak. Theo's first half hour on Saturday was inside, with Corinne and the packing line supervisor, before anybody went up the ladder. They asked when the drips started in each rain, how long after the rain began, whether wind direction made a difference, whether the drips appeared in snowmelt as well as rain, and exactly where each drip fell. The answers were useful: the drips started about two hours into a steady rain, not at the first shower; they had happened in rain from several directions; and they stopped a few hours after the rain stopped.
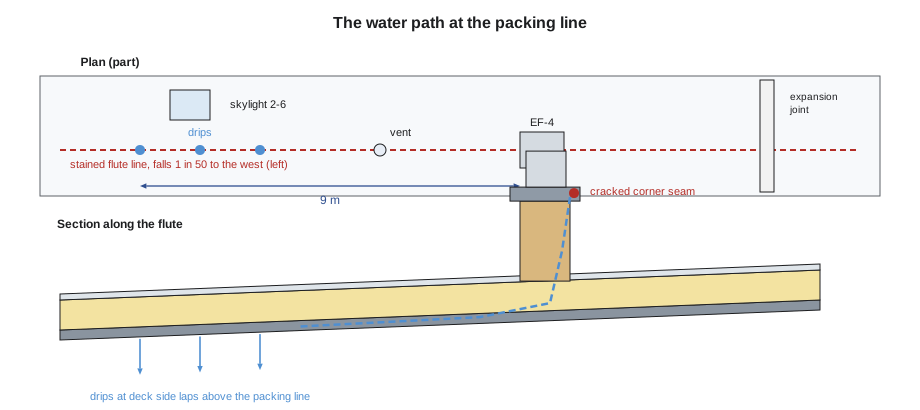
Then they looked up. With a lift and a flashlight, Rory found the three drip points on the underside of the deck: all three were on the same deck flute, in a line running east to west, at deck side laps where two sheets of deck joined. The underside of that flute was stained for several metres to the east of the drips, uphill. Skylight 2-6 was 2 m to the north, across three flutes, and its curb walls were stained too, but the stain on the curb did not reach the deck.
- A delay of two hours suggests water travelling some distance or soaking something before it drips, not a hole directly above.
- Drips lined up on one flute, with staining running uphill, suggest water running along the flute from upslope.
- Water does not usually cross from one flute to another on a steel deck; it runs along the flute it is in.
- The skylight's stained curb was a separate, smaller problem: condensation from the blocked weep.
"The skylight is guilty of something," Theo said, "but not this."
Step 2: survey the roof and list the suspects
On the roof, Theo had Rory pace out the line of the stained flute uphill from the drips and mark it with chalk. Every detail within about 2 m of that line, for 20 m uphill, was a suspect. There were four: skylight 2-6 just to the side, a plumbing vent boot 4 m upslope, the crushed section of the expansion joint 14 m upslope, and exhaust fan EF-4 9 m upslope, on a curb added by a mechanical contractor in 2023 when a new fan was installed. Theo looked at each one closely before any water was used.
- Skylight 2-6: base flashing sound, old sealant across the frame joint, weep blocked.
- Plumbing vent: boot and clamp in good condition.
- Expansion joint: crease in the cover from the October damage, no split found with a probe.
- EF-4: curb only 150 mm above the roof on its upslope side; the fan sat on a sheet metal curb cap whose four corners were butted and sealed with sealant, not folded or soldered; the sealant at the northeast corner was cracked open; the cap's skirt lapped the curb flashing by only about 40 mm.
Worked problem
How far did the water travel, and how far did it fall?
The EF-4 curb is 9.0 m upslope from the first drip point, along the flute. The deck slopes at 1 in 50. How far does the deck fall over that distance, and why would water entering at EF-4 take some time to reach the packing line?
Show solution
- Fall = 9.0 m × 1/50 = 0.18 m = 180 mm.
- Water entering at the curb first wets the curb's wood and insulation, then reaches the deck, then must fill the low side of the flute and run 9 m along it before reaching a deck lap where it can drip.
- The second and third drips are farther along, 11 m and 13 m from the curb, where more water was arriving through later laps.
Answer: A fall of 180 mm over 9 m is plenty to carry water along a flute, and the soaking of the curb and the length of the path explain the two-hour delay. It also explains why the drips stopped some hours after the rain: the wet curb kept feeding the flute.
Step 3: test, one detail at a time
Water testing proves a source instead of guessing it. The method Theo used follows the general approach in industry guidance for investigating water leakage:
- Wait for dry conditions, so any water that appears inside comes from the test.
- Put a spotter inside, under the drip points, with a radio and a watch, and someone on the roof with a hose at low pressure, no nozzle spray, never a pressure washer, which can force water through sound joints.
- Start with the lowest suspect, closest to the drips, and work upslope, so water from an upper test cannot run down and give a false result at a lower one.
- Test one detail, and one part of a detail, at a time, for long enough to match the delay seen in real rain, then wait before moving on.
- Record each test: what was wetted, for how long, and what the spotter saw and when.
Worked problem
Planning the water test
Theo plans to test five zones in order: skylight 2-6 flashing, skylight 2-6 frame, the plumbing vent, the EF-4 curb flashing, and the EF-4 curb cap. Each zone gets 30 minutes of water, followed by 20 minutes of waiting with the hose off. Setting up takes 30 minutes. If no zone leaks, how long will testing take? The light fails at about 4:45 pm and they start at 10:00 am.
Show solution
- Per zone = 30 + 20 = 50 minutes.
- Five zones = 5 × 50 = 250 minutes.
- With setup = 250 + 30 = 280 minutes = 4 hours 40 minutes.
- Finish = 10:00 am + 4 h 40 min = 2:40 pm.
Answer: About 4 hours 40 minutes, finishing around 2:40 pm, with two hours of light to spare for testing the expansion joint if needed and for a temporary repair.
The results took most of the day. Skylight 2-6 flashing: 30 minutes, nothing. Skylight 2-6 frame: 30 minutes, nothing at the packing line, although a little water appeared inside the skylight's curb on the frame side, the separate condensation and frame problem already known. Plumbing vent: nothing. EF-4 curb flashing, wetted below the curb cap skirt only: nothing. EF-4 curb cap, with the hose running gently over the northeast corner seam: at 13 minutes Rory's radio crackled. "First drip. Same place." Theo turned the hose off. Twenty minutes later the drip slowed, and the second drip point started. The expansion joint was never tested; it did not need to be.
Other tools exist for harder cases. Electronic leak detection, which uses a low-voltage current across a wetted membrane to find breaches, works well on large low-slope roofs with a conductive deck, and infrared surveys after sunset find wet insulation from the heat it holds. ROOF-330 covers those surveys. On this roof, a hose, a radio and patience were enough.
Step 4: open it up
Before repairing, Theo wanted to see the damage. With the fan's power isolated and locked out by the building's maintenance electrician, Theo and Dana lifted one side of the curb cap. The wood nailer at the top of the curb was black and soft at the northeast corner. The curb's insulation was wet, and a probe through a small cut in the membrane beside the curb found wet polyiso for about 1.2 m downslope. Dana cut a core 600 mm farther along and found it dry. Rory photographed each step with a tape in the picture.
The temporary repair the same afternoon was a folded sheet metal cover over the open corner, screwed to the cap and set in sealant tape, and the cut membrane was closed with a welded patch. It would keep the rain out for a few days. Nobody called it a fix.
Step 5: the permanent repair
On Tuesday, November 10, while Rory was on the Carrick Street job, Theo and Felix Amador, borrowed from Crew 3, made the permanent repair. Theo had fabricated a new one-piece curb cap in stainless steel in the shop on Monday, with its corners folded and soldered, a skirt that lapped 100 mm down over the curb flashing and a hemmed drip. They replaced the rotted nailer, cut out and replaced the wet insulation under a new TPO patch welded to the field, re-flashed the curb's upslope side, which was the only side short of height, as high as the existing curb allowed, set the new cap, and had the fan reconnected and tested by the maintenance electrician. Rory saw the photographs at Theo's Thursday session.
| Item | Done on November 10 | Recommended for spring 2027 |
|---|---|---|
| EF-4 curb cap | New one-piece cap, 100 mm skirt, soldered corners | — |
| EF-4 curb | Rotted nailer replaced; upslope side re-flashed | Raise the curb to full height with the mechanical contractor, and add a cricket |
| Wet insulation by EF-4 | Replaced; membrane patched and welded | Infrared survey of the whole roof after sunset |
| Skylight 2-6 | — | Cut out old sealant, clear weeps, check gaskets |
| Expansion joint | — | Replace crushed section; build a crossover; walkway pads |
| Other exhaust fan curbs | Checked visually; two similar caps found | Replace those caps the same way |
Step 6: the report
Theo wrote the report on Friday, November 13, and Glen sent it to Corinne that afternoon. It was four pages long, with a site plan, photographs and the water test log. It said what had leaked, how the investigation proved it, why the two earlier repairs had not worked, what had been done, what it had cost, and what should be done next and why, with prices for the spring work. It also said, plainly, that the two earlier service visits had sealed the wrong detail, and that Ridgecap had changed its service procedure: no leak repair at a suspected source without a water test or an opened-up inspection that proves the source. Glen insisted on that paragraph. "She paid for two visits that didn't work," he said. "She deserves to know we've learned from it."
The plan is to check the packing line after the next heavy rain and to put the spring work on the schedule for April. On November 15, as this course closes, the roof had not yet been tested by a big storm.
What the case shows
- The leak was at a detail, as almost every leak in this course has been: a curb cap whose corners relied on sealant, on a curb too low, with a skirt too short (lessons 1, 3, 4, 9 and 10).
- Water travelled 9 m along the deck before it appeared, so the nearest roof feature was the wrong suspect.
- A careful interview and an inside look narrowed the search before any water was used.
- Testing one detail at a time, from the bottom up, proved the source in a day.
- A good report turns a leak into a plan, and protects the owner's trust and the roofer's name.
Common mistakes
MistakeSealing the nearest roof feature and calling the leak fixed.
InsteadFind and prove the source before repairing.
MistakeTesting several details at once, or from the top down.
InsteadTest one at a time, starting with the lowest suspect.
MistakeUsing a pressure washer or a hard spray to test.
InsteadUse a gentle flow from a hose that imitates rain.
MistakeRepairing the entry point and leaving wet insulation in place.
InsteadOpen up, find the wet material and replace it.
MistakeLeaving the owner without a written report.
InsteadWrite up the findings, proof, repair, cost and next steps.
Summary and key terms
- Leak investigation starts with the people who see the leak: when, where, how long after the rain starts, and in what weather.
- Looking at the underside of the deck shows how water is travelling; on steel decks it usually runs along a flute from upslope.
- List every detail near the water path as a suspect and inspect each before testing.
- Water test with a gentle flow, one detail at a time, from the lowest suspect upward, long enough to match the delay seen in rain, with a spotter inside.
- Open up the source, find the extent of wet materials, and make a temporary and then a permanent repair.
- Report the findings, the proof, the repair and the recommendations in writing.
- Leak investigation
- A systematic search for the source of a leak, from interview to proof.
- Water test
- Wetting one part of the roof at a time, with a spotter inside, to find where water enters.
- Spotter
- The person inside the building who watches for water during a test.
- Deck flute
- The trough of a ribbed steel deck, along which water can travel under the roof.
- Electronic leak detection
- A method that finds breaches in a membrane by passing a low-voltage current across it.
- Curb cap
- The metal cover on top of a curb that a fan or unit sits on, acting as its counterflashing.
- Temporary repair
- A quick measure to stop water until a permanent repair can be made.
Practice problems
Work each problem on paper first, then reveal the answer to check.
Why did Theo start testing at the skylight rather than EF-4?
Show answer
It was the lowest suspect, so water from it could not give a false result at a lower detail.
A deck slopes at 1 in 50. How far does it fall over 15 m?
Show answer
15 × 1/50 = 0.30 m = 300 mm.
Name two questions to ask the people who see a leak.
Show answer
How long after the rain starts it drips; whether wind direction or snowmelt matters; exactly where it drips.
Why not test with a pressure washer?
Show answer
It can force water through joints that are sound in real rain.
What should a leak report contain?
Show answer
Findings, how the source was proved, the repair, the cost and recommendations.
Lesson quiz · 5 questions
Score 60% or more to complete this lesson.
Create a free account to save your progress, take quizzes and earn a certificate.