
ROOF-320 · Lesson 1 of 12 · 21 min
Why details matter most
▶ Video coming soon A video version of this lesson is on the way.
On the Saturday morning after Elmcrest, Theo Barnes unlocked the sheet metal shop at the Ridgecap yard at seven, put the coffee on, and told the three apprentices who had signed up for his fall flashing sessions, one Saturday and then Thursday evenings in the shop until Christmas, to empty their pockets onto the bench. Rory put down his notebook. "Read me every leak you have seen since April," Theo said. Rory turned the pages. The north parapet at Carrick Street, where the old flashing had never been fastened and had slumped away from the wall. The east parapet at Parkdale Arena, where the membrane bridged the corner and tore. The split at the outside corner of the kitchen exhaust curb at Corso's. The chimney on 41 Linden that had been sealed with roof cement and nothing else. The galvanized valleys on the north transept of St. Brendan's. The edge at Northgate that let go in the April storm. Theo waited until he had finished. "Six leaks," he said. "How many of them were in the middle of the field?" None were.
This course is about the places where roofs actually leak: edges and parapets, base and counter flashings, curbs, pipes and other penetrations, expansion joints, skylights and hatches, walls and chimneys on steep roofs, the sheet metal that ties it together, the sealants that are too often asked to do the work of a flashing, the drawings that show how each detail should be built, and a real leak investigation from start to finish. This first lesson explains why details fail more often than the field of the roof, the forces that move water into a building, and the handful of principles behind every good detail.
Where roofs leak
Roofers and roof consultants say it in different ways, but the experience is the same across the industry: most leaks on a roof that is reasonably new are found at flashings, penetrations, edges and transitions, not in the open field of the membrane or the shingles. The field is made in long, simple runs by machine-made sheets, often laid by the most practised crew members and inspected easily. Details are the opposite. Every one is a little different, they are built by hand in tight spaces, several trades touch them, they move differently from the field, and many are hidden under metal where nobody looks again.
Think about how a membrane field is made. A sheet is unrolled, aligned and seamed to the next one along a straight line, and a welder or a torch runs the length of the seam at a steady speed. At an inside corner of a parapet, the same roofer has to fold, cut, heat, press and seal three planes meeting at one point, often on hands and knees, while keeping the lap order right. A curb has four inside corners and four outside corners. A single rooftop unit can carry more hand-built joints than a hundred square metres of field.
Details also sit where water collects and where the roof meets something that moves differently. A wall rises next to a roof that is supported on a different structure. A pipe comes up through a deck that deflects under snow. A skylight frame expands in the sun. Each of these joints works every day of the year, and the field does not.
| Leak Rory saw in 2026 | Detail involved | What went wrong |
|---|---|---|
| Carrick Street office | Parapet base flashing | Flashing never fastened at the top; slumped, no cant |
| Parkdale Arena | Parapet base flashing | Membrane bridged the inside corner and tore |
| Corso's Trattoria | Curb outside corner | Flat patch stretched over the corner and split |
| 41 Linden Street | Chimney | No step flashing; roof cement only |
| St. Brendan's Church | Valleys | Galvanized steel from 1958 rusted through |
| Northgate Medical | Roof edge | Corners fastened like the field; untested edge |
How water gets in
Water does not need much of an opening. To build a detail that stays dry, it helps to know the forces that push or pull water through a joint. Building scientists usually list five or six:
- Gravity pulls water down and along any slope. A lap that faces the wrong way, with the lower piece over the upper one, lets gravity lead water straight in.
- Kinetic energy, the momentum of wind-driven rain, throws drops into openings and up under short laps.
- Surface tension lets a film of water cling to the underside of a surface and travel back along it. This is why a drip edge has a kick and a hem: the break in the surface makes the drop fall free.
- Capillary action draws water into narrow gaps, sometimes uphill. Two flat pieces of metal lapped tight can pull water several centimetres between them.
- Air pressure differences, from wind, suck water through a joint from the high-pressure side to the low-pressure side. At a parapet in a storm, the pressure can lift water up behind a counterflashing that would be dry in still rain.
- Hydrostatic pressure from standing water pushes water through any hole below the water line. A detail that sits in a pond is under pressure all the time.
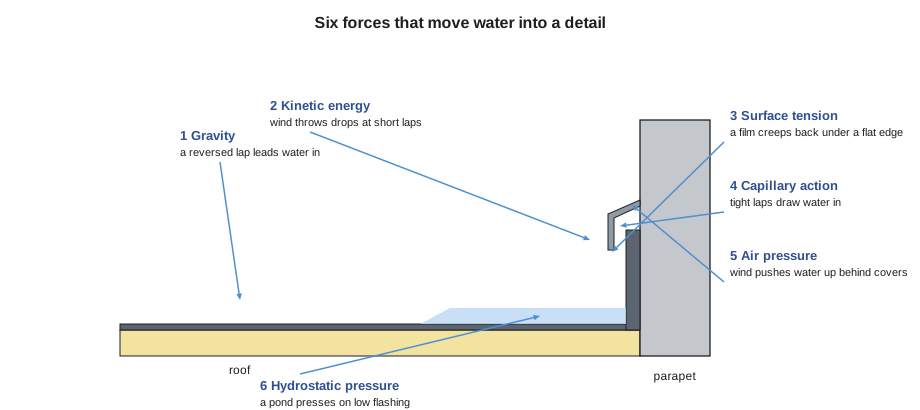
Each force has a matching answer. Gravity is answered by laps in the right order, with the upper piece always over the lower piece, the way shingles are laid. Kinetic energy is answered by enough lap length and by covers that shield the joint. Surface tension is answered by drips and kicks. Capillarity is answered by gaps, hems and breaks wider than a capillary can bridge, or by sealing the lap completely. Air pressure is answered by a continuous air barrier behind the detail and by pressure-equalized covers. Hydrostatic pressure is answered by height: keep the top of every flashing well above the highest water that can stand on the roof.
Six principles of a good detail
Theo wrote six lines on the whiteboard and left them up for every session in the fall. They are not code requirements, but almost every code rule and maker requirement in this course is one of them in practice.
- Shed water by gravity. Lap every piece so water runs over a joint, never into it, from the top of the detail to the field.
- Get height above water. The membrane flashing must rise well above the highest point that water can reach, including ponds, drifting snow, and water backed up behind a blocked drain. Industry guidance commonly sets about 200 mm above the finished roof surface as a minimum for base flashings.
- Provide two lines of defence. A base flashing keeps water out; a counterflashing over it keeps water off the top of the base flashing. If one fails, the other still works.
- Allow for movement. Parts on different structures, or made of different materials, will move at different rates. Let them slide, flex or float instead of tying them rigidly together.
- Keep the air barrier continuous. A detail that leaks air leaks moisture, and air pressure can drive rain through it.
- Make it buildable and maintainable. A detail that cannot be built in the space available, or cannot be inspected and repaired later, will fail. Sealant that has to be renewed every few years must be where a maintenance worker can reach it.
Most failures break more than one of these principles at once. The Carrick Street flashing had too little height at one point, no fastening at the top, no cant to support it at the bottom, and a counterflashing that relied on sealant alone.
Counting the details on a roof
A useful habit, and the first step in estimating any re-roof, is to count the details. Theo had the apprentices take the Redhill Freight roof from Crew 3's job file and list everything that was not field.
Worked problem
How much of a roof is detail?
The Redhill Freight roof is 98.0 m by 61.0 m, with parapets on three sides and a metal edge along the 98.0 m south side. It has 7 rooftop unit curbs, each about 1.8 m by 1.2 m, 8 skylights about 1.2 m by 1.2 m, 6 drains and 22 pipe and conduit penetrations. Find the length of perimeter flashing, the length of curb and skylight flashing, and compare the number of hand-built pieces with the field area.
Show solution
- Parapet length = 98.0 + 61.0 + 61.0 = 220.0 m. Metal edge = 98.0 m.
- One curb perimeter = 2 × (1.8 + 1.2) = 6.0 m; 7 curbs = 42.0 m.
- One skylight perimeter = 4 × 1.2 = 4.8 m; 8 skylights = 38.4 m.
- Total flashing length = 220.0 + 98.0 + 42.0 + 38.4 = 398.4 m.
- Hand-built items: 7 curbs + 8 skylights + 6 drains + 22 penetrations = 43, plus 4 corners where parapets meet or end.
- Field area = 98.0 × 61.0 = 5,978 m².
Answer: About 400 m of flashing and more than 40 hand-built details on a 6,000 m² roof. The details are a small share of the area but take a large share of the labour, and nearly all of the risk.
Crew 3's time records for Redhill bear this out. Sabine's crew spent roughly as many hours on the parapets, curbs, skylights and penetrations as on laying and welding the whole field. That is normal on a commercial roof, and it is why estimators price details by the piece and by the metre, not by the square.
Who touches a detail
A roof field belongs to the roofer. A detail rarely does. The mechanical contractor sets the rooftop unit and its curb, the electrician runs conduit through the roof, the plumber brings up vent stacks, the mason builds the parapet and cuts the reglet, the glazier or the skylight maker supplies the skylight, the sheet metal shop bends the copings and counterflashings, and the general contractor decides who goes first. Each trade works to its own drawings, and gaps between trades are where water gets in.
Theo has a rule for this: whoever builds the last layer of a detail owns the whole detail. If Ridgecap is asked to flash a curb that someone else set crooked, too low, or too close to a wall, the time to say so is before the flashing goes on, in writing, to the general contractor or the owner. Once the flashing is on, the leak is Ridgecap's.
- Check curb heights, spacing from walls and other curbs, and whether the curb is level and square before flashing.
- Check that pipes and conduits have room around them for a boot or a sleeve, and are not clustered so tightly that no flashing can be built.
- Check that walls have a way to counterflash them: a reglet, a receiver, a through-wall flashing or a surface for a termination bar.
- Check that equipment can be serviced without standing on the flashings or removing them.
- Record what you found, with photographs, before you cover it.
Details you can see and details you cannot
Some details stay in view for the life of the roof: pipe boots, pitch pans, exposed termination bars, sealant at counterflashings, coping joints. These can be inspected each spring and fall, and their weak points, especially sealant, can be renewed. Others are hidden: the membrane under a coping, the base flashing behind a counterflashing, the wood nailer under an edge, the air barrier tie at a parapet. These must be right the first time, because nobody will see them again until they fail.
That difference changes how a detail should be built. A hidden layer should rely on durable materials and mechanical laps, not on sealant. A visible layer can use sealant as a secondary seal, as long as somebody is going to look at it. ROOF-330 covers roof inspection and maintenance programs; in this course the aim is to build details that need as little of that as possible.
Theo's first exercise
Before the coffee was gone, Theo gave each apprentice a printed roof plan of a small two-storey office with a parapet, two rooftop units, a hatch, a gas line, four plumbing vents and a skylight, and asked them to circle every place where water could get in. Rory circled eleven. Keisha found fourteen. Theo had seventeen, including the two gas line supports, the hatch ladder anchors, and the joint where the parapet met a taller stair tower. "Every one of those needs a drawing, a material, a sequence and a person," Theo said. "That is what the Thursday nights are about." The lessons in this course follow the details he walked them through that fall, on the roofs Rory worked on and in the shop.
Common mistakes
MistakeSpending the care on the field and rushing the details.
InsteadPlan the details first; they take most of the labour and carry most of the risk.
MistakeLapping a piece the wrong way because it fits more easily.
InsteadAlways put the upper piece over the lower piece, the way water runs.
MistakeRelying on sealant to keep water out of a hidden joint.
InsteadUse laps, height and mechanical fastening; treat sealant as a secondary seal where it can be maintained.
MistakeFlashing over another trade's problem without saying anything.
InsteadReport crooked, low or crowded curbs and pipes in writing, with photographs, before you flash them.
MistakeForgetting that wind can drive water uphill behind a flashing.
InsteadKeep the air barrier continuous and give counterflashings enough lap and fastening.
Summary and key terms
- Most leaks on reasonably new roofs are at flashings, penetrations, edges and transitions, not in the field.
- Water moves by gravity, kinetic energy, surface tension, capillarity, air pressure and hydrostatic pressure.
- Good details shed water by gravity, rise well above water, have two lines of defence, allow movement, keep the air barrier continuous and can be built and maintained.
- A typical commercial roof has hundreds of metres of flashing and dozens of hand-built details, which take a large share of the labour.
- Many trades touch a detail; the roofer who builds the last layer should check the work of the others first.
- Hidden layers must be right the first time; visible sealant joints need regular maintenance.
- Detail
- Any place where the roof covering meets an edge, wall, curb, penetration, joint or change in plane.
- Base flashing
- The membrane or other roofing that turns up from the roof surface onto a wall, curb or other vertical surface.
- Counterflashing
- A cover, usually metal, that laps down over the top of a base flashing and keeps water off it.
- Capillary action
- The drawing of water into a narrow gap by surface tension, even against gravity.
- Drip edge
- A bent edge on metal that makes water drop clear of the surface below instead of running back along it.
- Hydrostatic pressure
- The pressure of standing water, which pushes water through any opening below the water line.
- Transition
- A joint between two different roof systems, materials or planes.
Practice problems
Work each problem on paper first, then reveal the answer to check.
Name the six forces that can move water into a detail.
Show answer
Gravity, kinetic energy, surface tension, capillary action, air pressure and hydrostatic pressure.
What is a commonly used minimum height for a base flashing above the finished roof?
Show answer
About 200 mm.
A roof is 40 m by 25 m with parapets on all sides. How long is the parapet flashing?
Show answer
2 × (40 + 25) = 130 m.
Which answers capillary action: a longer tight lap, or a hem and gap?
Show answer
A hem and gap, which break the narrow space a capillary needs.
Why should a hidden layer not depend on sealant?
Show answer
Nobody will inspect or renew it, and sealant needs maintenance.
Lesson quiz · 5 questions
Score 60% or more to complete this lesson.
Create a free account to save your progress, take quizzes and earn a certificate.