
ROOF-220 · Lesson 9 of 12 · 24 min
Taped and adhered seams
▶ Video coming soon A video version of this lesson is on the way.
Wednesday, October 28, was seam day at the parish hall. The three EPDM sheets were bonded, and two field seams ran the length of the roof, each 24.0 m (78 ft) long, with the top sheet folded back along each lap where the crew had kept the adhesive off. Sabine had saved the seams for the morning when everyone was fresh. "On EPDM," she said, "the seams are the roof. Thirty-two years ago somebody made these seams in a hurry. Look what happened." She pointed at the pile of old membrane in the bin, its liquid-adhesive seams curled open like old envelopes.
This lesson covers the seams of EPDM roofs, made with tape or adhesive: the products, the preparation, the step-by-step method, T-joints and cover strips, weather, inspection and repair. It also looks at the taped and adhered repairs used on some thermoplastic roofs.
How EPDM seams have changed
Because EPDM cannot be welded, its seams are bonded. For the first decades of EPDM roofing, seams were made with liquid splice adhesive, a contact adhesive brushed onto both faces of the lap, allowed to flash off and pressed together, then sealed at the edge with a bead of lap sealant. Liquid seams were slow and very sensitive to skill, weather and cleanliness, and many failed after 15 to 25 years, as the hall's had.
Since the 1990s, seam tape has largely replaced liquid splice adhesive. Seam tape is a strip of fully cured synthetic rubber adhesive, usually 75 mm (usually 3 in) wide for field seams and up to 150 mm (6 in) or wider for some systems, with a release liner on one or both sides. Because the tape's thickness and adhesive are made in the factory, a tape seam is far more consistent than a liquid seam. Some EPDM sheets now come with the tape factory-applied along one edge, which saves a step on the roof and keeps the tape clean.
The products
| Product | Purpose |
|---|---|
| Seam primer | cleans and primes the seam area so the tape can bond; applied with a scrub pad |
| Seam tape | the bonding layer between the two sheets in the lap |
| Cover strip (cured) | a strip of cured EPDM with tape on its back, used over T-joints, edge metal and batten strips |
| Uncured flashing | formable EPDM for corners and irregular shapes |
| T-joint cover | a pre-cut, often pre-molded, patch for T-joints |
| Lap sealant | a sealant bead along certain seam and flashing edges where the maker requires |
| Weathered membrane cleaner | for cleaning old EPDM before repairs |
Every product must be from the membrane maker's system. Primer from one maker and tape from another may not bond, and the warranty would not cover them anyway.
Lap width and layout
The maker sets the minimum lap and the position of the tape. Many EPDM sheets are printed or marked with a lap line. For 75 mm (3 in) tape, the lap is set so the tape sits fully within it and shows slightly past the edge of the top sheet, typically about 3 to 13 mm (1/8 to 1/2 in), all along the seam. The visible tape edge is the easiest check that the tape is there and fully covered.
End laps, where one sheet's end meets the next, are made the same way, at least the maker's minimum width, and staggered from the end laps of neighbouring sheets so T-joints do not line up.
Worked problem
Seam tape for the hall
The hall has two field seams 24.0 m long. Tape comes in rolls 30.5 m long. Allowing 0.3 m extra at each end of each seam for trimming into the edge details, how many rolls are needed?
Show solution
- Tape per seam = 24.0 + 2 × 0.3 = 24.6 m.
- Total = 2 × 24.6 = 49.2 m.
- Rolls = 49.2 ÷ 30.5 = 1.6, so 2 rolls.
Answer: Two rolls. Each seam is taped with one continuous length where possible; a splice in the tape is itself a joint to be overlapped as the maker says.
Making a taped seam
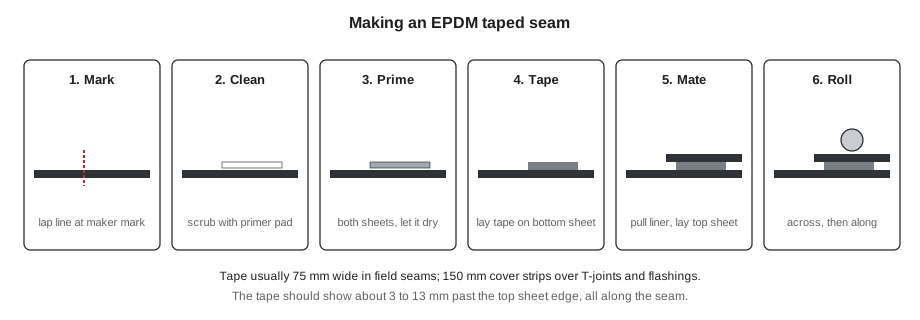
The method Sabine taught, following the maker's instructions:
- Position the top sheet over the bottom sheet at the lap line, relaxed and flat, with no wrinkles. Mark the top sheet's edge on the bottom sheet with a crayon or marker, every metre or so.
- Fold the top sheet back to expose the lap area on both sheets.
- Clean and prime. Stir the primer, dip a scrub pad, and scrub it onto both lap surfaces with long, firm strokes along the seam, until the surface is evenly coated and dark. The scrubbing removes talc, dust and the slight film on the sheet; the primer prepares the rubber. Prime a little wider than the tape.
- Let the primer dry. It is ready when it is dry to the touch, by the same dry-finger test as bonding adhesive: no transfer, no stringing. Primer applied too thick takes longer and can leave solvent trapped under the tape.
- Apply the tape to the bottom sheet, liner side up, with its edge on the marks so it will show slightly past the top sheet edge. Press it down with your hand as you unroll it.
- Lay the top sheet back over the tape, smooth and without wrinkles, so its edge lies on the marks.
- Pull the release liner out from under the top sheet, at a low angle, pulling toward you along the seam, while pressing the top sheet onto the tape with your other hand.
- Roll the seam immediately with a silicone or steel hand roller about 50 mm (2 in) wide, first across the seam with short strokes, then along its full length, pressing firmly. Rolling is what gives the tape full contact.
Rory's first seam took the three of them forty minutes. The second took twenty-five. Felix showed him how to keep the liner tail flat and pull it steadily, "like starting a lawnmower slowly," so it would not tear and leave a strip of liner in the lap.
Worked problem
Primer for the seams and details
This primer's data sheet says one 3.78 L can primes about 70 m of 75 mm seam, counting both sheets. The hall has 49.2 m of field seam, plus about 36 m of 150 mm cover strip at the edge metal and 24 m of wall flashing lap. Cover strip and flashing laps use primer at twice the rate per metre because they are twice as wide. How many cans?
Show solution
- Equivalent 75 mm seam length = 49.2 + 2 × (36 + 24) = 49.2 + 120 = 169.2 m.
- Cans = 169.2 ÷ 70 = 2.4, so 3 cans.
Answer: Three cans, and a fourth for repairs and the patch at the soft spot, because primer left open thickens and is wasted.
T-joints and cover strips
Where an end lap crosses a field seam, the extra thickness at the step leaves a small channel. On EPDM roofs every T-joint gets a T-joint cover, a pre-cut patch of cured or uncured EPDM with rounded corners, primed and applied over the joint and rolled hard. Some makers also call for lap sealant at the edges of the cover.
Cured cover strip, typically 150 mm (6 in) wide with tape backing, is used over:
- The flange of edge metal, where the membrane is turned down over the roof edge and the metal is nailed on top of it.
- Batten strips and termination bars in some details.
- Repairs and patches.
On the hall, the edge metal along the three open sides was set over the membrane and fastened, and then stripped in with cover strip: the metal flange and a strip of membrane beside it were primed, and the cover strip applied, lapping both by at least the maker's minimum.
Lap sealant
Lap sealant is a thick EPDM-compatible sealant applied as a bead along the exposed edges of some seams and flashings, tooled to cover the edge. Older liquid-adhesive seams always needed it. With modern tape, many makers no longer require it along field seams, but still require it at T-joint covers, cut edges of reinforced membrane, termination bars and some flashing edges. Sabine checked the maker's details before every job; the hall's maker required it at T-joint covers and at the top edge of the wall flashing only.
Weather and EPDM seams
- Dry surfaces only: no dew, frost or rain on the lap. Moisture under primer or tape ruins the bond.
- Temperature: primers flash off slowly in cold weather; tape is stiffer and less tacky. Keep tape and primer warm until use, and follow the maker's minimum temperatures, often around −4 to 4 °C (25 to 40 °F) depending on the product.
- Dew point: the same blushing risk as bonding adhesive applies to solvent primers (lesson 6).
- Wind: blows dust onto primed surfaces. Prime only what can be taped within the maker's open time, often within the same hour or so.
Wednesday morning at the hall was cool but dry, 8 °C (46 °F) at 8:00 a.m. with a dew point near freezing, so seam work started at once. The tape rolls had spent the night in the heated trailer.
Inspecting EPDM seams
EPDM seams are not probed with a steel probe the way welded seams are, because a sharp tool can damage the tape edge. They are checked:
- Visually: the tape edge shows evenly along the whole seam, there are no wrinkles, fishmouths or bridges, and no liner left in the lap.
- By feel: pressing along the seam edge with a thumb or a blunt, rounded tool to find loose spots.
- At T-joints and cover strips: corners rounded and fully rolled.
Defects are marked and fixed at once: a loose edge is lifted, cleaned, reprimed and re-taped or covered with a strip; a fishmouth is cut, flattened and patched.
The soft spot
After the seams, Rory repaired the soft spot from Tuesday near the church wall, with Sabine watching. He cut an X through the membrane over the loose area, folded back the four flaps, found a dry patch of cover board where the adhesive had skinned before the sheet was rolled in, applied bonding adhesive to both faces, let it flash off and pressed the flaps down. Then he cleaned and primed a square around the cut and applied a patch of cover strip, its corners rounded, at least 75 mm (3 in) past the cut in every direction, and rolled it.
Taped and adhered repairs on thermoplastic roofs
Thermoplastic roofs are normally repaired by welding. But some makers allow tape-based repairs in special cases, such as emergency patches in rain or cold, or very old TPO that will not weld. These use the maker's specific primer and tape products for TPO or PVC, and are usually treated as temporary until a welded repair can be made. Older PVC roofs sometimes have solvent-welded seams, in which a solvent briefly dissolves the surfaces so they fuse; repairs to them are made by hot-air welding after cleaning.
Worked problem
T-joints on a mechanically attached TPO roof
Redhill has 21 field seams 92.5 m long, and each run of sheets has an end lap every 30.5 m, staggered between rows. About how many T-joints are there in the field, each needing a T-joint cover?
Show solution
- Runs of sheets in the field = 20.
- End laps per run = 92.5 ÷ 30.5 = 3.03, so about 3 end laps per run.
- Each end lap meets a side seam at each of its two ends: 2 T-joints per end lap.
- T-joints = 20 × 3 × 2 = 120.
Answer: About 120 T-joint covers in the field alone, more in the perimeter. It is the same idea on TPO and EPDM: wherever three layers meet, the step needs covering, by a welded patch on TPO and a taped one on EPDM.
By 2:00 p.m. on Wednesday the seams, T-joint covers and edge strips were done. Sabine walked every seam on her knees, pressing the tape edge with the rounded end of a seam roller handle, and found one spot on the north seam where Rory had stretched the liner and left a short loose edge. He fixed it while she watched. "Fine," she said. "Now it'll last longer than either of us will be roofing."
Common mistakes
MistakeTaping over talc, dust or unprimed rubber.
InsteadScrub-prime both lap surfaces with the maker's primer and let it dry.
MistakeApplying tape onto wet primer.
InsteadWait until the primer passes the dry-finger test.
MistakeSkipping the roller because the tape grabbed.
InsteadRoll every seam firmly, across and then along its length.
MistakeLeaving T-joints uncovered.
InsteadCover every T-joint with a primed, rolled T-joint cover.
MistakeMixing primers, tapes and sealants from different makers.
InsteadUse only the membrane maker's system products.
Summary and key terms
- EPDM seams are bonded, today mostly with factory-made seam tape instead of liquid splice adhesive.
- The tape sits within the lap and shows slightly past the top sheet edge along the whole seam.
- Scrub-prime both surfaces, let the primer dry, lay the tape, mate the top sheet, pull the liner and roll firmly.
- Every T-joint gets a cover; edge metal and joints get cover strip; lap sealant goes where the maker requires.
- Dry surfaces, the maker's temperatures and the dew point govern seam work.
- EPDM seams are checked visually and by feel, not with a sharp probe; defects are fixed at once.
- Seam tape
- A factory-made strip of cured rubber adhesive used to bond EPDM laps.
- Seam primer
- A primer scrubbed onto EPDM lap surfaces so the tape bonds.
- Liquid splice adhesive
- An older contact adhesive used to bond EPDM seams before tape.
- Release liner
- The protective film on seam tape, pulled out after the top sheet is laid.
- Lap sealant
- A sealant bead applied along certain seam and flashing edges.
- Factory-applied tape
- Seam tape applied to the sheet edge in the factory.
- Cover strip
- Cured EPDM strip with tape backing, used over joints, edge metal and repairs.
Practice problems
Work each problem on paper first, then reveal the answer to check.
A roof has three seams 40 m long. Tape rolls are 30.5 m. How many rolls, with 0.3 m extra per seam end?
Show answer
3 × 40.6 = 121.8 m; 121.8 ÷ 30.5 = 4.0, so 4 rolls, or 5 to be safe.
How far should the tape show past the top sheet edge?
Show answer
Typically about 3 to 13 mm, evenly along the whole seam.
Why is a steel seam probe not used on EPDM tape seams?
Show answer
A sharp tool can damage the tape edge; EPDM seams are checked visually and by feel.
When is primer ready for tape?
Show answer
When it is dry to the touch, with no transfer or stringing.
What goes over every T-joint on an EPDM roof?
Show answer
A primed and rolled T-joint cover.
Lesson quiz · 5 questions
Score 60% or more to complete this lesson.
Create a free account to save your progress, take quizzes and earn a certificate.