
ROOF-220 · Lesson 8 of 12 · 26 min
Heat welding seams
▶ Video coming soon A video version of this lesson is on the way.
At 7:20 on Tuesday morning, October 20, the hoist thermometer read 4 °C (39 °F) and there was a light frost on the parked trucks, though the TPO was dry. Before anyone welded a seam, Owen set up a test station on a sheet of plywood: two scraps of the day's TPO, lapped, and the robotic welder pointed at them. He handed Rory a hand welder too. "Everybody makes a test weld before work and after lunch," he said. "New guys, old guys, me." Rory's first test weld, made with the hand welder at the setting the crew had used on Friday, peeled apart cleanly in his fingers, shiny on both faces. A cold weld. Owen nodded. "Cold sheet, cold air, same setting as a warm day. That's why we test."
This lesson covers hot-air welding of TPO and PVC: the equipment, the power supply, the settings, test welds, hand and robotic welding technique, weather, the common defects and the safety rules.
How a hot-air weld works
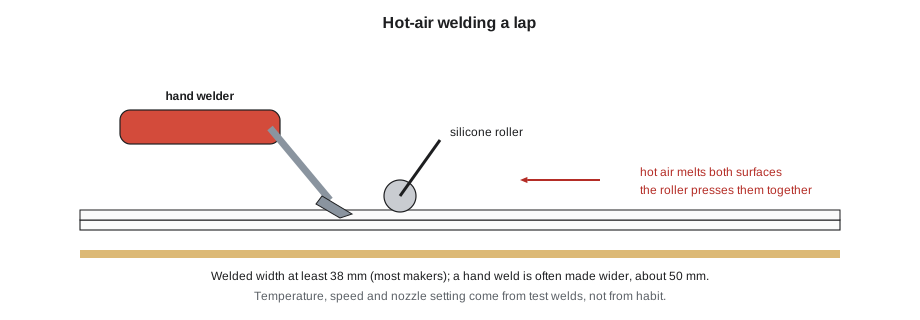
A hot-air welder blows a stream of air through an electric heating element and out of a flat nozzle at a temperature of several hundred degrees. The nozzle is slid into the lap between two thermoplastic sheets, where the hot air softens both surfaces. A roller pressing on the top sheet just behind the nozzle forces the softened surfaces together, and as they cool they fuse into one piece. Three things control a weld:
- Heat: the air temperature at the nozzle, set on the welder.
- Time: how long the material is exposed, which depends on the travel speed.
- Pressure: the force of the roller or the weighted pressure wheel.
Too little heat or too much speed gives a cold weld that peels apart. Too much heat or too little speed scorches and thins the sheet, which can weaken it and expose the scrim. The right combination depends on the membrane, its thickness, its age and the weather, which is why settings come from test welds, not from habit or from Friday.
The equipment
| Tool | What it does | Notes |
|---|---|---|
| Robotic (automatic) welder | travels along the field seam on its own wheels, welding with a wide nozzle and a weighted pressure wheel | speed and heat set on the machine; heavy; needs a steady power supply |
| Hand welder | hand-held heat gun with a flat nozzle | for details, short seams, repairs; nozzles of about 40 mm (1-1/2 in) and 20 mm (3/4 in) |
| Silicone roller | presses the lap behind the hand welder nozzle | about 40 to 50 mm (1-1/2 to 2 in) wide |
| Narrow roller (brass or steel) | presses welds into corners and steps | for T-joints and inside corners |
| Seam probe | blunt hooked tool for checking welds | used once welds are cool |
| Wire brush | cleans the nozzle | a clogged nozzle gives uneven heat |
| Seam cleaner and clean cloths | prepare lap surfaces | the maker's cleaner only |
Robotic welders weld field seams far faster and more evenly than hand welding: a typical machine runs at around 3 m per minute (around 10 ft per minute) on new sheet. Hand welders are used for everything the robot cannot reach: flashings, corners, patches, T-joints and the ends of seams near walls.
Power
Welders draw a lot of current, and their heat drops if the voltage drops. A robotic welder may draw around 4 to 6 kW and each hand welder about 1.6 kW. On Redhill, Crew 3 used its own generator on the roof, set on a plywood pad with a drip tray, rather than building outlets, because a steady supply makes for steady welds.
- Use a generator large enough for all the welders running at once, with margin.
- Use heavy-gauge cords of the length and size the welder maker allows; long, thin cords drop the voltage and cool the weld.
- Keep cords off sharp edges and out of puddles, and route them so the robotic welder will not run over them.
- Use ground fault protection on all temporary power, as Ridgecap's electrical safety program requires.
- Shut down welders before refuelling the generator, and refuel only when it has cooled.
Worked problem
Sizing the generator
Crew 3's robotic welder draws 4.6 kW, and two hand welders draw 1.6 kW each. Ridgecap's rule is to load a generator to no more than 80 in 100 of its continuous rating. Is a 10 kW generator big enough?
Show solution
- Total load = 4.6 + 2 × 1.6 = 7.8 kW.
- Allowed load = 0.80 × 10 = 8.0 kW.
- 7.8 kW is under 8.0 kW, so yes, just.
Answer: Yes, but with little margin. If a third hand welder or a screw gun charger is plugged in, the generator would be overloaded, and the welds would cool as the voltage sagged. Crew 3 keeps a second, smaller generator for the hand welders on busy detail days.
Test welds
A test weld is a short sample lap welded with the day's equipment on the day's membrane and then torn apart by hand to see how the weld behaves. Crew 3's routine, which follows what most makers require:
- Make test welds at the start of each work session (morning and after lunch), whenever the weather changes markedly, after any change of setting, nozzle or power source, and when switching to a different membrane or an older sheet.
- Weld a lap at least 300 mm (12 in) long with the planned settings.
- Let it cool fully, around ten minutes.
- Cut strips about 25 mm (1 in) wide across the weld and peel them apart slowly by hand.
- Judge the result, adjust, and repeat until a good weld is made. Write the settings, time and weather on the daily sheet.
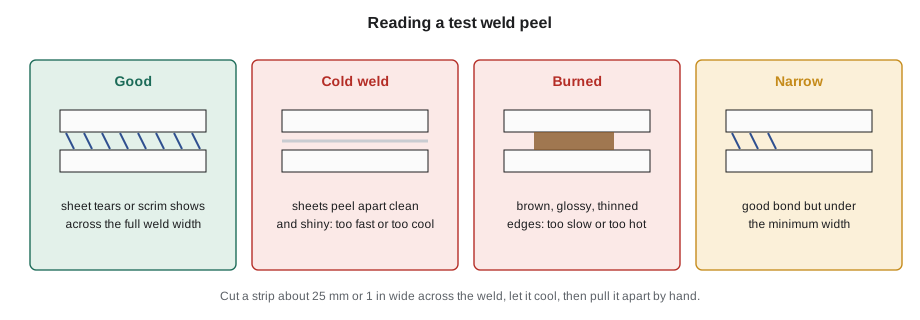
A good weld does not peel apart at the weld line. Instead, the membrane tears beside the weld or the top layer pulls away from the scrim, leaving scrim fibres showing, across the full width of the weld. The welded width must be at least the maker's minimum, typically 38 mm (1-1/2 in).
Worked problem
Judging a test strip
Rory's second test weld, made 25 °C hotter, tore beside the weld with scrim showing, over a width he measured at 32 mm. The maker's minimum is 38 mm. Is the weld acceptable, and what should he change?
Show solution
- The bond is good: the sheet tore rather than the weld peeling.
- The width, 32 mm, is less than 38 mm, so the weld is narrow and not acceptable.
- Narrow welds usually mean the nozzle was not inserted far enough into the lap, or the roller was running off the edge of the nozzle.
Answer: Not acceptable. Keep the heat, insert the nozzle fully and keep the roller tracking just behind the nozzle. His third test weld measured 45 mm wide, and Owen signed the daily sheet.
Preparing the lap
- New, clean membrane can usually be welded as it comes. Any dirt, dust, dew, pollen or footprint on the lap must be cleaned off with the maker's cleaner and a clean, lint-free cloth, then allowed to dry fully. Solvent left in the lap boils in the heat and leaves voids.
- Membrane exposed for more than a day or so, or older sheet, is cleaned whether it looks dirty or not.
- The lap is checked for wrinkles and set flat. A wrinkle in a lap becomes a channel through the weld, called a fishmouth.
- The lap width is checked: wide enough to cover the plates and leave room for the full weld outside them.
Robotic welding
Owen ran the robotic welder on the field seams. The routine:
- Set the heat and speed from the test weld. Let the machine reach temperature.
- Line the machine up on the seam with the nozzle guide at the lap edge, so the nozzle sits fully in the lap and the weld will be outside the plates.
- Insert the nozzle and start the drive at the same moment. Walk with the machine, steering lightly, watching the lap edge and the small bead at the edge of the weld.
- Keep the power cord behind the machine and clear of the seam.
- At the end of the seam, or at an obstruction, pull the nozzle out and stop. Finish the last part by hand.
- Never let the machine stand still with the nozzle in the lap: it will burn through in seconds.
Worked problem
How long to weld the field seams
Redhill has about 1,940 m of field seam. If the robotic welder averages 3 m per minute while welding, and actual welding time is about 60 in 100 of each working day because of setting up, moving cords and stopping at obstructions, how many hours of robot work is that?
Show solution
- Welding time = 1,940 ÷ 3 = 647 minutes = 10.8 hours.
- Working time = 10.8 ÷ 0.60 = 18 hours.
Answer: About 18 hours of robot work, spread over the weeks as the sheets went down. The hand welding at details took far longer.
Hand welding
Hand welding is a skill that takes practice. Owen taught Rory the three-pass method most crews use:
- Tack: spot-weld the top sheet to the bottom one at intervals along the back of the lap, so it cannot move.
- Back weld (pre-weld): weld the back edge of the lap, a narrow strip deep in the lap, so that the hot air in the final pass cannot escape backwards and the lap is closed.
- Final weld: insert the nozzle into the lap at a slight angle so the hot air blows toward the open edge, and move it steadily while the roller follows about 5 mm (1/4 in) behind the nozzle tip, pressing firmly. Watch for a small, even bead of melted material at the edge.
Hand welds are usually made wider than the minimum, often about 50 mm (2 in), because the hand is less steady than the machine. Rory practised on scraps for an hour before Owen let him weld a patch on the roof. His first welds wandered; his tenth was straight.
T-joints and step-offs
Where an end lap crosses a side lap, three thicknesses of membrane meet at a T-joint. The step from two layers to three can leave a tiny channel at the edge of the top sheet that the roller cannot close. Makers handle it in two ways:
- For thinner sheets, round off and press the step with a narrow roller while welding, or bevel the edge of the middle sheet.
- For sheets thicker than 1.14 mm, most makers require a T-joint cover: a round patch of unreinforced membrane welded over the joint.
T-joints are one of the most common places for probes to find voids, and Owen had Rory weld every T-joint cover on the east side that afternoon.
Weather and welding
- Cold: the sheet takes heat away faster, so slower speed or more heat is needed; test welds decide. Cold sheets are also stiffer and harder to lay flat.
- Hot sun: the sheet is already warm, so the same setting can scorch. Re-test after lunch on hot days.
- Wind: cools the nozzle area and the lap. Shield hand welding with a board on windy days.
- Moisture: dew, frost or rain in the lap ruins welds. Laps are dried and cleaned, and welding stops in rain.
- Changing conditions: a cloud passing over on a cool day can change the result. Experienced welders watch the bead at the edge of the weld; when it changes, they stop and check.
Defects
| Defect | What it looks like | Usual cause |
|---|---|---|
| Cold weld | probe enters; sheets peel apart clean | too fast, too cool, poor pressure, dirty lap |
| Burn-through or scorching | brown, glossy, thinned or holed sheet | too slow, too hot, machine left standing |
| Narrow weld | good bond less than the minimum width | nozzle not fully inserted, roller off line |
| Fishmouth | small open tunnel at the lap edge | wrinkle in the lap |
| Void at T-joint | probe enters at the step | step not pressed or no T-joint cover |
| Plate showing through or cut | plate edge pressing through the top sheet | underdriven fastener, plate too close to edge |
Defects are marked with paint as they are found and repaired the same day by re-welding or by welding a patch over them (lesson 11).
Welding safety
- Burns: the nozzle and the air from it can burn skin instantly. Set welders down on their stands, never on the membrane or your leg.
- Fire: hot air can ignite wood, paper, dust and insulation facers, especially if blown into gaps at walls and curbs. Keep the nozzle out of openings, and Ridgecap treats hot-air welding near combustible materials as hot work, with a fire extinguisher at hand and a check of the area at the end of the day.
- Electricity: damaged cords, wet connections and generators without protection can kill. Inspect cords daily.
- Fumes: overheated membrane gives off irritating fumes; scorching is a sign the setting is too hot.
- Lifting and posture: robotic welders are heavy, and hand welding means hours on the knees. Knee pads and rotation help.
By the end of Tuesday, Owen had welded the four seams Rory and Felix had fastened. At 3:30 p.m. he let Rory walk the robot along the last 20 m of a seam, his hand on the steering bar. "Don't steer it," Owen said. "Guide it. And if anything goes wrong, nozzle out first, then think."
Common mistakes
MistakeWelding with yesterday's settings.
InsteadMake and peel a test weld at the start of each session and after any change.
MistakeLetting the robotic welder stand still with the nozzle in the lap.
InsteadNozzle out before stopping, every time.
MistakeWelding over a damp or dirty lap.
InsteadClean with the maker's cleaner, let it dry fully, then weld.
MistakeMaking hand welds no wider than the minimum.
InsteadMake hand welds wider, about 50 mm (2 in), for margin.
MistakeUsing long, thin extension cords.
InsteadUse cords of the gauge and length the welder maker allows; voltage drop cools the weld.
Summary and key terms
- Hot air softens both surfaces and a roller presses them together; heat, time and pressure control the weld.
- Robotic welders do field seams; hand welders do details, short seams, patches and T-joints.
- A steady power supply of adequate size matters; voltage drop cools welds.
- Test welds at each session start and after changes; a good peel tears the sheet or shows scrim across the full weld width.
- Welds must be at least the maker's minimum width, typically 38 mm (1-1/2 in); hand welds are made wider.
- Weather changes settings; cold welds, burns, narrow welds, fishmouths and T-joint voids are the common defects.
- Hot-air welder
- A tool that blows heated air through a nozzle to soften thermoplastic membranes for welding.
- Robotic welder
- A self-propelled welder for long field seams.
- Test weld
- A sample weld made and peeled to check settings before production welding.
- Cold weld
- A weld with too little fusion that peels apart cleanly.
- Fishmouth
- A small open tunnel at a seam edge caused by a wrinkle.
- T-joint cover
- A round patch welded over the joint where an end lap meets a side lap.
- Back weld
- A narrow first weld deep in the lap that closes it before the final weld.
Practice problems
Work each problem on paper first, then reveal the answer to check.
Two hand welders at 1.6 kW and a robot at 5.0 kW: what is the total load?
Show answer
5.0 + 3.2 = 8.2 kW.
A test strip tears beside the weld across 40 mm; the minimum is 38 mm. Acceptable?
Show answer
Yes: a good bond, wider than the minimum.
A test strip peels apart clean and shiny. What does it mean, and what should change?
Show answer
A cold weld: slow down or increase heat, check pressure and cleanliness, then re-test.
How long does 600 m of seam take at 3 m per minute of welding time?
Show answer
200 minutes, about 3.3 hours of welding.
Name two times besides the start of the day when a test weld is made.
Show answer
After lunch; after a setting, nozzle or power change; when the weather changes; on older sheet.
Lesson quiz · 5 questions
Score 60% or more to complete this lesson.
Create a free account to save your progress, take quizzes and earn a certificate.