
ROOF-220 · Lesson 5 of 12 · 24 min
Mechanically attached systems
▶ Video coming soon A video version of this lesson is on the way.
On Tuesday, October 20, Owen told Rory about the twenty-ninth. On September 29, a cool, gusty afternoon, two crew members had unrolled a full field sheet on the north side of the warehouse and gone for more plates before fastening it. A gust got under the free edge, lifted the sheet like a parachute and folded it back on itself across three rows of finished seams. Nobody was hurt and nothing was damaged except the sheet, which had a crease and two scrapes and had to be replaced. But it had taken four people twenty minutes to get the membrane down, and Sabine had stopped the crew for a meeting on the spot. The rule since then was simple: a sheet is fastened as soon as it is positioned, before anyone walks away from it.
Rory spent that Tuesday fastening seams with Felix. This lesson covers mechanically attached single-ply systems: how they work, the fasteners and plates, how the fastening pattern is set by the wind zones, how fasteners are installed and checked, and the variations on the basic system.
How a mechanically attached roof works
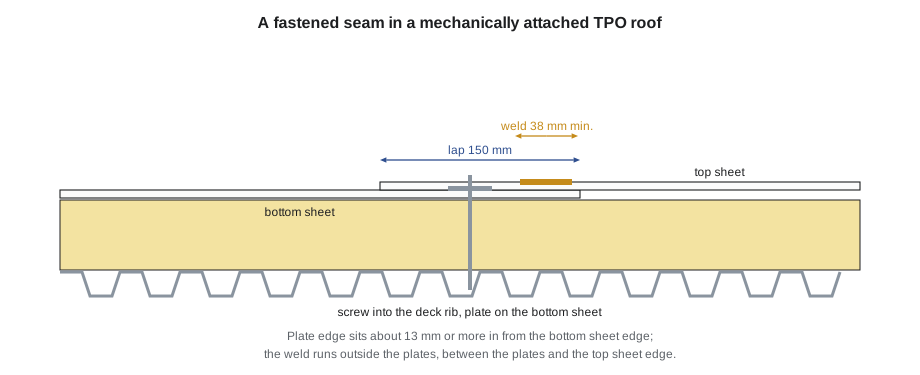
In a mechanically attached system, the membrane is fastened to the deck at intervals, and the membrane between the fasteners is loose. The most common arrangement, called in-seam fastening, works like this:
- Each reinforced sheet is laid with its edge on the line, overlapping the previous sheet's fastened edge.
- The edge of each sheet is fastened through the membrane and insulation into the deck with screws and plates, in a row along the edge, within the lap area.
- The next sheet laps over that row, covering the plates, and is welded to the sheet below along a strip outside the plates.
When wind lifts the roof, the membrane between rows billows up and pulls on the fastener rows. The loads go from the membrane, through its scrim, into the plates, down the screws and into the deck. That is why mechanically attached sheets must be reinforced, why the weld must be outside the plates, and why the fastener spacing and the sheet width together set the strength of the system.
Fasteners and plates
Membrane fasteners are heavy-duty roofing screws with coatings that resist corrosion, sized for the deck type. Plates, often called seam plates or barbed plates, are round or oval steel discs, typically about 50 to 60 mm (2 to 2-3/8 in) across, with small barbs on the underside that grip the membrane. Every system specifies its own screws and plates; they are tested together with the membrane and are part of the warranty.
| Deck | Typical fastener | Notes |
|---|---|---|
| Steel | self-drilling or sharp-point heavy-duty screw | must go through the top flange of the deck a set minimum, often 19 mm (3/4 in) |
| Structural concrete | pre-drilled hole, special concrete screw or drive anchor | drill depth and bit size from the maker |
| Wood plank or plywood | wood-deck screw | set penetration into or through the deck |
| Gypsum, cement-wood fibre, lightweight concrete | special fasteners only | pull-out testing usually required |
Fastener length is chosen to pass through everything above the deck and reach the required penetration into it:
Worked problem
Fastener length at Redhill
Redhill's new roof has two layers of 75 mm polyiso over a steel deck. The fastener must penetrate at least 19 mm through the top flange. Fasteners come in 152 mm, 178 mm and 203 mm lengths. Which length is needed?
Show solution
- Thickness above deck = 75 + 75 = 150 mm, plus about 2 mm of membrane and plate = 152 mm.
- Minimum length = 152 + 19 = 171 mm.
- The 152 mm screw is too short; the 178 mm screw gives 178 − 152 = 26 mm of penetration.
Answer: The 178 mm screw. A fastener that is too long is wasteful and can hit conduit below the deck; one that is too short holds nothing. Where the insulation is tapered, the length changes across the roof, and the crew keeps the lengths sorted by area.
Before fastening into a steel deck, the crew finds out what is underneath. Electrical conduit, sprinkler pipes and gas lines are sometimes run tight under the deck, and a roofing screw through a live cable or a gas line is a serious hazard. On Redhill, Sabine had walked the warehouse floor with the building's maintenance lead in August and marked the areas where services ran under the deck.
Laying out the zones
The design sets three things for each wind zone: sheet width, fastener spacing along the seam, and sometimes extra fastener rows. On Redhill the pattern, taken from the tested assembly the designer chose, was:
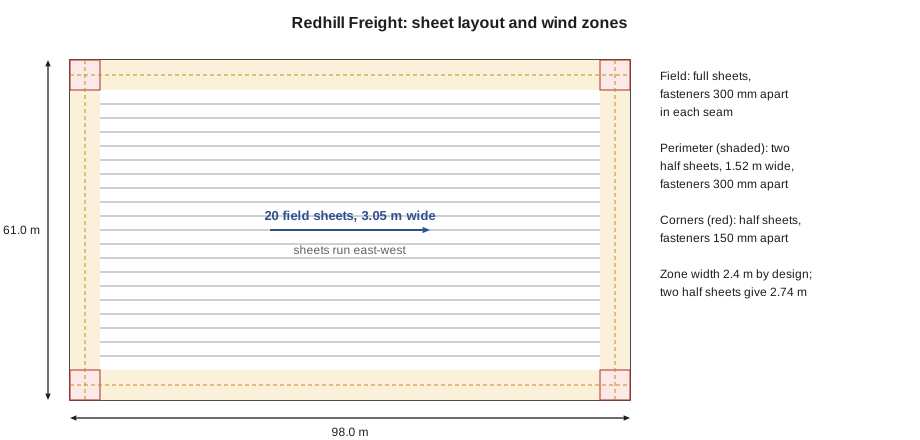
- Field: full sheets 3.05 m (10 ft) wide, fasteners every 300 mm (12 in) in each seam.
- Perimeter: half sheets 1.52 m (5 ft) wide, fasteners every 300 mm (12 in). Narrower sheets put the rows closer together, which roughly doubles the number of fasteners per unit area.
- Corners: half sheets, fasteners every 150 mm (6 in).
- Zone width: 2.4 m (8 ft) by design; two half sheets laid side by side cover 2.74 m (9 ft) net, so the half sheets run around the whole roof two deep.
Fastener density, the number of fasteners per unit of roof area, makes the zones easy to compare:
Worked problem
Fasteners for the warehouse
Redhill's roof is 98.0 m by 61.0 m. The half-sheet band is 2.74 m wide all round. Net sheet widths, after 150 mm laps, are 2.90 m for field sheets and 1.37 m for half sheets. How many membrane fasteners does the roof need?
Show solution
- Field area = (98.0 − 5.48) × (61.0 − 5.48) = 92.52 × 55.52 = 5,136.7 m².
- Band area = 98.0 × 61.0 − 5,136.7 = 5,978 − 5,136.7 = 841.3 m². Corners = 4 × 2.74 × 2.74 = 30.0 m²; perimeter = 841.3 − 30.0 = 811.3 m².
- Densities: field 1 ÷ (2.90 × 0.30) = 1.149 per m²; perimeter 1 ÷ (1.37 × 0.30) = 2.433 per m²; corners 1 ÷ (1.37 × 0.15) = 4.866 per m².
- Fasteners = 5,136.7 × 1.149 + 811.3 × 2.433 + 30.0 × 4.866 = 5,902 + 1,974 + 146 = 8,022.
Answer: About 8,000 fasteners and plates for the membrane alone, before the insulation fasteners and extra fastening at walls and curbs. Glen's estimate added 5 in 100 and rounded up to full boxes.
The perimeter band is only about 14 in 100 of the roof area but takes about a quarter of the fasteners. That is the wind design doing its job.
Installing the fasteners
Felix showed Rory the routine with the screw gun, a heavy-duty drill with a depth-sensing clutch and a long extension so it could be used standing up:
- Snap or follow the fastener line printed on the sheet, set so the plates sit inside the lap with the edge of the plate a set distance, often about 13 mm (1/2 in) or more, from the sheet edge.
- Mark the spacing with a gauge stick or a tape, or use the marks printed on the sheet.
- Set the plate barb side down and drive the screw straight, perpendicular to the deck, until the plate is snug and flat.
- Stop. An overdriven screw dimples the plate, tears the scrim or strips the deck. An underdriven screw leaves the plate loose and standing proud, so the weld above it may be poor and the plate can cut the top sheet.
- On steel decks, drive into the top flanges, not the bottoms of the flutes; check by feel and by looking for the screw tip under the deck where it can be seen.
- Check that each screw has actually engaged. A screw that spins without tightening has missed the flange or stripped; drive another beside it and leave the failed one, or remove it if the maker says to.
Rory's first hundred fasteners went slowly. By noon he had stopped overdriving and Felix had stopped watching.
Pull-out tests
On re-roofs, on decks that are not new steel, or where the deck's condition is in doubt, the designer or maker requires pull-out tests. A sample fastener is installed, and a calibrated pull tester pulls it out, measuring the force at which it lets go. The test procedure is set out in ANSI/SPRI FX-1, a field test for roofing fastener withdrawal resistance that Canadian makers also use. The results tell the designer whether the deck will hold the fasteners at the planned spacing, or whether the spacing must be closer or the fastener changed.
At Redhill, a testing firm pulled 30 fasteners across the roof in early September after the old roof came off, including at the rusty deck areas around two old drains. The results met the maker's minimum everywhere except at one drain, where the deck was replaced.
Worked problem
Load on each fastener
The designer's field-zone design pressure at Redhill is 1.40 kPa (1.40 kN/m²). Each field fastener holds a strip 2.90 m wide by 0.30 m long. What load does each fastener carry at the design pressure?
Show solution
- Tributary area = 2.90 × 0.30 = 0.87 m².
- Load = 1.40 × 0.87 = 1.22 kN.
Answer: About 1.22 kN per fastener. The designer compares this with the tested assembly and the pull-out results, with the required safety factor. In the corners, where the pressure is higher, the halved sheet width and halved spacing cut each fastener's area to a quarter.
Securing the insulation
Under a mechanically attached membrane, the membrane fasteners also help hold the insulation, but the boards still need their own attachment so they do not shift before the membrane goes on and so they stay flat. The maker specifies a minimum number of insulation fasteners per board, often about four to eight per 1.2 m by 2.4 m board for mechanically attached systems, with large flat plates. Adhered systems need many more (lesson 6). At Redhill, the bottom layer of polyiso was laid loose and the top layer fastened through both with eight fasteners per board, joints offset from the layer below by at least 150 mm (6 in).
Perimeter and angle-change securement
Wherever the membrane changes direction, at walls, curbs, the roof edge and around large penetrations, it must be fastened so that the billowing field sheet cannot pull on the flashing. Makers require a row of fasteners, or a fastened bar or securement strip, at the base of every wall and curb and around the perimeter. This is called perimeter or base securement, and the flashing membrane is then welded over it. Rory learned to count those rows as part of the job, not an extra.
Variations
- Induction welding. Special plates with a coated top are fastened to the insulation and deck first, in a grid. The membrane is laid over them, and an induction tool placed on top of each plate heats it so the coating bonds to the underside of the membrane. Magnets hold the spot while it cools. The membrane is attached in the field, not only at the seams, so wider sheets can be used and billowing is reduced.
- Batten strips. Some EPDM and older systems fasten the membrane with continuous metal or plastic batten strips, then cover the strips with a cover strip.
- Fleece-back mechanically attached systems, used over rough recovery surfaces.
- Air retarders. An air barrier at the deck reduces air pressure coming from inside the building, which reduces billowing and the load on the fasteners.
Strengths and limits
Mechanically attached systems are light, fast and work in cold weather, because no adhesives need warm temperatures to cure. They suit large roofs on steel decks, like Redhill. Their limits are billowing, which flexes the membrane at the fastener rows and pumps air under it; the noise of a billowing roof in a storm; the need for a deck that holds fasteners; and fasteners that can conduct heat and condense moisture at their tips in cold climates. Lessons 6 and 7 cover the other two methods.
At the end of Tuesday, Rory and Felix had fastened four field seams 92 m long, about 1,200 fasteners. Owen followed behind with the robotic welder. "You fastened them," he said. "Now I've got to trust them."
Common mistakes
MistakeLeaving a positioned sheet unfastened.
InsteadFasten each sheet edge before walking away; wind will lift it.
MistakeOverdriving or underdriving screws.
InsteadDrive until the plate is snug and flat; stop there.
MistakeUsing the same fastener length across tapered insulation.
InsteadMatch length to the insulation thickness in each area and keep lengths sorted.
MistakeFastening into a steel deck without knowing what is under it.
InsteadLocate conduit, pipes and gas lines below the deck before fastening.
MistakeSpacing fasteners by eye in perimeter and corner zones.
InsteadUse the zone layout and gauge marks; corners and perimeters need the closer spacing.
Summary and key terms
- Mechanically attached sheets are fastened in their laps with screws and plates, and the next sheet is welded over the plates.
- Wind loads go from the membrane through the scrim and plates into the screws and deck.
- Sheet width and fastener spacing set the fastener density; perimeter and corner zones use half sheets and closer spacing.
- Fastener length = everything above the deck + the required penetration; know what is under the deck.
- Pull-out tests check that the deck holds the fasteners.
- Insulation needs its own fasteners, and the membrane is secured at every wall, curb and edge.
- Mechanically attached
- A system in which the membrane is fastened to the deck at intervals and loose between fasteners.
- In-seam fastening
- Fastening each sheet along its edge inside the lap so the next sheet covers the fasteners.
- Seam plate
- A barbed steel plate used under a fastener to grip the membrane.
- Fastener density
- The number of fasteners per unit of roof area.
- Pull-out test
- A field test measuring the force needed to withdraw a fastener from the deck.
- Billowing
- The upward flexing of a mechanically attached membrane between fastener rows in wind.
- Induction welding
- Bonding the membrane to coated plates from above with an induction tool.
Practice problems
Work each problem on paper first, then reveal the answer to check.
Insulation is 100 mm thick on a steel deck, penetration 19 mm. What is the minimum fastener length?
Show answer
100 + about 2 + 19 = 121 mm; use the next standard length up.
Field sheets 2.90 m net, spacing 0.30 m. How many fasteners per square metre?
Show answer
1 ÷ (2.90 × 0.30) = 1.15 per m².
Why are half sheets used in perimeter zones?
Show answer
Narrower sheets put fastener rows closer together, increasing fastener density where uplift is higher.
What does an overdriven screw do?
Show answer
Dimples the plate, tears the scrim or strips the deck.
A design pressure of 2.0 kPa acts on a fastener area of 0.41 m². What is the load?
Show answer
2.0 × 0.41 = 0.82 kN.
Lesson quiz · 5 questions
Score 60% or more to complete this lesson.
Create a free account to save your progress, take quizzes and earn a certificate.