
ROOF-220 · Lesson 11 of 12 · 23 min
Testing seams and inspection
▶ Video coming soon A video version of this lesson is on the way.
Rory was back at the warehouse on Thursday, October 29, for the day the maker's technical representative, Derek Asante, would walk the roof. The consultant, Martin Oyelaran, who had reviewed the Cedarbrook school roof in the summer, would walk it with him. Sabine had the whole crew on the roof at 7:00 a.m. with seam probes, paint markers, a hand welder each and a box of T-joint covers. "Derek's going to find things," she said. "Our job this morning is to make sure he has to look hard."
This lesson covers quality control on single-ply roofs: the daily routine, seam probing, test cuts, records, leak detection methods, inspections by the maker and consultant, the punch list and the warranty.
Quality control is daily, not final
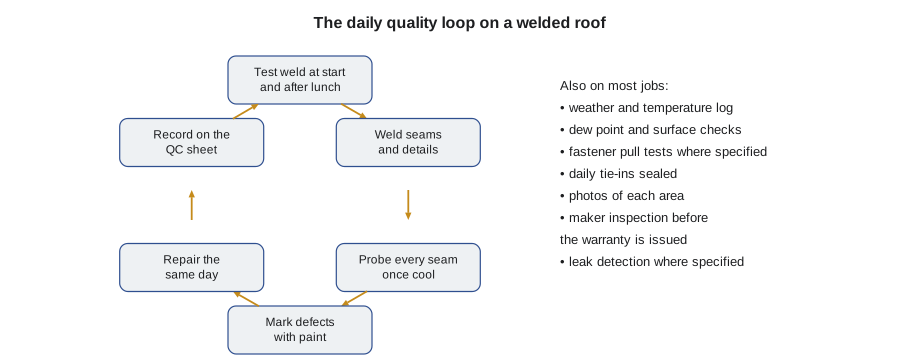
A final inspection can only find what is left. On Redhill, quality control happened every day for seven weeks, and Sabine kept a daily QC sheet in a binder in the trailer:
- Weather: temperature, humidity, wind and conditions at start, midday and end, and any stoppage.
- Test welds: time, welder, settings and result, signed by the person who peeled it.
- Area completed: which sheets were laid, fastened and welded, marked on a roof plan.
- Fastener checks: spot checks of spacing and length in each zone, and the screw lengths in use.
- Probing: which seams were probed and by whom, how many defects were found and when they were repaired.
- Daily tie-ins: where the day's work ended and how it was sealed.
- Photos: each area before covering, especially insulation, fastening patterns and details that will be hidden.
- Problems and changes: anything that differed from the drawings, and who approved it.
"If it's not written down, it didn't happen," Sabine said, "and if something goes wrong in year twelve, this binder is what the lawyers will read."
Probing seams
Every welded seam on a thermoplastic roof is probed once it has cooled, usually at least half an hour after welding. Probing warm seams can open welds that would have been fine once cool. The probe is a steel tool with a blunt, rounded hooked tip. The method:
- Hold the probe at a low angle with the tip against the edge of the top sheet.
- Draw it along the seam edge with firm, steady pressure, pushing into the edge of the lap, not down into the bottom sheet.
- Feel for any place where the tip slips into the lap. On a good weld the tip slides along the edge and cannot enter.
- Mark any entry with a paint marker on both sides of the void.
- Pay extra attention to T-joints, the ends of seams, corners, patches and places where seams cross insulation joints or fasteners.
Rory probed the east half of the south perimeter that morning, about 400 m of seam, on his knees with a foam pad. He found two voids, both at T-joints where the cover patch had not been rolled into the step, and one short cold section at the end of a robot seam near a curb, where the machine had been stopped and the weld finished by hand.
Worked problem
How long probing takes
A careful probe moves about 10 m per minute along a field seam, but corners, T-joints and details take longer, so crews plan on an average of 5 m per minute overall. How long does it take to probe Redhill's 1,940 m of field seam and about 1,100 m of perimeter seams, flashing laps and details?
Show solution
- Total = 1,940 + 1,100 = 3,040 m.
- Time = 3,040 ÷ 5 = 608 minutes, about 10.1 hours.
Answer: About ten person-hours for one complete probe of the roof, on top of the probing done daily as the seams were made. Sabine split the final probe among four people on the morning of the inspection.
Hold points during the job
Some things cannot be inspected once they are covered, so the specification sets hold points: stages at which work stops until the consultant or maker has seen it. On Redhill they were:
- The bare deck after tear-off, including the repairs at the old drains, before any insulation went down.
- The first area of insulation with its fastening pattern, before membrane covered it.
- The first area of membrane with fastening and welds, as a sample of the standard expected for the rest of the roof.
- The first example of each kind of detail: a parapet, a curb, a pipe boot, a drain and the coated metal edge.
Getting the first example of each approved early means that a mistake is made once, not three hundred times. Sabine phoned Martin a day ahead for each hold point and kept a note in the QC binder of who looked at what and when.
Test cuts
Test cuts, or seam samples, check that production welds are as good as test welds. A strip about 25 mm (1 in) wide is cut across a finished seam, at locations chosen by the inspector or set by the specification, and peeled apart. The hole left behind is patched with a welded patch extending past the cut on all sides. Makers and specifications differ on how many cuts they want; some want a few per day, some only when probing finds a problem. Too many cuts weaken the roof with patches, so they are taken where they tell the most.
On adhered roofs, adhesion tests check the bond between the membrane and the substrate: a strip of membrane is cut and pulled back, and the inspector looks at whether the adhesive failed, the substrate facer tore, or the membrane let go. On EPDM tape seams, a small seam sample may be cut and peeled to check the tape bonded to both sheets.
Tie-ins and night seals
At the end of each day on a re-roof, wherever new roof meets old roof or open insulation, the edge must be sealed so rain overnight cannot get under the new work. On Redhill, the crew sealed each day's edge with a strip of membrane fastened and adhered to the deck below, cut away the next morning before work continued. Water that gets into new insulation through an open tie-in is trapped there under a new membrane, and it shows up later as blisters, ponding and wet ceilings.
Leak detection methods
Several methods can check a finished membrane for holes. Which one, if any, is used depends on the specification:
| Method | How it works | Notes |
|---|---|---|
| Low-voltage electronic leak detection | water on the membrane, a voltage between the wet surface and the conductive deck or layer below, and sensors find where current passes through a hole | needs a conductive layer under the membrane; follows ASTM D7877 |
| High-voltage spark testing | a brush or broom charged with high voltage is swept over a dry membrane; a spark jumps where there is a hole | needs a conductive layer below; dry surface; ASTM D7877 |
| Infrared thermography | an infrared camera at night finds wet insulation, which holds heat longer | finds wet areas, not small holes in new roofs |
| Flood testing | water is held on a section of roof for a period | only with the designer's approval; adds heavy load; rare on roofs |
| Vacuum box | a box with a clear top and soapy water over a seam; bubbles show leaks | used for spot checks of seams |
Electronic methods only work if something below the membrane conducts electricity. Insulation does not, so where electronic leak detection is specified over insulation, a conductive primer or a conductive scrim is installed under the membrane during construction. Redhill's specification did not call for electronic testing; the consultant relied on probing, test cuts and his own walk-over.
The maker's inspection
Before the maker issues a warranty, its technical representative inspects the finished roof. Derek arrived at 10:00 a.m. with the warranty application, the shop drawings and a probe of his own. He and Martin walked every curb, corner, drain and edge, probed seams at random across the field and probed every T-joint he passed. He checked:
- That the membrane, insulation, fasteners and accessories were the ones in the warranty application.
- Fastener spacing in the perimeter and corners, by feeling the plates through the top sheet along the laps and measuring between them, and comparing with the drawings and the QC photos.
- Flashing heights, terminations and the coping fastening.
- Welds at details, T-joint covers and pre-molded corners.
- Drain clamping rings and sealant.
- Pipe boot clamps and sealant.
- Walkway pads and protection at rooftop units.
- Housekeeping: no loose fasteners, cut-offs or debris left on the roof.
His punch list, handed to Sabine at 12:30 p.m., had eleven items:
| No. | Item | Fix |
|---|---|---|
| 1 to 3 | probe voids at three T-joints in the northwest perimeter | clean, re-weld, add T-joint covers |
| 4 | pipe boot clamp loose on a 100 mm vent | tighten clamp, add sealant at top |
| 5 | scorched area about 50 mm (2 in) long beside a skylight curb weld | weld a patch over it |
| 6 | termination bar sealant missing over 0.5 m (20 in) at the north parapet | clean and apply sealant |
| 7 | two plates felt standing proud in a perimeter lap | cut, re-drive, patch |
| 8 | walkway gap missing at one rooftop unit; pads touching | cut a drainage gap |
| 9 | loose cut-offs and screws near the west parapet | sweep and remove |
| 10 | coated metal joint cover not welded at one end | weld and probe |
| 11 | drain dome missing at drain 4 | install dome |
"Eleven on a roof this size is good," Derek told Sabine. "I've seen forty." The crew had every item fixed and probed by 2:15 p.m., and Derek checked each one, initialled the list and said he would submit the warranty application that day.
Worked problem
Patching a scorched area
The scorched area beside the skylight curb is 50 mm long and 15 mm wide. The maker's patch must extend at least 50 mm past the damage on every side and have rounded corners. What is the smallest patch?
Show solution
- Length = 50 + 2 × 50 = 150 mm.
- Width = 15 + 2 × 50 = 115 mm.
- Owen cut a patch 150 mm by 150 mm from unreinforced flashing, corners rounded.
Answer: At least 150 mm by 115 mm (6 in by 4-5/8 in); a square patch was easier to cut and weld. The scorch had happened when a hand welder was set down on the membrane during a phone call. Owen made the welder stands a rule again at the next toolbox talk.
The consultant's role
Martin, working for the owner, had visited Redhill weekly during the job, checked the deck repairs, the insulation, the fastening and a sample of welds, and written a short field report after each visit. At the final inspection he looked for the same things as Derek, but his question was different: not whether the maker would warrant the roof, but whether the owner had received what the contract and specification required. He asked for the QC binder, the pull-test results, the product delivery slips, and photos of the insulation fastening in the areas he had not seen.
Warranties
Single-ply membrane makers offer several kinds of warranty:
- Material-only warranties, which cover defects in the membrane itself.
- System or no-dollar-limit (NDL) warranties, which cover leaks caused by defects in the materials or workmanship of the roofing system, for a set term such as 15, 20 or 30 years, often with conditions on maintenance.
- Wind speed warranties, which cover damage up to a stated wind speed, for an extra fee and stricter fastening.
The contractor also gives a workmanship warranty, often two years. Warranties are voided by unauthorized alterations, such as another trade cutting into the roof to add equipment without the maker's approval, and by lack of maintenance. Redhill's warranty was a 20-year system warranty, issued the week after the inspection, with a requirement for inspections every year and after severe storms.
After the inspection: owner's manual
At closeout, the owner receives the warranty, the as-built roof plan, product data, the maker's care and maintenance guide, a list of approved repair contractors and a contact for warranty claims. Sabine added a one-page note for Lena: keep other trades on the walkway pads, call Ridgecap before anyone cuts the roof for new equipment, keep the drains clear, and have the roof inspected each spring and fall.
Common mistakes
MistakeProbing seams while they are still warm.
InsteadWait until welds cool, usually at least half an hour, then probe.
MistakeProbing only the field seams.
InsteadProbe every seam, T-joint, patch, corner and detail; details hold most of the defects.
MistakeLeaving the day's work unsealed at a tie-in.
InsteadSeal every tie-in at the end of the day.
MistakeTaking many test cuts to be safe.
InsteadTake cuts where they tell the most and patch each properly; too many weaken the roof.
MistakeTreating the maker's inspection as the first check.
InsteadRun QC every day; the final inspection should find little.
Summary and key terms
- Quality control is a daily routine: weather, test welds, areas completed, fastener checks, probing, tie-ins, photos and changes, all recorded.
- Probe every welded seam once cool, with firm pressure along the lap edge; mark and repair voids the same day.
- Test cuts and adhesion tests check production work; each cut is patched.
- Electronic leak detection needs a conductive layer below the membrane; other methods include infrared, vacuum box and, rarely, flood tests.
- The maker inspects before issuing a warranty; the consultant checks the work against the contract.
- Warranties have terms and conditions; alterations without approval and poor maintenance can void them.
- Seam probe
- A blunt hooked steel tool drawn along a welded seam edge to find voids.
- Test cut
- A strip cut across a finished seam and peeled to check the weld.
- Tie-in
- The sealed edge where the day's new roofing meets old roofing or open work.
- Punch list
- A list of items to be fixed before a job is accepted.
- Electronic leak detection
- Methods that use electric current to locate holes in a membrane.
- NDL warranty
- A no-dollar-limit system warranty covering leaks from materials and workmanship.
- QC sheet
- A daily record of weather, tests, work completed, inspections and repairs.
Practice problems
Work each problem on paper first, then reveal the answer to check.
Why are welds not probed while still warm?
Show answer
Probing warm welds can open bonds that would be sound once cool.
At 5 m per minute, how long does it take to probe 1,500 m of seam?
Show answer
300 minutes, 5 hours.
What must be under a membrane for electronic leak detection to work?
Show answer
A conductive layer, such as a conductive deck, primer or scrim.
A scorch is 40 mm by 10 mm; patches extend 50 mm past damage. Smallest patch?
Show answer
140 mm by 110 mm, corners rounded.
Name three things recorded on a daily QC sheet.
Show answer
Weather; test welds and settings; areas completed; probing results; tie-ins; photos; changes.
Lesson quiz · 5 questions
Score 60% or more to complete this lesson.
Create a free account to save your progress, take quizzes and earn a certificate.