
ROOF-210 · Lesson 8 of 12 · 25 min
Base sheets and securement
▶ Video coming soon A video version of this lesson is on the way.
On Thursday, November 12, while the torch crew finished the Carrick Street field, Dana sent Rory and Priya Natt, a journeyperson on Crew 2, to the Westlane Veterinary Clinic, where a general contractor had just finished the steel deck on a small one-storey addition. The building had to be closed in before winter so the interior trades could work. The roof would be finished in the spring, but for the next five months it would have to keep out rain, snow and wind with only part of the system in place. "So the base sheet goes on like it's the roof," Priya said, "because until April, it is."
The base sheet is the first ply of a multi-ply bituminous roof. This lesson covers what base sheets do, the ways they and the layers under them are attached, how wind uplift decides the attachment pattern, and how to work out fastener quantities and lengths.
What a base sheet does
- It is the first waterproofing layer: with the cap sheet it makes a two-ply membrane, and it keeps the building dry if the cap is damaged.
- It gives the cap a clean, uniform surface to bond to.
- On a mechanically attached system, it is the layer that is fastened, and it holds everything below it down against wind.
- It can act as a temporary roof between the dry-in and the finish, as at Westlane.
- A venting base sheet, with granules or channels on its underside and only partial attachment, lets vapour from a damp deck move sideways to vents instead of lifting the membrane in blisters.
- On a wood deck, a base sheet nailed first separates the membrane from the wood, which moves, and from the joints between boards or panels.
Attachment methods
| Method | How the base sheet is held | Typical use |
|---|---|---|
| Mechanically fastened | screws and plates or nails with caps through the sheet laps and field into the deck | steel and wood decks; over insulation with long fasteners; temporary roofs |
| Fully adhered: hot | mopped in hot asphalt over a cover board or insulation that is itself attached | built-up and SBS systems where hot work is allowed |
| Fully adhered: cold | set in cold adhesive | odour-sensitive and flameless jobs |
| Fully adhered: torch | torched to a primed concrete deck or an approved non-combustible cover board | concrete decks, some recovers |
| Self-adhered | pressure-sensitive adhesive on a primed cover board | flameless jobs, Carrick Street |
| Partially attached | spot- or strip-mopped, or fastened only at laps, often a venting base sheet | damp or uneven decks, lightweight concrete |
Every layer under the membrane must be attached to the one below it, or the roof is only as strong as its weakest bond. Insulation and cover boards are held with fasteners and plates, hot asphalt, low-rise foam adhesive or cold adhesive; ROOF-310 deals with them in detail. The rule for this course: before a base sheet is laid, the crew must know what holds each layer below it and must have seen that it was done.
Wind uplift
ROOF-120 explained how wind flowing over a roof creates suction that tries to lift the membrane, and that the suction is greatest at the corners, next highest along the perimeter and lowest in the middle of the roof, the field. Every low-slope system is designed to resist a calculated uplift pressure in each of those zones.
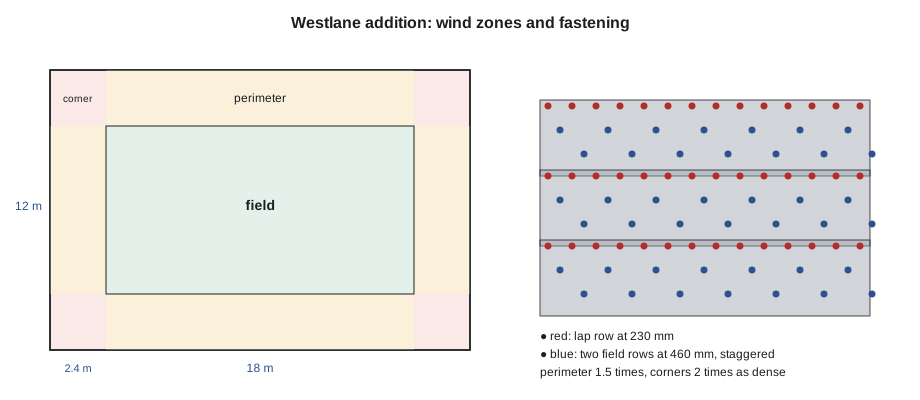
In Canada, the National Building Code and the Ontario Building Code point to CSA A123.21 for testing the wind uplift resistance of membrane roof systems. The system's tested resistance must meet the wind load calculated for the building, its height, its exposure and each roof zone. Many specifications also name a system listed by a testing organization or the manufacturer. The designer does the calculation; the roofer's job is to install exactly the tested pattern: the fastener type, plate, spacing, rows and zone widths, with nothing skipped.
Zone widths depend on the building's height and size and on the code edition, so they come from the drawings or the specification, not from habit. On the Westlane drawings, the perimeter zone was 2.4 m (8 ft) wide, and the corners were 2.4 m by 2.4 m squares.
Mechanically fastened base sheets
On a wood deck, base sheets are nailed with roofing nails through metal or plastic caps, or with screws and plates. On a steel deck, they are fastened with roofing screws and plates, either directly to the deck or through the insulation. A common pattern for a lap-fastened base sheet, and the one specified at Westlane for the field, is:
- One row of fasteners in the side lap, at 230 mm (9 in) centres, placed so the next sheet's lap covers them.
- Two rows down the field of each sheet, at 460 mm (18 in) centres, staggered, roughly one third and two thirds of the way across.
- Closer spacing in the perimeter and corners, as the specification shows: at Westlane, one and a half times as many fasteners per square metre in the perimeter and twice as many in the corners.
Fasteners must be the type in the tested system, driven straight, with the plate seated flat and snug. A plate driven crooked or crushed into the board loses holding power; one left loose lets the sheet flutter and the fastener back out. On steel decks, screws go into the top flanges of the deck, never into the flutes, and must penetrate the deck by at least 19 mm (3/4 in).
Worked problem
Fasteners per unit area
A base sheet is 1.0 m wide with a 75 mm side lap. It is fastened with one lap row at 230 mm and two field rows at 460 mm. How many fasteners per square metre of roof?
Show solution
- Per metre of sheet length: lap row 1 ÷ 0.23 = 4.35; two field rows 2 × (1 ÷ 0.46) = 4.35; total 8.70.
- Each metre of sheet covers 0.925 m × 1 m = 0.925 m² net.
- Fasteners per m² = 8.70 ÷ 0.925 = 9.4.
Answer: About 9.4 fasteners per square metre in the field.
Worked problem
Fasteners for the Westlane addition
The Westlane roof is 18.0 m by 12.0 m, with a 2.4 m perimeter zone and 2.4 m by 2.4 m corners. Field density is 9.4 per m², perimeter 1.5 times that and corners 2 times. Add 5 per cent. How many fasteners and plates?
Show solution
- Corners = 4 × 2.4 × 2.4 = 23.0 m².
- Perimeter strips = 2 × (18.0 − 4.8) × 2.4 + 2 × (12.0 − 4.8) × 2.4 = 63.4 + 34.6 = 97.9 m².
- Field = 216 − 23.0 − 97.9 = 95.0 m² (the whole roof is 18.0 × 12.0 = 216 m²).
- Field: 95.0 × 9.4 = 893. Perimeter: 97.9 × 14.1 = 1,381. Corners: 23.0 × 18.8 = 433.
- Total = 893 + 1,381 + 433 = 2,707; with 5 per cent, 2,842.
Answer: About 2,850 fasteners and plates. They come in boxes of 500, so Priya orders six boxes of each.
Look at how much of the total comes from the edges: on this small roof, the perimeter and corners are a little over half the area but need about two thirds of the fasteners. On a small building, nearly all of the roof is edge.
Fastener length
A fastener through insulation must be long enough to pass through every layer and still bite into the deck by the required amount, but not so long that it hits whatever is under the deck.
Worked problem
Choosing the screw length
At Westlane, the layers over the steel deck are 100 mm of polyiso and a 13 mm gypsum cover board, with the base sheet about 3 mm thick. The screw must go at least 19 mm through the top of the deck. Screws are stocked in 127 mm and 152 mm lengths. Which length?
Show solution
- Layers = 100 + 13 + 3 = 116 mm.
- Minimum length = 116 + 19 = 135 mm.
- The 127 mm screw is too short; the 152 mm screw goes 152 − 116 = 36 mm below the top of the deck.
Answer: Use the 152 mm screw. Its tip ends 36 mm below the top of the deck, still above the bottom of the deck flute, which on this deck is 38 mm deep.
Before driving a single screw
Before the crew fastened anything at Westlane, Priya went inside with the site superintendent and looked up at the underside of the deck. Electrical conduit, sprinkler pipe and gas lines are sometimes run tight under steel decks, and a roofing screw driven into a live conduit is an electrical hazard and a fire risk; one driven into a sprinkler or gas line is a flood or a leak. The rules:
- Ask the general contractor or owner what is under the deck, and look before fastening.
- Where services run close under the deck, mark them on the roof surface and keep fasteners clear, or have the services moved, as the specification and the general contractor decide.
- Never try a longer fastener to "get a better bite" without checking what is below.
- If a fastener goes in and something feels wrong, such as no resistance, a jolt or water, stop and report it.
O. Reg. 213/91 also requires that a worker be protected from contact with energized electrical equipment; on a new building the electrical contractor may not have energized anything yet, but an addition attached to an operating clinic may have live circuits from day one.
Pull-out tests
On recover jobs, old decks and some new ones, the specification calls for pull-out tests before fastening starts. A test fastener is driven into the deck and pulled with a calibrated gauge to find the force it holds before failing (ROOF-120, lesson 10). The results tell the designer whether the planned pattern will work or more fasteners are needed. The roofer installs the test fasteners where the specification says, in a grid and at suspect areas such as near drains and old leaks, and records each result with its location.
Laying a mechanically fastened base sheet
- Check the layers below are attached and that the surface is dry, clean and flat.
- Start at the low edge; lay the first sheet on a chalk line, square to the drain line.
- Fasten the lap edge at the specified spacing on a line about 25 to 50 mm (1 to 2 in) in from the edge, so the next sheet's lap covers the fasteners fully.
- Fasten the field rows at the specified spacing.
- Lap the next sheet over the fasteners, and seal the lap by the system's method: heat-welded, adhered, or self-adhered selvage.
- Change the pattern at each zone line exactly where the drawing shows it, and mark the zone lines on the roof with chalk before starting.
- Close the day with water cut-offs, and before winter, inspect every lap and edge of a base sheet that will serve as a temporary roof.
By Friday noon the Westlane addition was dry, with its base sheet sealed to the new parapet blocking and the joint at the old building covered with a temporary self-adhered strip. Priya photographed every zone with its fastener pattern for the warranty file. "In April," she told Rory, "somebody will ask how this was fastened. These pictures are the answer."
Attaching insulation in brief
ROOF-310 covers insulation in detail, but the base sheet can only be as secure as the boards below it. The common methods:
- Mechanical fasteners and plates, in a pattern set by the tested system for each board size and zone.
- Low-rise foam adhesive in beads at a set spacing, closer in the perimeter and corners, with boards walked in or weighted while the foam sets.
- Hot asphalt mopping, on systems where hot work is used.
- Cold adhesive, where the maker lists it.
Whatever the method, boards are laid with staggered joints, tight together, with no gaps over 6 mm (1/4 in) filled with scrap; layers are offset so joints do not line up; and only as much insulation is laid each day as can be covered with the base or a temporary membrane.
Leaving a base sheet as a winter roof
Priya's checklist before Westlane was left for the winter: every lap probed; every fastener covered; edges and the joint with the old building sealed; drains open and their temporary strainers in; no loose materials left on the roof; and an agreement with the general contractor that the interior trades would not use the roof as a storage platform or walkway. A base sheet is tough, but it is not a finished roof, and a winter of traffic and snow shovels can puncture it.
Common mistakes
MistakeUsing the field fastener pattern everywhere.
InsteadChange to the denser perimeter and corner patterns exactly at the zone lines shown on the drawings.
MistakeDriving screws into the deck flutes.
InsteadFasten into the top flanges of a steel deck, with the specified penetration.
MistakeFastening without checking what is under the deck.
InsteadLook under the deck and keep fasteners clear of conduit, sprinkler and gas lines.
MistakeCrushing plates into the board.
InsteadDrive fasteners straight and seat plates flat and snug.
MistakeLeaving lap fasteners exposed.
InsteadPlace the lap row so the next sheet's lap covers every fastener.
Summary and key terms
- The base sheet is the first ply, a surface for the cap and, on fastened systems, what holds the roof down.
- Base sheets are mechanically fastened, fully adhered (hot, cold, torch or self-adhered) or partially attached.
- Wind suction is highest at corners, then perimeters, then the field; the tested pattern for each zone must be installed exactly.
- Work out fasteners per unit area from the row spacing and net sheet width, then by zone.
- Fasteners must pass all layers and penetrate the deck by the required amount without hitting services below.
- Pull-out tests and photographs record how the roof was secured.
- Base sheet
- The first ply of a multi-ply bituminous roof.
- Securement
- The way a roof membrane and its layers are held to the deck against wind and movement.
- Field, perimeter and corner zones
- Areas of a roof with increasing wind uplift, each with its own attachment pattern.
- Lap fastening
- Fastening a sheet along its side lap so the next sheet covers the fasteners.
- Plate
- A metal or plastic disc under a fastener head that spreads its hold over the sheet or board.
- Pull-out test
- A test of the force a fastener can hold in the deck before it pulls out.
- Venting base sheet
- A base sheet with a textured underside that lets vapour move sideways to vents.
Practice problems
Work each problem on paper first, then reveal the answer to check.
A base sheet with 0.925 m net width has a lap row at 300 mm and one field row at 300 mm. How many fasteners per m²?
Show answer
Per metre: 1 ÷ 0.3 + 1 ÷ 0.3 = 6.67; 6.67 ÷ 0.925 = 7.2 per m².
Insulation 75 mm, cover board 13 mm and base 3 mm sit over a steel deck. What is the shortest screw that penetrates 19 mm?
Show answer
75 + 13 + 3 + 19 = 110 mm.
Why are corners fastened more densely than the field?
Show answer
Wind suction is highest at the corners.
What should be done before fastening into a steel deck over an occupied building?
Show answer
Check underneath for conduit, pipes and other services and keep fasteners clear.
Where do the perimeter and corner zone widths come from?
Show answer
The drawings or specification, based on the wind design.
Lesson quiz · 5 questions
Score 60% or more to complete this lesson.
Create a free account to save your progress, take quizzes and earn a certificate.