
ROOF-130 · Lesson 8 of 12 · 27 min
Laying shingles and nailing patterns
▶ Video coming soon A video version of this lesson is on the way.
Rory had nailed off underlayment, drip edge and starter, but on the second morning at 19 Linden Wes finally handed him the coil nailer for field shingles. Before he let Rory fire it, Wes tore one shingle off the course Rory's training partner had laid the day before and held it up. Four clean nail holes, each through the double band of the laminate, each sitting just above the top edge of the shingle below. "Every nail in that zone, flush, straight," Wes said. "Four hundred thousand nails a season on this crew. Get one wrong a thousand times and that's a roof in a storm."
This lesson covers laying out a shingle roof with chalk lines, choosing and following an offset pattern, the rules for nails and their placement, the six-nail pattern and steep-slope rules, nail guns, and the checks that show a roof was nailed right.
Layout before laying
Shingles follow lines, not the eave. Eaves are rarely perfectly straight, and courses that follow a wavy eave get worse with every course. Crew 5 sets out each slope with chalk lines:
- A starter line along the eave, set from the drip edge for the right overhang (lesson 6).
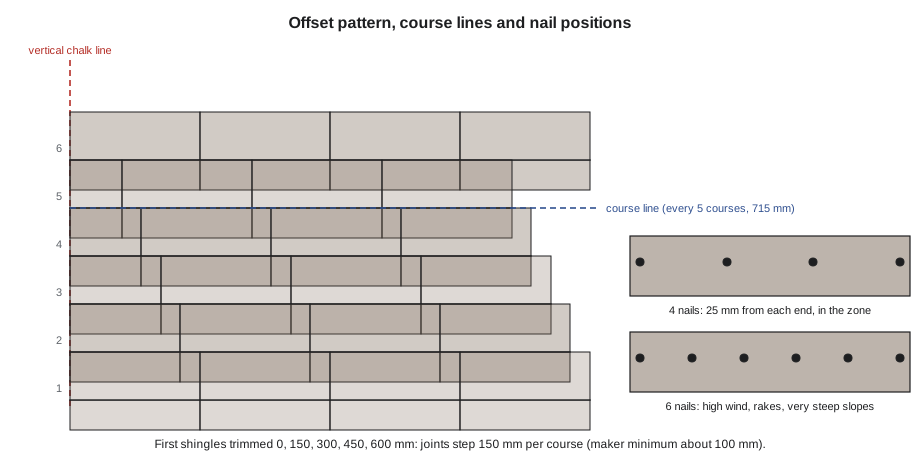
- Horizontal course lines every few courses, measured up the slope from the starter line at both ends of the slope, so each line is parallel to the ridge. Ridgecap snaps one every 5 courses, at 5 × 143 = 715 mm (5 × 5-5/8 = 28-1/8 in) intervals.
- Vertical lines for the offset pattern, square to the eave, near the middle of the slope or at a rake. On long slopes, starting in the middle lets the crew work both ways and finish with similar cuts at both rakes.
- A check at the ridge: measure from the last course line to the ridge on both ends. If the two figures differ, adjust a few courses slightly before reaching the top.
The horizontal lines are measured from the bottom edge of the starter course, which is also the bottom edge of the first course. Course 5's bottom edge sits on the first line, course 10's on the second, and so on.
Offset patterns
Each course is shifted sideways from the one below, so the joints between shingles (and on three-tab shingles, the slots between tabs) never line up from course to course. Water running down a joint lands on solid shingle below instead of finding another joint.
- Three-tab shingles need precise offsets because their slots are in a regular line: usually half a tab or a third of a tab, which is why the old 6-inch and 5-inch patterns are named for their offset.
- Laminated shingles look random, but they still have rules. Most manufacturers require joints in adjacent courses to be at least about 100 mm (4 in) apart, and some forbid joints from lining up two courses apart. The wrapper shows the approved pattern.
- Racking, laying shingles straight up the slope in a column with each course trimmed the same, is allowed by some makers and forbidden by others, because the installer may skip nails under the shingle above. Ridgecap lays shingles in a diagonal, stair-step pattern, which keeps all four nails of each shingle visible as it is laid.
Worked problem
Where the joints fall
Rory starts each course at a vertical chalk line, trimming the first shingle by 0, 150, 300, 450 and 600 mm on courses 1 to 5, then starting again. The shingles are 1,000 mm long. Where are the first joints in each course, measured from the chalk line, and are adjacent joints at least 100 mm apart?
Show solution
- Course 1: full shingle, joint at 1,000 mm.
- Course 2: first piece 850 mm, joint at 850 mm.
- Course 3: 700 mm. Course 4: 550 mm. Course 5: 400 mm.
- Adjacent courses differ by 150 mm, which is more than 100 mm.
- Course 6 starts again at 1,000 mm, 600 mm from course 5's joint at 400 mm.
Answer: Every pair of adjacent courses is 150 mm apart or more, so the pattern meets the 100 mm rule. The offcuts (150, 300, 450 and 600 mm) are used at the far rake, which keeps waste down.
Nails: the rules
ROOF-120 introduced shingle nails. The requirements for the nails themselves:
- The Ontario Building Code calls for corrosion-resistant roofing nails with heads at least 9.5 mm across and shanks at least 2.95 mm thick, long enough to go 12 mm into the deck or right through it.
- Galvanized steel roofing nails are standard. Bright (uncoated) nails rust and stain; staples are allowed in some codes but forbidden by most shingle warranties, and Ridgecap never uses them.
- Length: long enough for the deck, plus the shingle thickness at the nail line, plus the underlayment. Caps and courses over flashings need longer nails.
Worked problem
Is the nail long enough?
The deck is 15.5 mm panel. At the nail line, the nail passes through about 10 mm of shingle (the double common bond and the top of the shingle below) and 1 mm of underlay. Is a 32 mm (1-1/4 in) coil nail long enough?
Show solution
- Length left after the shingles and underlay = 32 − 10 − 1 = 21 mm.
- The deck is 15.5 mm thick, so 21 mm goes right through it, with 21 − 15.5 = 5.5 mm sticking out below.
- The code asks for 12 mm into the deck or right through it; the nail goes right through.
Answer: Yes. A 32 mm nail passes through the 15.5 mm deck. On a 19 mm board deck the same nail would only just pass through (21 mm against 19 mm); for caps, use 44 mm (1-3/4 in) nails.
Where the nails go
On every shingle, the nails must be:
- In the nailing zone printed or marked on the shingle: on laminated shingles, through the double-thick common bond area, so each nail holds both layers and also catches the top edge of the shingle in the course below.
- Below the sealant strip of the course above, so the nail heads are covered by the next course. Nails above the zone (high nailing) miss the course below, and the shingle is held by half the nails it should have.
- About 25 mm (1 in) in from each end, with the others spread evenly or placed where the wrapper shows.
- Never in the exposed part of the shingle, except where the instructions call for it at caps and rake edges.
- Never through the factory sealant strip, which would stop it bonding.
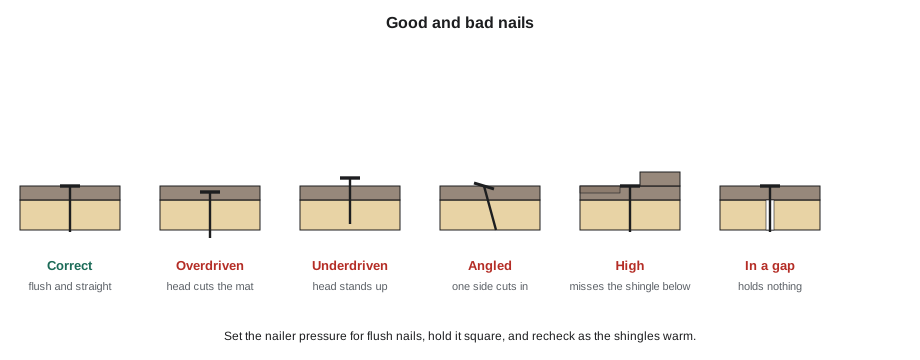
| Nail fault | What goes wrong | Fix |
|---|---|---|
| Overdriven | the head cuts into the mat; the shingle tears off in wind | lower the nailer pressure; add a correct nail beside it and seal the bad one |
| Underdriven | the head stands up and pushes through the shingle above, or stops it sealing | tap it down flush; lower the gun angle or raise pressure |
| Angled | one side of the head cuts in, the other stands up | hold the nailer square to the deck |
| High (above the zone) | misses the shingle below; holding power is halved | add nails in the zone |
| Low (in the exposure) | nail shows or is just under the next course's edge; leaks | remove; seal the hole; renail in the zone |
| In a deck gap or knot | holds nothing | add a nail beside it in sound wood |
Four nails or six?
The standard pattern on most laminated shingles is four nails per shingle. Six nails, or the maker's high-wind pattern, are used where:
- The maker requires them for a higher wind warranty.
- The local design wind speed is high enough that the instructions or code call for them.
- The slope is very steep, usually above about 21 in 12 (60 degrees), as on mansards, where the shingles hang more than they lie. Most makers also require spots of asphalt roofing cement under each tab or shingle on such slopes.
Ridgecap uses six nails on all rake shingles, on any exposed roof such as a house on the brow of the Escarpment, and wherever the owner buys the maker's top wind warranty.
Worked problem
Nails for the Elmcrest bungalow
The Elmcrest bungalow needs 16.5 squares of field shingles at 65 shingles per square. Wes uses four nails in the field and six on the first two courses at the eaves (about 1.4 squares of the roof). One box holds 7,200 nails. How many nails are needed, and how many boxes?
Show solution
- Field squares at four nails = 16.5 − 1.4 = 15.1 squares; nails = 15.1 × 65 × 4 = 3,926.
- Eave squares at six nails = 1.4 × 65 × 6 = 546.
- Total = 3,926 + 546 = 4,472 nails.
- Boxes = 4,472 ÷ 7,200 = 0.62, so 1 box for the field. Caps and starter take more, and a second box goes on the truck.
Answer: About 4,500 nails, so one box, with a second on the truck for the starter, caps and spares.
Laying a course
Crew 5's routine for each course:
- Place the shingle with its bottom edge on the course line (or butted to the course below at the right exposure), its end tight against the previous shingle without forcing it.
- Nail the end nearest the last shingle first, then work across, so the shingle lies flat with no buckle.
- Keep several bundles open and draw shingles from each in turn to blend colour.
- At the rake, let the course run past the rake edge, then cut it back along a chalk line for the right overhang (lesson 6).
- At walls, penetrations and valleys, follow the flashing details (lessons 9 to 11).
- Check exposure every few courses with a tape or the gauge on the shingle hatchet. Use the course lines, not the eave.
Nail guns
Pneumatic coil roofing nailers drive almost every nail on a Ridgecap roof. Used badly, they cause both roof failures and injuries:
- Set the air pressure so nails drive flush on the actual deck and shingle. Test on a scrap and recheck when the sun warms the shingles, because soft shingles let nails sink deeper.
- Hold the nailer square to the shingle, so nails are not angled.
- Ridgecap uses sequential-trip triggers (the nose must be pressed before each pull of the trigger) on all roofing nailers, because contact (bump) triggers fire when the tool bounces, causing double nails and the most nailer injuries.
- Keep fingers off the trigger when moving, never point the tool at anyone, and disconnect the air before clearing jams or passing the tool.
- Keep the hose on the roof bracket plank or tied off so it cannot drag tools or a worker toward the edge.
- Wear safety glasses. A nail that hits a hidden metal strap can ricochet.
Worked problem
Checking the gun pressure
At 8:00 on a cool August morning, Rory's nailer drives flush at 90 psi. By 13:00 the shingles are much warmer and softer. Keisha pulls up a shingle and finds heads cut into the mat. What should Rory do?
Show solution
- The warm shingles offer less resistance, so the same pressure drives the nails deeper.
- Lower the pressure in small steps, test on a scrap, and check a few freshly laid shingles.
- Fix the overdriven nails already laid: add a correctly driven nail beside each one and seal the damaged spot as the maker allows.
Answer: Turn the pressure down to suit the warmer shingles, and recheck whenever conditions change.
Checking the work
Quality control on a shingle roof happens as the work goes on, not after. Wes and Keisha check:
- Every so often, lift a freshly laid shingle (before it seals) and look at the nails under it: number, position in the zone, flush and straight.
- Exposure and course lines, by tape and by eye from the ground.
- Offsets: no joints closer than the maker's minimum.
- Rakes and eaves: overhang, straight cuts, rake nails.
- Clean-up: offcuts, wrappers and dropped nails removed from the roof and gutters daily.
Shingle manufacturers and inspectors check the same things. A manufacturer's representative inspecting a roof for an extended warranty lifts shingles at random, and if the nails are wrong, the warranty is refused for the whole roof.
Rory's first slope
Rory laid the back slope of 19 Linden over two days. Keisha lifted shingles at random: on the first morning, three high nails on one course where he had rushed the nailer; on the second, none. By the end of the job, Wes was letting him check other people's work. "It's not about being fast," Wes said. "Fast comes by itself. It's about the four nails being right on the shingle nobody will ever lift again."
Common mistakes
MistakeFollowing the eave instead of chalk lines.
InsteadSnap course lines every few courses, measured from the starter line at both ends.
MistakeLining up joints in adjacent courses.
InsteadKeep adjacent joints at least the maker's minimum apart, usually about 100 mm (4 in).
MistakeNailing above the nailing zone.
InsteadHigh nails miss the shingle below; nail through the common bond, in the marked zone.
MistakeOverdriving nails with a gun set too high.
InsteadSet and recheck pressure as the shingles warm; nails must be flush.
MistakeUsing bump-fire triggers.
InsteadUse sequential triggers to prevent double nails and injuries.
Summary and key terms
- Lay out every slope with a starter line, horizontal course lines and vertical offset lines; never follow the eave.
- Offset each course so joints never line up; follow the maker's minimum, usually about 100 mm (4 in).
- Nails must be corrosion-resistant roofing nails of the code size, long enough to go 12 mm (3/4 in in the US) into the deck or through it.
- Place nails in the nailing zone, below the sealant, about 25 mm (1 in) from each end, straight and flush.
- Four nails is the usual pattern; six nails and hand-sealing are used for high wind, rakes and very steep slopes.
- Set nailers for flush driving, use sequential triggers, and check nails by lifting shingles as the work proceeds.
- Course line
- A horizontal chalk line used to keep shingle courses straight and at the right exposure.
- Offset
- The sideways shift between joints in one course and the next.
- Racking
- Laying shingles in vertical columns rather than a diagonal pattern; not allowed by some makers.
- Nailing zone
- The marked band on a shingle where the nails must go.
- High nailing
- Nails placed above the nailing zone, missing the shingle below.
- Overdriven nail
- A nail driven so hard its head cuts into the shingle.
- Sequential trigger
- A nailer trigger that fires only when the nose is pressed first and then the trigger is pulled.
Practice problems
Work each problem on paper first, then reveal the answer to check.
Course lines are every 5 courses at 143 mm exposure. How far apart are they?
Show answer
5 × 143 = 715 mm.
A nail is 25 mm long and passes through 10 mm of shingle and 1 mm of underlay into a 19 mm board deck. Does it meet the code?
Show answer
25 − 11 = 14 mm into the deck, more than 12 mm, so yes, even though it does not pass through.
Why are high nails a problem?
Show answer
They miss the top edge of the shingle below, halving the holding power.
When does Ridgecap use six nails?
Show answer
On rakes, exposed roofs, high-wind warranties and very steep slopes.
How many nails for 10 squares at 65 shingles per square and 4 nails each?
Show answer
10 × 65 × 4 = 2,600.
Lesson quiz · 5 questions
Score 60% or more to complete this lesson.
Create a free account to save your progress, take quizzes and earn a certificate.