
ROOF-130 · Lesson 6 of 12 · 24 min
Drip edge and starter courses
▶ Video coming soon A video version of this lesson is on the way.
The first shingle on a roof is not a shingle that anyone sees. At 19 Linden, Keisha showed Rory the row that would sit under the first visible course: a strip of starter shingles running along the eave, its sealant line just above the drip edge. "Every gust of wind tries the eave first," she said. "If the starter's wrong, the first course lifts, and once the first course goes, the wind has a handle on the whole roof."
The edges of a shingle roof are where it is most exposed to water running off and wind trying to lift it. This lesson covers the metal drip edge that finishes the eaves and rakes, the order in which edge metal and membranes are installed, and the starter course that seals and anchors the bottom and sides of the shingle field.
What drip edge does
Drip edge is a strip of bent sheet metal fastened along the eaves and rakes of the deck. It:
- Covers and protects the edge of the deck, the most rot-prone wood on the roof.
- Throws water off the roof clear of the fascia, so it drips into the eavestrough (gutter) or to the ground instead of running back along the underside of the deck and into the fascia, soffit and wall.
- Gives the starter and first course a straight, stiff edge to overhang.
- Supports the shingle edge so it does not sag and curl over the deck edge.
- At the rakes, closes the gap between the deck and the rake board against wind-driven rain, insects and birds.
The Ontario Building Code does not set out a specific drip edge rule for shingle roofs, but every major shingle manufacturer's instructions call for metal drip edge at the eaves and rakes, and Ridgecap installs it on every roof.
Profiles and materials
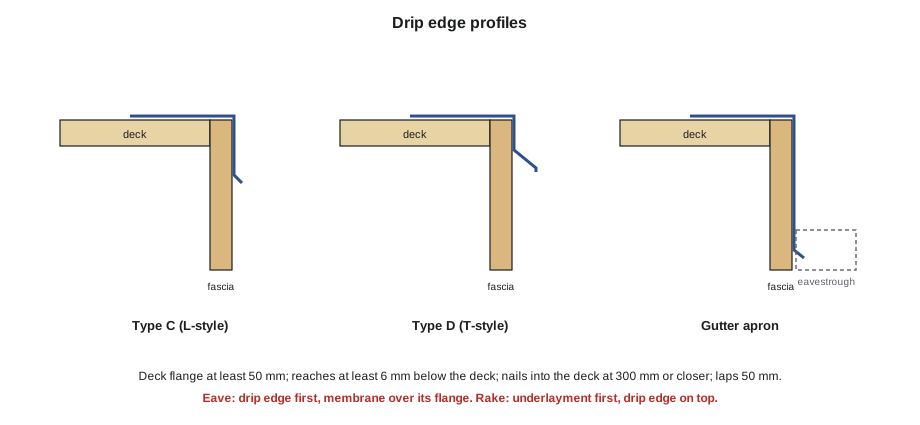
| Profile | Shape | Where Ridgecap uses it |
|---|---|---|
| Type C (L-style) | a deck flange and a short down-leg with a small kick at the bottom | rakes and simple eaves on older houses |
| Type D (T-style) | a deck flange, a face and a lip that projects out from the fascia | most eaves and rakes; it throws water clear of the fascia best |
| Gutter apron | a longer down-leg that reaches into the eavestrough (gutter) | eaves where the eavestrough (gutter) sits low or is set back |
Drip edge is made of pre-painted galvanized steel, pre-painted aluminum or, on premium work, copper. Lengths are usually 3.05 m (10 ft). It must reach at least about 6 mm (1/4 in) below the underside of the deck and lie at least 50 mm (2 in) back onto the deck, which are the minimums in the shingle makers' instructions. Ridgecap's standard pieces have a 75 mm deck flange.
Like all roofing metal, drip edge must be compatible with what touches it. ROOF-120 showed that aluminum next to copper or wet treated wood corrodes. Use aluminum or stainless nails with aluminum drip edge, hot-dipped galvanized nails with galvanized steel, and copper nails with copper.
The order of the layers at the edges
Water must always run over a lap and never into one. At the eave, water runs down the roof toward the edge; at the rake, wind blows water sideways under the edge. The order of installation follows from that:
- Eave drip edge goes on first, directly on the deck.
- Eave protection (or the first course of underlayment on roofs without it) goes on top of the eave drip edge flange. Water running down the membrane runs onto the metal and off.
- Underlayment goes on over the rest of the deck, running out to the edge at the rakes.
- Rake drip edge goes on last, on top of the underlayment. Wind-blown water that gets under the rake edge meets the metal first and runs down over the underlayment.
This is the order the shingle makers' instructions show, and it is also how the code describes it in the US. Some crews put the eave membrane under the eave drip edge so the metal holds it down; Ridgecap does not, because water running down the membrane would then run behind the metal and onto the fascia.
Installing drip edge
- Check the fascia and deck edge are sound and straight. A wavy fascia makes a wavy drip edge, and a wavy drip edge makes a wavy shingle line.
- Set the drip edge tight against the fascia or rake board, with the deck flange flat on the deck.
- Nail through the deck flange into the deck, not the fascia, about 25 mm (1 in) in from the inside edge of the flange, at no more than 300 mm (12 in) apart (or closer if the maker says), with nails that will be covered by the shingles.
- Lap each piece over the next by at least 50 mm (2 in). On rakes, the upper piece laps over the lower one, like shingles. On eaves, lap so the joint is not facing the prevailing wind.
- At the eave-rake corner, the rake piece laps over the eave piece. Cut the rake piece's down-leg and fold its end around the corner so there is no open gap.
- Seal nothing that is meant to drain. Sealant at drip edge laps traps water.
Worked problem
Drip edge for 19 Linden
19 Linden is a gable roof: two eaves of 10.4 m and four rakes of 4.567 m. Drip edge comes in 3.05 m lengths lapped 50 mm. How many lengths are needed, and about how many nails at 300 mm?
Show solution
- Total length = 2 × 10.4 + 4 × 4.567 = 20.8 + 18.27 = 39.07 m.
- Each length covers 3.05 − 0.05 = 3.00 m once lapped.
- Lengths = 39.07 ÷ 3.00 = 13.02, so 14 lengths.
- Nails = 39.07 ÷ 0.30 = 130 spaces, so about 135 nails allowing for an extra nail at each end of each run.
Answer: 14 lengths and about 135 nails. Ordering lengths run by run would be more accurate, because a short run still uses a whole piece; Rory checks: each eave needs 4 lengths and each rake 2, for 4 + 4 + 2 + 2 + 2 + 2 = 16. He orders 16.
Why a starter course is needed
Look at the bottom of any shingle. A three-tab shingle has slots between its tabs, and a laminated shingle has gaps and openings between the tongues of its lower layer. On every course above the first, those openings sit over the solid upper part of the shingle below. On the first course there is nothing below them but the underlayment, so without a starter course water would run straight through the openings onto the eave.
The starter course is a row of shingle material laid along the eave under the first course. It:
- Fills in under the slots and gaps of the first course, so water runs over shingle all the way to the edge.
- Puts a line of factory sealant along the eave, which bonds to the underside of the first course and holds it down in wind.
- Gives the first course the same thickness under it as every other course, so it lies flat.
- At the rakes, if the maker calls for it, adds a sealant line along the gable edge, where wind uplift is strongest.
Starter products
- Manufactured starter strips: rolls or bundles of narrow strips made for the purpose, with a sealant line placed near the eave edge. Ridgecap uses the shingle maker's own starter, which keeps the warranty complete and puts the sealant exactly where the first course needs it.
- Three-tab shingles with the tabs cut off: the traditional starter. The tabs are removed, leaving the upper part with its sealant line, which is then turned so the sealant is near the eave. These work, but they take time to cut and the sealant may not line up with the first course of a laminated shingle.
- What not to use: laminated shingles turned upside down or backwards. Their sealant ends up in the wrong place or facing the wrong way, they are thick and uneven, and the first course does not seal. This is one of the most common causes of eave shingles blowing off.
Installing the starter course
- Snap a chalk line along the eave for the top edge of the starter, so the bottom edge overhangs the drip edge by the amount the maker specifies, usually about 6 to 19 mm (1/4 to 3/4 in). Too little overhang lets water curl back onto the fascia; too much lets the edge sag and catch the wind.
- Start at one rake, trimming the first starter piece so its joints will not line up with the joints of the first course. Shingle makers give a minimum offset, often about 100 mm (4 in); Ridgecap simply trims 150 mm (6 in) off the first starter strip.
- Lay the starter with its sealant line at the eave edge, butt the pieces together without gaps or overlaps, and nail along the printed nail line, which is placed so the first course will cover the nails.
- On the rakes, if the maker calls for rake starter, lay strips along each rake with the sealant at the rake edge, overhanging the rake drip edge by the same amount as the eave.
- Check the line by eye from the ground. A starter course that wanders shows in every course above it.
Worked problem
Starter overhang and the first course
Rory snaps the starter line so the starter overhangs the drip edge by 12 mm. The drip edge projects 25 mm out from the fascia. How far past the fascia face will the bottom of the shingles be, and is the overhang within the maker's 6 to 19 mm range?
Show solution
- The first course sits flush with the bottom edge of the starter.
- Distance past the fascia = 25 + 12 = 37 mm.
- The overhang past the drip edge is 12 mm, which is inside 6 to 19 mm.
Answer: The shingle edge sits 37 mm out from the fascia, with a 12 mm overhang past the drip edge, which is inside the range.
Worked problem
Starter for 19 Linden
The starter covers 32 m per bundle. 19 Linden needs starter on both 10.4 m eaves and all four 4.567 m rakes. How many bundles?
Show solution
- Length = 2 × 10.4 + 4 × 4.567 = 39.07 m.
- Bundles = 39.07 ÷ 32 = 1.22, so 2 bundles.
Answer: Two bundles of starter. The partial bundle left over goes back to the shop for the next small job.
At the rakes: the shingle edge
Along the rakes, the field shingles are cut so they overhang the rake drip edge by the same 6 to 19 mm (1/4 to 3/4 in). Rake shingles are the ones most likely to blow off, because wind flowing over a gable end lifts the edge. Crew 5's rake details:
- Rake starter with sealant at the edge, where the maker calls for it.
- Cut rake shingles with a hook blade along a chalk line, never by eye.
- Keep nails at least about 25 mm (1 in) and no more than about 75 mm (3 in) from the rake edge, or as the maker says, so they hold the edge without showing.
- Where the maker calls for it, add a 75 mm bead of asphalt roofing cement under the rake edge of shingles that will not reach a factory sealant line, such as cut pieces.
- Do not leave pieces narrower than about 75 mm (3 in) at the rake; adjust the layout so the end pieces are wide enough to nail properly.
Ready for shingles
At the end of the morning, 19 Linden had 16 lengths of brown Type D drip edge, eave protection lapped over the eave flanges, synthetic underlay to the ridge, rake metal on top, and a straight row of starter along both eaves and up all four rakes. Wes walked the street side, looked up and nodded. "Straight starter, straight roof," he said. "Now you can shingle."
Common mistakes
MistakeLaying eave membrane under the eave drip edge.
InsteadEave drip edge goes on the deck first; membrane and underlayment go over its flange.
MistakePutting rake drip edge under the underlayment.
InsteadRake drip edge goes on top of the underlayment so wind-driven water runs over it.
MistakeNailing drip edge into the fascia.
InsteadNail through the deck flange into the deck at no more than 300 mm (12 in) apart.
MistakeUsing upside-down laminated shingles as starter.
InsteadUse the maker's starter strip, or properly cut three-tab starter, with the sealant at the eave.
MistakeLetting the starter overhang too much or too little.
InsteadOverhang the drip edge by the maker's range, usually about 6 to 19 mm (1/4 to 3/4 in).
Summary and key terms
- Drip edge protects the deck edge, throws water clear of the fascia and gives the shingles a straight, stiff edge.
- It reaches at least about 6 mm (1/4 in) below the deck and 50 mm (2 in) onto it, is nailed into the deck at 300 mm (12 in) or closer, and laps 50 mm (2 in).
- Eave drip edge goes on the deck, under the membrane; rake drip edge goes over the underlayment.
- The starter course fills under the first course's openings and puts a sealant line at the eave.
- Use the maker's starter, offset its joints from the first course, and overhang the drip edge by the specified amount.
- Rakes get starter, careful cuts and correct nailing because wind attacks them first.
- Drip edge
- Bent metal edging fastened along the eaves and rakes to protect the deck edge and shed water clear of the fascia.
- Type D drip edge
- A T-shaped drip edge with a projecting lip that throws water away from the fascia.
- Gutter apron
- A drip edge with a long down-leg that reaches into the gutter.
- Starter course
- The row of shingle material laid along the eave (and sometimes rakes) under the first course.
- Sealant line
- The strip of factory-applied asphalt adhesive that bonds one course to the next.
- Overhang
- The distance a shingle edge projects past the drip edge.
- Rake starter
- Starter strip laid along a gable edge to seal the rake shingles.
Practice problems
Work each problem on paper first, then reveal the answer to check.
Which goes on first at the eave: drip edge or eave protection?
Show answer
Drip edge, then eave protection over its flange.
Which goes on first at the rake: drip edge or underlay?
Show answer
Underlay, then drip edge on top.
A gable roof has two 9.0 m eaves and four 4.2 m rakes. How many 3.05 m drip edge lengths lapped 50 mm are needed in total, by run?
Show answer
Each eave: 9.0 ÷ 3.0 = 3 lengths; each rake: 4.2 ÷ 3.0 = 1.4, so 2. Total 3 + 3 + 2 × 4 = 14.
Why should laminated shingles not be used upside down as starter?
Show answer
Their sealant ends up in the wrong place and the first course does not seal.
What overhang past the drip edge do most makers call for?
Show answer
About 6 to 19 mm.
Lesson quiz · 5 questions
Score 60% or more to complete this lesson.
Create a free account to save your progress, take quizzes and earn a certificate.