
ROOF-130 · Lesson 12 of 12 · 29 min
Case study: reroofing a bungalow
▶ Video coming soon A video version of this lesson is on the way.
In early September 2026, Ridgecap's office took a call from Grace Okafor, who owned the 1956 brick bungalow on Elmcrest Avenue that Wes had used for Rory's first quiz. Granules were piling up in the eavestroughs (gutters), the shingles on the south slope were curling, and every February an ice dam formed along the north eave and a stain spread across the ceiling of the back bedroom. A neighbour had suggested putting new shingles over the old ones. "Before I spend that money," Mrs. Okafor said, "I want somebody to tell me what is actually wrong."
This lesson follows the whole job, from the site visit to the final walk-around: what Crew 5 found, the decisions they made and why, the quantities, the schedule and the problems that came up. Every step uses something from lessons 1 to 11.
The house
| Item | Elmcrest bungalow |
|---|---|
| Built | 1956, one storey, brick veneer on wood frame, full basement |
| Roof | hip roof, all four slopes at 5 in 12, framed with rafters at 406 mm (16 in) centres |
| Plan with overhangs | 13.4 m by 9.2 m (44 ft by 30 ft) |
| Walls (outside) | 12.2 m by 8.0 m (40 ft by 26 ft), so the overhang is 600 mm (24 in) all round |
| Deck | original 19 mm by 140 mm (1 by 6) boards, laid tight |
| Covering | two layers of three-tab shingles, the top layer about 22 years old |
| Chimney | brick, on the north slope, 900 mm (36 in) wide across the slope and 600 mm (24 in) deep |
| Penetrations | one plumbing vent; a bathroom fan that ended in the attic |
| Ventilation | four old box vents; aluminum perforated soffits |
| Attic | about 250 mm (10 in) of blown-in insulation over the original batts |
The site visit
Wes and Rory spent an hour at the house. From the ground, with binoculars and a ladder at the eave, they found:
- A 5 in 12 slope, measured with a level at the eave (lesson 1).
- Two layers of shingles, visible at the eave edge, with no drip edge and the fascia board soft at the north-west corner.
- Curled, granule-bare shingles on the south and west slopes, which get the most sun.
- Old roofing cement smeared around the chimney, with no visible step flashing, and cracked mortar at the top courses of brick.
- A cracked rubber boot on the plumbing vent.
From the attic, with Mrs. Okafor's permission:
- The board deck was mostly sound and dry, but dark and soft for about 2.4 m (8 ft) along the north eave, around the chimney, and on the boards above the bathroom.
- The bathroom fan duct ended loose in the attic, and the boards above it were stained black with old moisture.
- Every soffit vent was buried under insulation. With no intake, the four box vents had been pulling warm, moist air out of the house through the ceiling.
- Frost marks and rusty nail tips on the north slope.
Rory summed it up in his notebook in four lines: "Ice dams: warm attic, no intake, fan into attic. Rot: north eave, chimney, fan. Chimney leak: no flashing. South slope: just old."
Why not just put new shingles on top?
Wes explained the decision to Mrs. Okafor in plain terms:
- The roof already has two layers. A third layer adds weight and heat, follows every curl of the old shingles, and is outside the conditions most shingle makers set for applying over an old roof.
- The rot at the north eave and around the chimney cannot be fixed from above an old roof.
- The chimney needs real step flashing woven with the shingles and new counterflashing, which means taking off the shingles around it anyway.
- The eave protection that will stop the ice-dam leak has to go directly on the deck.
- The ice dams will not stop until the attic is fixed: intake opened, the fan vented outside and the exhaust balanced.
In Hamilton, as in most Ontario municipalities, re-roofing a house with the same kind of covering does not need a building permit, as long as no structural work is done, but the work must still meet the Building Code. Ridgecap notes on the quote that framing repairs, if any are found, would be done by a carpenter and might need a permit.
The specification
Ridgecap's written quote listed every layer, so the owner knew what she was paying for and the crew knew what to install:
| Layer or item | Specification |
|---|---|
| Tear-off | both layers to the deck; all flashings, vents and the plumbing boot removed |
| Deck | replace rotten boards with matching 19 mm lumber or panels shimmed flush; renail loose boards; allowance for 10 m² |
| Fascia | replace the soft section at the north-west corner; wrap in pre-finished aluminum |
| Drip edge | pre-finished Type D at all eaves |
| Eave protection | two rows of self-adhered membrane at all eaves (installed even though Hamilton is just under the code's degree-day limit) |
| Underlay | the shingle maker's synthetic over the rest of the deck |
| Starter | the maker's starter strip at all eaves |
| Shingles | the maker's laminated shingle, Class H wind rating, four nails in the field, six in the first two eave courses |
| Hips and ridge | the maker's hip and ridge cap |
| Chimney | cricket on the high side; apron, step flashing and counterflashing in reglets; mortar repair by a mason (by the owner) |
| Plumbing vent | new pipe flashing |
| Bathroom fan | new insulated duct to a roof cap with a damper and flashing (by Ridgecap's service crew) |
| Ventilation | baffles at every rafter bay; old box vents replaced by new static vents sized to the code; soffits cleared |
| Cold weather | hand-seal the first two eave courses and the hip shingles if the sealant has not bonded before the crew leaves |
| Warranty | the maker's system warranty, registered by Ridgecap |
Quantities
Rory's take-off, worked out in lessons 2, 5, 6, 10 and 11, came together on one sheet:
| Item | Calculation | Order |
|---|---|---|
| Roof area | 13.4 × 9.2 × 1.0833 = 133.55 m² (14.4 squares) | — |
| Field shingles | 133.55 × 1.15 ÷ 9.29 = 16.53 squares × 3 | 50 bundles |
| Starter | 45.2 m ÷ 32 m per bundle | 2 bundles |
| Hip and ridge caps | 4 × 6.78 + 4.2 = 31.3 m ÷ 10 m | 4 bundles |
| Eave protection | 2 rows × 45.2 m ÷ 19.65 m, plus 1 for the chimney | 6 rolls |
| Underlay | remaining area ÷ net coverage, plus 1 | 2 rolls |
| Drip edge | 45.2 m ÷ 3.00 m | 16 lengths |
| Step flashing | chimney sides: 600 ÷ 143 = 4.2, so 5 courses + 1 = 6 per side | 12 pieces (pack of 100) |
| Nails | about 4,500 field nails, plus starter and caps | 2 boxes of coils |
Worked problem
Tear-off weight
Two layers of three-tab shingles come off 133.55 m² of roof at about 11 kg/m² per layer. The bin is rated for 4 t. Is one bin enough?
Show solution
- Weight = 2 × 11 × 133.55 = 2,938 kg.
- Add the rotten boards, about 10 m² × 10 kg/m² = 100 kg, and old flashings and vents, say 50 kg.
- Total ≈ 2,938 + 100 + 50 = 3,088 kg, about 3.1 t.
Answer: About 3.1 t, under the 4 t limit, so one bin.
Designing the ventilation
The ventilation was the part of the job that would actually stop the ice dams, so Wes made Rory work it out on paper before ordering anything.
Worked problem
How much vent area?
The insulated ceiling is the area inside the walls: 12.2 m × 8.0 m. Find the minimum vent area at 1/300, and the share that must be at the top and bottom.
Show solution
- Ceiling area = 12.2 × 8.0 = 97.6 m².
- Minimum vent area = 97.6 ÷ 300 = 0.3253 m² = 3,253 cm².
- At least 25 per cent at the top: 0.25 × 3,253 = 813 cm². At least 25 per cent at the bottom: 813 cm².
Answer: 3,253 cm² in total, with at least 813 cm² at the top and 813 cm² at the bottom.
The first idea was a ridge vent. But the ridge is only 4.2 m long. After stopping the slot 300 mm short of each hip junction, the vent would be 3.6 m long, giving 3.6 × 380 = 1,368 cm². That meets the code minimum for the top, but it would leave the ends of the attic, under the hips, with little air movement, and Ridgecap's vent maker does not allow its ridge vent to be combined with box vents on the same attic. So Wes chose static vents only, spread over the four slopes high up near the hips and ridge.
Worked problem
Choosing the static vents
Each static vent has a net free area of 325 cm². The cleared soffits give about 190 cm² per metre over 36 m of the eaves. How many vents are needed for the top, and does the intake beat the exhaust?
Show solution
- To give about half the required area at the top: 0.5 × 3,253 = 1,627 cm²; 1,627 ÷ 325 = 5.0.
- Wes uses 6 vents, so the four slopes can be balanced: two each on the long north and south slopes, one on each hip end. Exhaust = 6 × 325 = 1,950 cm².
- Intake = 36 × 190 = 6,840 cm².
- Total = 1,950 + 6,840 = 8,790 cm², more than 3,253. Top 1,950 is more than 813; intake 6,840 is more than exhaust 1,950.
Answer: Six static vents high on the slopes, with the soffits cleared and a baffle in every rafter bay. Intake is more than three times the exhaust, which is what the vent maker wants.
The cricket
The chimney is 900 mm wide across the slope, which is over the code trigger, so it gets a cricket (lesson 11). Its ridge rises 187.5 mm at the chimney. Rory framed it on the deck with a 38 mm by 89 mm (2 by 4) ridge piece and two triangles of 12.5 mm plywood, then the whole cricket was covered with self-adhered membrane lapped onto the main deck and up the chimney, and finished in pre-finished steel formed in the sheet metal shop by Theo Barnes.
The job, day by day
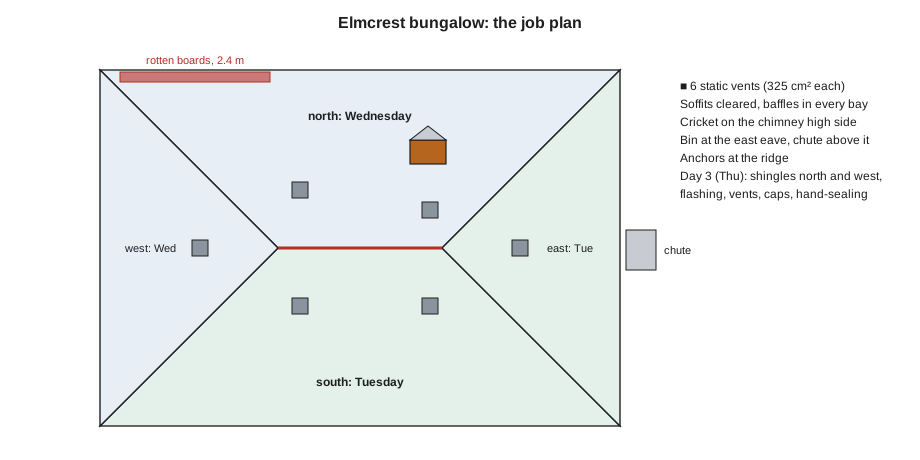
The job was booked for Tuesday to Thursday, October 13 to 15, 2026, with rain forecast for the Thursday evening and morning temperatures around 3 °C (37 °F).
- Tuesday: the bin arrived at 7:00. The crew set roof anchors, hung the chute at the east eave, tarped the gardens and leaned plywood over the windows. Tear-off ran on the south and east slopes; the deck there was sound. By 13:00 those slopes had drip edge, membrane and underlayment. In the afternoon, Rory and Keisha crawled the attic, pulled back the insulation and stapled in baffles at every rafter bay, while the service crew ran the bathroom fan duct to a new roof cap.
- Wednesday: the north and west slopes came off. At the north eave, the crew cut out 2.4 m of rotten boards across six rafter bays, and the soft fascia corner; around the chimney, three more boards. New boards went in flush, nailed at every rafter. Rory framed the cricket. Because the morning was cold, the membrane rolls had spent the night in the heated shop and were kept in the van until used. By the end of the day every slope was dried in, and the field shingles were on the south and east slopes.
- Thursday: shingles on the north and west, chimney flashing, the six static vents (four in the US version of the job), the plumbing boot, the hip caps from the bottom up and the ridge from the east end. Because it was mid-October and the sealant had not bonded, the crew hand-sealed the first two eave courses and every hip cap with spots of roofing cement as the maker's instructions show. The magnet sweeper went over the lawn, beds and driveway twice. The rain arrived at 19:00, an hour after the bin left.
Worked problem
Was three days realistic?
Crew 5 is four roofers plus Rory and Keisha. Wes plans on about 2.5 squares per crew hour for tear-off and dry-in of two layers, and about 2 squares per crew hour for shingling a hip roof with caps. The roof is about 14.4 squares. How many crew hours is that, and how does it fit into three 9-hour days?
Show solution
- Tear-off and dry-in: 14.4 ÷ 2.5 = 5.8 crew hours.
- Shingling and caps: 14.4 ÷ 2 = 7.2 crew hours.
- Total main work = 5.8 + 7.2 = 13.0 crew hours.
- Three days give 3 × 9 = 27 crew hours. The remaining 14 hours cover set-up, deck repairs, the cricket, flashing, vents, attic baffles, hand-sealing and clean-up.
Answer: About 13 crew hours of main work in 27 available hours: comfortable, with time for the problems that every old roof brings.
Problems on the way
- A third surprise layer: under the two layers of three-tab, a strip of very old roll roofing had been laid along the north eave as a homemade ice-dam patch. It came off with the rest, but it added an hour.
- The owner's question: on Wednesday, Mrs. Okafor's brother asked why Ridgecap did not just add a ridge vent and keep the old box vents too, "for more air." Rory explained that two kinds of exhaust on one attic short-circuit each other, and that the real problem had been no intake at all. Wes, listening from the ladder, did not have to say a word.
- The mortar: the top courses of the chimney were too soft to hold a reglet. Ridgecap set the counterflashing into the sound courses lower down and told the owner the mason should repoint and rebuild the crown in the spring. It went in the closing report with photographs.
The final walk-around
Before the crew left, Wes and Rory walked the house with Ridgecap's residential checklist:
- Shingles: straight courses, correct exposure, offsets, no high or exposed nails (Wes lifted shingles at random on each slope before they sealed).
- Edges: drip edge straight and tight, shingle overhang within the maker's range, fascia repaired.
- Hips and ridge: caps straight, laps facing downwind, junctions sealed.
- Chimney: apron, step flashing, cricket and counterflashing; no cement used as flashing.
- Penetrations: plumbing boot and fan cap flashed; fan running to the outside.
- Ventilation: daylight at every soffit bay from the attic; six static vents (four in Columbus) open; old box vent holes patched.
- Site: bin gone, gardens uncovered, eavestroughs (gutters) cleaned of granules and debris, nails swept, spare bundle and cap pieces labelled in the garage.
- Paperwork: photos of the deck repairs and flashing before they were covered, the warranty registration, the mortar note for the owner.
What the job taught
The bungalow had three separate problems that looked like one. The curled shingles were simply old. The bedroom stain came from ice dams, which came from a warm, unventilated attic with a fan blowing into it. The chimney leak came from having no flashing at all. A new layer of shingles over the old ones, as the neighbour had suggested, would have fixed only the first problem, and only for a while.
In the second week of November 2026, after the season's first heavy snowfall and a few sunny afternoons, Wes drove past Elmcrest Avenue. The neighbours' eaves already had a fringe of icicles where snow had melted over warm attics and refrozen. The Okafor house had an even layer of snow right to the edge of the roof and no ice at the eaves at all. Wes sent Rory a photo with one line: "That's what the attic did." The real test will come in February, but the first sign was good.
Common mistakes
MistakeTreating every leak as a shingle problem.
InsteadFind each cause separately: age, ice dams, missing flashing, ventilation.
MistakeAdding a third layer over two old ones.
InsteadTear off to the deck when there are two or more layers, rot or flashing problems.
MistakeChoosing a ridge vent on a hip roof without checking the ridge length.
InsteadWork out the net free area the ridge can give; use static vents or approved hip vents when the ridge is short.
MistakeLeaving the cause of the ice dams in place.
InsteadClear the intake, add baffles, vent fans outdoors and balance the exhaust.
MistakeSkipping hand-sealing on a late-season roof.
InsteadHand-seal where the sealant cannot bond before winter, as the maker's instructions show.
Summary and key terms
- A re-roof starts with a site visit from the ground and the attic, and each symptom is traced to its own cause.
- Two layers, rot, missing flashing and ice-dam leaks all point to a tear-off to the deck.
- A written specification lists every layer: deck, drip edge, eave membrane, underlayment, starter, shingles, caps, flashings and ventilation.
- The take-off uses slope and hip factors, waste, roll coverage and lengths, and the tear-off weight decides the bin.
- Ventilation is designed to the code and the vent maker: balanced, with clear intake and a single exhaust type.
- A three-day job is planned slope by slope so the house is dried in every night, and is closed out with a checklist, photos and a warranty registration.
- Site visit
- An inspection of the roof and attic before quoting a re-roof.
- Specification
- The written list of materials and methods for the job.
- Take-off
- The quantities of materials worked out from the measurements.
- Static vent
- A fixed roof vent with no moving parts, set high on a slope as exhaust.
- Hand-sealing
- Placing spots of roofing cement under shingles that cannot self-seal in cold weather.
- Closing report
- The notes and photographs given to the owner at the end of a job.
Practice problems
Work each problem on paper first, then reveal the answer to check.
The bungalow ceiling is 97.6 m². What vent area does 1/300 require?
Show answer
97.6 ÷ 300 = 0.325 m² = 3,253 cm².
Why were static vents chosen over a ridge vent?
Show answer
The 4.2 m ridge was short, and the vent maker does not allow ridge vents and box vents together.
What three causes were behind the bungalow's problems?
Show answer
Old shingles, ice dams from a warm unventilated attic with a fan into it, and a chimney with no flashing.
How high was the cricket?
Show answer
450 × 5 ÷ 12 = 187.5 mm.
Why hand-seal the eave courses in October?
Show answer
The sealant strips may not bond before winter without sun heat.
Lesson quiz · 5 questions
Score 60% or more to complete this lesson.
Create a free account to save your progress, take quizzes and earn a certificate.