
ROOF-130 · Lesson 7 of 12 · 26 min
Shingle types and exposure
▶ Video coming soon A video version of this lesson is on the way.
The supplier's truck dropped two pallets of shingles at the curb of 19 Linden, and Keisha made Rory read every label before a single bundle went up the ladder. Product name, colour, the run number stamped on the wrapper, the wind rating, the exposure. "Two different run numbers," she said, pointing. "Same colour name, made on different days. If you lay one pallet on the front and the other on the back, nobody notices. If you lay one pallet on the bottom half of the front and the other on the top half, the owner sees a line across the roof for twenty-five years."
This lesson describes how asphalt shingles are made, the main types and what their ratings mean, and the single most important number on a shingle: its exposure. It also covers how shingles are stored and handled so they go on the roof in good condition.
How an asphalt shingle is made
Every modern asphalt shingle in North America has the same basic make-up, described in ROOF-120:
- A mat of glass fibres, which gives the shingle strength and fire resistance. Older organic shingles used a felt of paper and wood fibre; they are no longer made in North America, but Crew 5 still tears them off old roofs.
- Asphalt that coats and fills the mat. The asphalt is mixed with finely ground mineral filler, which makes it stiffer and more fire- and weather-resistant.
- Mineral granules pressed into the top surface. They shield the asphalt from the sun's ultraviolet light, give the colour and add fire resistance. Some granules carry copper or zinc to resist the black streaks of algae common on north slopes in humid summers.
- A back surface of fine sand or talc so the shingles do not stick together in the bundle.
- A factory sealant strip: a line of heat-activated asphalt adhesive. Once the sun warms the roof, it bonds each course to the one above it.
- A release strip of plastic film on the back, lined up with the sealant of the shingle below it in the bundle so the shingles do not glue together. It does not need to be removed.
In Canada, glass-mat asphalt shingles are made to CSA A123.5. Most products sold in Canada are also tested and labelled to the US ASTM standards described below.
Types of asphalt shingle
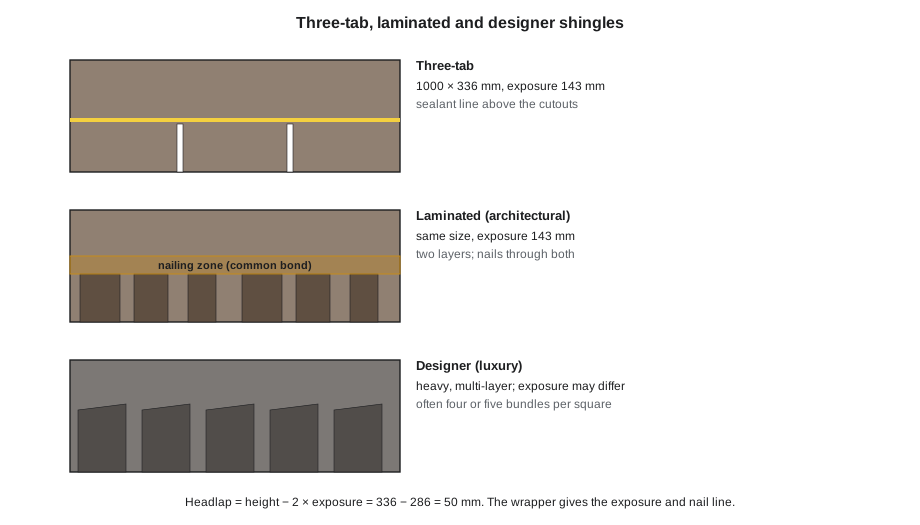
| Type | Description | Weight per square (approx.) | Notes |
|---|---|---|---|
| Three-tab (strip) | one layer, two cutouts making three tabs | 95 to 110 kg (210 to 240 lb) | flat look; few made now; still used for starter and some caps |
| Laminated (architectural, dimensional) | two layers bonded together, with irregular tongues on the bottom layer | 100 to 135 kg (220 to 300 lb) | the standard Ridgecap shingle; hides deck unevenness; higher wind ratings |
| Designer (luxury) | heavy multi-layer shingles shaped to look like slate or shakes | 135 to 200 kg (300 to 450 lb) | premium price and look; often four or five bundles per square; special exposure |
| Impact-resistant | laminated or designer shingles with a rubberized (SBS) asphalt or reinforced mat | similar to laminated | rated to UL 2218 Class 4 against hail; may lower insurance costs |
Ridgecap's standard shingle on Linden Street, the Elmcrest bungalow and most of its residential work is a laminated shingle from its main supplier. Its matching starter, hip and ridge caps and synthetic underlayment come from the same manufacturer, which allows the longest warranty.
What the ratings mean
Shingle wrappers and data sheets carry several ratings. A roofer should know what each one tests:
| Rating | What it tests | Classes |
|---|---|---|
| Wind: ASTM D7158 | the uplift resistance of sealed shingles in a lab, translated into a design wind speed | Class D (115 mph), Class G (150 mph), Class H (190 mph) |
| Wind: ASTM D3161 | shingles in front of a fan blowing for two hours | Class A (60 mph), Class D (90 mph), Class F (110 mph) |
| Impact: UL 2218 | steel balls dropped from height to simulate hail | Class 1 to Class 4 (largest ball) |
| Fire: CAN/ULC-S107 or ASTM E108 (ASTM E108 or UL 790) | flame spread and burning brands on a test roof | Class A (best), B, C |
| Algae resistance | manufacturer's warranty against algae streaking | stated in years |
Wind ratings assume the shingles are installed exactly as the instructions say: the right nails in the right place, the right starter, and the sealant bonded. A Class H shingle nailed high or laid over the wrong starter can blow off in a moderate storm. Lesson 8 covers why.
Hamilton's code wind pressure (0.46 kPa for a 1-in-50-year wind, from the Ontario climate data) is moderate; Ridgecap's laminated shingle carries Class H and Class F wind ratings and a Class A fire rating, which is far more than a Hamilton house needs. The extra margin covers the gusts that come off the lake and the Escarpment.
Exposure, headlap and the nailing zone
Exposure is the part of each shingle that is left showing to the weather: the distance from the bottom edge of one course to the bottom edge of the next. It is set by the manufacturer and printed on the wrapper. On most laminated shingles made to metric dimensions, which is nearly all shingles sold in Canada and the US today, the shingle is 1,000 mm by 336 mm (39-3/8 in by 13-1/4 in) and the exposure is 143 mm (5-5/8 in). Older shingles, still found on tear-offs, were 914 mm by 305 mm (36 in by 12 in) with a 127 mm (5 in) exposure.
Because every course is lapped by the next, most of each shingle is covered by the shingles above. On a three-tab shingle, every point on the roof is covered by at least two thicknesses of shingle, except at the cutouts. The headlap is the amount by which each course overlaps the course two courses below it:
Worked problem
Headlap of a standard shingle
A shingle is 336 mm high with a 143 mm exposure. What is the headlap?
Show solution
- Headlap = 336 − 2 × 143 = 336 − 286 = 50 mm.
Answer: 50 mm. Every course overlaps the course two below it by 50 mm, and that lap is what keeps wind-driven water out.
On a laminated shingle there is a band across the middle where the two layers overlap, called the common bond area. Nails must go through this double-thick band, in the nailing zone that the manufacturer prints or marks on the shingle, so that each nail catches both layers and also the top edge of the shingle below. Lesson 8 covers nail placement in detail.
Worked problem
What happens if exposure creeps
A new crew member lays shingles at 150 mm exposure instead of 143 mm. What is the headlap now, and how far off is the 32nd course?
Show solution
- Headlap = 336 − 2 × 150 = 36 mm, instead of 50 mm.
- Error per course = 150 − 143 = 7 mm.
- After 32 courses: 32 × 7 = 224 mm.
Answer: The headlap falls to 36 mm, the nails move out of the nailing zone of the course below, and the courses finish 224 mm out of line with the other slope. The roof is outside the warranty and must be fixed.
Shingles per square and courses per slope
With the size and exposure known, the number of shingles per square and the number of courses on a slope follow directly.
Worked problem
Shingles per square
How many 1,000 mm shingles at 143 mm exposure cover a square (9.29 m²)? How many old 914 mm three-tabs at 127 mm?
Show solution
- Each metric shingle shows 1.000 × 0.143 = 0.143 m².
- Shingles per square = 9.29 ÷ 0.143 = 65.0.
- Each old shingle shows 0.914 × 0.127 = 0.1161 m², and 9.29 ÷ 0.1161 = 80.0.
Answer: 65 metric shingles per square, or 80 of the old size. That is why three bundles of metric laminates usually hold about 64 to 66 shingles in all.
Worked problem
Courses on 19 Linden
The 19 Linden slope is 4,567 mm long from the eave edge to the ridge. How many courses of 143 mm exposure fit?
Show solution
- Courses = 4,567 ÷ 143 = 31.9.
- So 31 full courses and a 32nd course that is trimmed or partly covered by the ridge cap.
- Rory snaps a horizontal chalk line every few courses to check: course 10 should sit 10 × 143 = 1,430 mm above the eave edge.
Answer: About 32 courses per slope. Checking with chalk lines on both slopes means the courses meet evenly at the ridge.
A good crew measures the slope, divides by the exposure and then decides how the last course will finish before laying the first one. If the last course would be a sliver less than about half an exposure, the exposure of a few courses near the top can be reduced slightly so the ridge cap covers a decent last course. Exposures are never increased beyond the printed figure.
Colour, blends and run numbers
Laminated shingles are made in colour blends: granules of several colours mixed so that the roof does not look flat. Every production run is a little different, so manufacturers stamp a run or lot number on each bundle. Crew 5's rules:
- Order the whole job at once so it comes from one run where possible.
- Check the run numbers on delivery. If there are two, plan to use one run on whole slopes and the other on other whole slopes, never mixing within a slope.
- Work from several bundles at once, taking shingles from three or four open bundles in turn, so the blend on the roof is even. Never lay a whole bundle in one patch.
- Keep the spare bundle left for the owner from the same run as the main roof.
Storage and handling
- Store bundles flat on a pallet, off the ground, covered against rain but not wrapped airtight in the sun, which can soften and stick them together. Do not stack pallets more than two high.
- Do not bend bundles over the ridge or a shoulder when it is cold; shingles become brittle below about 4 °C (40 °F) and crack. In cold weather, keep bundles warm until they are used.
- On a hot day, laminated shingles soften and scuff. Carry bundles flat, and do not drag them across the finished roof.
- Do not lay shingles that are cracked, wet, stuck together or deformed.
- Break bundles over a ridge or the roof bracket plank only when they are warm enough to bend.
Cold-weather application
Sealant strips need the sun's heat to bond. In spring and summer, a few warm days seal a new roof. In late fall, as on the Elmcrest bungalow in October, the strips may not seal until the next spring, and a winter storm can lift unsealed shingles. Shingle makers allow cold-weather application with extra steps: handle shingles carefully to avoid cracking, and hand-seal each shingle with spots of asphalt roofing cement placed as the instructions say. Ridgecap hand-seals every shingle on the rakes and the first two courses at the eaves on any roof shingled after the middle of October, and on any roof in a windy, exposed spot.
19 Linden, by the label
Keisha had been right: the two pallets at 19 Linden came from two runs. Rory planned the job so one run covered the front slope and the other the back slope, and opened four bundles at a time on each. When the roof was done, nobody could tell. The spare bundle in the garage came from the back-slope run, the side that faces the street behind, which Keisha said was the side the owner would most likely repair.
Common mistakes
MistakeLaying shingles at a guessed or remembered exposure.
InsteadRead the wrapper; most metric laminates are 143 mm (5-5/8 in), but designer shingles differ.
MistakeMixing two run numbers on one slope.
InsteadKeep each run on whole slopes, and blend from several open bundles.
MistakeAssuming the wind rating holds however the shingles are installed.
InsteadRatings depend on correct nails, nail placement, starter and sealing.
MistakeLeaving a thin last course at the ridge.
InsteadPlan the courses from the slope length before starting and adjust a few courses if needed; never increase the exposure.
MistakeBending cold bundles over the ridge.
InsteadShingles crack below about 4 °C (40 °F); keep them warm and handle them flat.
Summary and key terms
- Asphalt shingles are a glass mat filled with asphalt, surfaced with granules, with a factory sealant strip.
- Three-tab, laminated, designer and impact-resistant shingles differ in layers, weight, look and ratings; laminated shingles are Ridgecap's standard.
- Wind ratings (ASTM D7158 D, G, H and D3161 A, D, F), impact ratings (UL 2218) and fire classes describe tested performance, valid only with correct installation.
- Exposure is set by the maker; metric shingles are usually 1,000 by 336 mm (39-3/8 by 13-1/4 in) at 143 mm (5-5/8 in) exposure.
- Headlap = height − 2 × exposure; creeping exposure reduces headlap and moves nails out of the nailing zone.
- Shingles per square = square area ÷ exposed area per shingle; courses = slope length ÷ exposure.
- Exposure
- The part of a shingle left exposed to the weather; the distance between the bottom edges of successive courses.
- Headlap
- The overlap of a course over the course two courses below it.
- Laminated shingle
- A shingle made of two layers bonded together, giving a thicker, textured look.
- Common bond area
- The double-thick band of a laminated shingle where its two layers overlap, where the nails go.
- Sealant strip
- A line of heat-activated asphalt adhesive that bonds each course to the one above.
- Run number
- A production lot number on a bundle; bundles of the same colour from different runs can look different.
- Hand-sealing
- Adding spots of roofing cement under shingles that may not self-seal, as in cold weather.
Practice problems
Work each problem on paper first, then reveal the answer to check.
A shingle is 336 mm high with a 140 mm exposure. What is the headlap?
Show answer
336 − 280 = 56 mm.
A slope is 6.0 m long. How many courses at 143 mm?
Show answer
6,000 ÷ 143 = 42.0, so 42 courses.
What does UL 2218 Class 4 mean?
Show answer
The shingle passed the largest steel-ball impact test, simulating hail.
Why work from several open bundles at once?
Show answer
To blend the colour evenly across the slope.
Why hand-seal shingles laid in late October?
Show answer
The sealant strips may not bond before winter storms without sun heat.
Lesson quiz · 5 questions
Score 60% or more to complete this lesson.
Create a free account to save your progress, take quizzes and earn a certificate.