
ROOF-130 · Lesson 10 of 12 · 22 min
Hips, ridges and roof ventilation
▶ Video coming soon A video version of this lesson is on the way.
The last thing Crew 5 does on every shingle roof is cap it, and the last thing Wes checks before signing off is whether air can move through the attic. At 19 Linden he sent Rory up into the attic with a flashlight before the ridge went on. "Look at the soffits," Wes called up through the hatch. "Can you see daylight at the bottom of every rafter bay?" Rory could not. Forty years of blown-in insulation had buried every soffit vent. A ridge vent on top of that attic would have been a chimney with no air coming in at the bottom.
Hips and ridges are the external corners and the top of a roof. They are covered with cap shingles bent over the joint. Ridges are also where most attics breathe out. This lesson covers hip and ridge caps, then attic ventilation: why it matters to a shingle roof, how much the codes require, how to balance intake and exhaust, and how to install ridge vents and other vents.
Hip and ridge caps
At a hip or ridge, the field shingles from the two slopes meet, but their top edges are cut and nailed, not lapped. Cap shingles cover that joint. They are bent over the hip or ridge, each one lapping the one before it so water runs over the laps.
- Manufactured hip and ridge caps: thick, pre-cut and often pre-bent pieces made for the shingle line, with their own sealant strips and a stated exposure. Ridgecap uses the shingle maker's cap, which is required for the longest warranties and is the only product that suits thick laminated shingles.
- Cut caps from three-tab shingles: the traditional method. A three-tab shingle is cut at the slots into three pieces about 333 mm (13 in) square, with the top corners tapered so they do not show under the next cap. Laminated shingles should not be cut for caps; their layers crack when bent, and most makers forbid it.
- High-profile caps: tall, decorative ridge pieces that give a heavier ridge line, used on some premium roofs.
Installing caps
- Finish the field shingles on both slopes, trimmed to meet at the hip or ridge without a gap. On a ridge with a ridge vent, the shingles stop at the edges of the vent slot.
- Snap a chalk line on each side of the hip or ridge, half the cap width out from the centre, so the caps run straight.
- Hips first, from the bottom up. Start at the eave with a trimmed cap (or a starter cap) cut flush with the drip edge, then lay each cap lapping the one below at the stated exposure.
- Ridges after the hips, starting at the end of the ridge away from the prevailing wind, so the exposed edges of the caps face downwind. In Hamilton the prevailing winds are generally from the west, so Crew 5 usually starts at the east end.
- Nail each cap with two nails, one each side, about 25 mm (1 in) in from the edge and just below the area the next cap will cover, as the maker shows. Cap nails must be longer than field nails: they pass through the cap, two layers of field shingles and often a ridge vent. Ridgecap uses 44 mm (1-3/4 in) nails, or longer through ridge vents, as the vent maker requires.
- Where a hip meets the ridge, cover the junction with a cut cap or a piece made for it, set in roofing cement so it seals.
- At the far end of a ridge, cut the last cap to length, nail it through its exposed face, and cover the nail heads with roofing cement.
- In cold weather, keep caps warm before bending them. A cracked cap is a leak in the most exposed spot on the roof.
Worked problem
Caps for 19 Linden
The ridge at 19 Linden is 10.4 m long. The cap product has a 203 mm exposure, and a bundle covers 10 m. How many caps are laid, and how many bundles are needed?
Show solution
- Caps = 10,400 ÷ 203 = 51.2, so 52 caps, the last one cut to length.
- Bundles = 10.4 ÷ 10 = 1.04, so 2 bundles.
Answer: About 52 caps from 2 bundles. The rest of the second bundle stays with the spare field bundle for the owner.
Why ventilation matters to a shingle roof
ROOF-120 showed how moist, warm air leaking into an attic causes condensation, frost and ice dams. Ventilation is the second line of defence, after air sealing and insulation. Air drawn in at the eaves and out near the ridge:
- Carries away moisture that gets into the attic, so it does not condense on the cold underside of the deck in winter.
- Keeps the deck cold in winter, so snow does not melt over the attic and freeze at the eaves.
- Takes some of the heat out of the attic in summer, which helps the shingles last.
Shingle manufacturers' warranties require ventilation that meets the code or their own guidelines, and a manufacturer can refuse a claim for blistered or curled shingles on a roof with a stuffy attic. So the roofer is responsible for checking ventilation on every re-roof, even though the attic is not part of the roof covering.
How much ventilation
Ventilation is measured by its net free area (NFA): the actual open area that air can pass through, after allowing for screens, louvres and baffles. Every vent product lists its NFA, in square centimetres or square inches per vent, or per metre of length.
- Under Article 9.19.1.2 of the 2024 Ontario Building Code, the unobstructed vent area must be at least 1/300 of the insulated ceiling area, or 1/150 where the roof slope is less than 1 in 6 or the roof is built with roof joists, such as a cathedral ceiling. The vents must be spread out evenly, with at least 25 per cent of the area at the top of the space and at least 25 per cent at the bottom.
- Ventilation makers add their own rule: intake must be at least as large as exhaust. If there is more exhaust than intake, the exhaust vents pull air from wherever they can, including the house below, through every leak in the ceiling. That draws warm, moist air into the attic, the opposite of what ventilation is for.
Ridgecap designs every re-roof to the code minimum with about half the area as intake at the soffits and half as exhaust at or near the ridge, and never less intake than exhaust.
Worked problem
Ventilation for 19 Linden
The insulated attic floor at 19 Linden is 9.6 m by 6.8 m. Find the minimum vent area at 1/300, and check whether a ridge vent of 380 cm² per metre, cut 300 mm short of each end of the 10.4 m ridge, plus continuous soffit vent of 190 cm² per metre along both 10.4 m eaves, meets the code and the intake rule.
Show solution
- Ceiling area = 9.6 × 6.8 = 65.28 m².
- Minimum vent area = 65.28 ÷ 300 = 0.2176 m² = 2,176 cm².
- Ridge vent length = 10.4 − 2 × 0.3 = 9.8 m; exhaust = 9.8 × 380 = 3,724 cm².
- Soffit length = 2 × 10.4 = 20.8 m; intake = 20.8 × 190 = 3,952 cm².
- Total = 3,724 + 3,952 = 7,676 cm², more than 2,176. Top and bottom are each about half (more than 25 per cent). Intake 3,952 is more than exhaust 3,724.
Answer: It passes, on paper. But only if the soffit vents are actually open to the attic, which at 19 Linden they were not.
That is the catch Wes had sent Rory to find. Soffit vents that are buried under insulation, painted over or blocked by old wood soffits count for nothing. At 19 Linden, Ridgecap's quote already included baffles: Rory and Keisha installed a cardboard or foam baffle (a rafter vent) at the bottom of every rafter bay, pushing the insulation back so air from the soffit could flow up under the deck.
Exhaust vents
| Vent | Where | Notes |
|---|---|---|
| Ridge vent | along the ridge, under the caps | Ridgecap's first choice: continuous, even exhaust at the highest point; needs enough ridge length |
| Static box vents (roof louvres) | individual vents near the ridge | used on hip roofs with short ridges; spread evenly, high on the slope |
| Turbine vents | near the ridge | spin in wind; noisy and prone to leaks when worn |
| Gable vents | in gable walls | cross-ventilation; can short-circuit a ridge vent |
| Powered attic fans | roof or gable | can depressurize the attic and pull house air through the ceiling; Ridgecap removes them on re-roofs unless the owner insists |
One rule applies to all of them: do not mix exhaust types on the same attic space. Air takes the easiest path. A ridge vent beside box vents or gable vents will draw its air from the nearest exhaust opening instead of from the soffits, leaving the lower attic stagnant. When Ridgecap installs a ridge vent, it removes the old box vents and patches the deck, and closes off gable vents from inside unless the attic designer says otherwise.
Installing a ridge vent
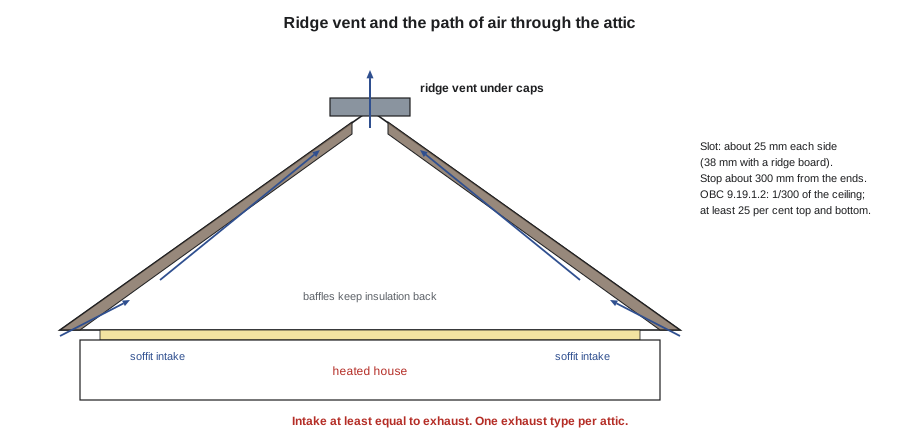
- Cut the slot before the underlayment goes on, or cut the underlayment back afterward. The vent maker gives the slot width: commonly about 25 mm (1 in) each side of the ridge on truss roofs, or about 38 mm (1-1/2 in) each side where there is a ridge board, so the opening clears the board. Set the saw depth to the deck thickness so it does not cut the framing.
- Stop the slot short of each end of the ridge, and short of hip junctions, by the distance the maker requires, often about 300 mm (12 in).
- Run the underlayment and field shingles up to the edge of the slot, leaving it open.
- Lay the ridge vent over the slot, centred, and nail it through to the deck with the long nails the maker specifies, at the spacing shown. Butt or join sections as the maker shows; do not leave gaps.
- Install the cap shingles over the vent, with nails long enough to pass through the caps and the vent into the deck.
- Check from the attic: daylight through the slot, and no nails in the framing.
Hip roofs and short ridges
A hip roof has a short ridge, sometimes only a metre or two, which may not give enough exhaust area for the attic. Options include ridge vents along the hips (some products are made for this, and some makers do not allow it), static box vents set high on the slopes, or a combination of ridge vent with box vents on the same roof if the vent maker allows it. The Elmcrest bungalow, with a 4.2 m ridge, is exactly that case. Lesson 12 works out its vents.
What Rory found at 19 Linden
With baffles in every bay and the ridge vent in, Wes sent Rory back into the attic at 4 p.m. on a warm afternoon. Air was moving: the strings Rory had taped to two baffles were lifting toward the ridge. Rory also checked the bathroom fan: unlike the house Dana had written up in the spring, its duct ran properly to a roof cap. "Shingles on top, airflow underneath," Wes said. "Most re-roofs only get the first half."
Common mistakes
MistakeCutting laminated shingles to use as caps.
InsteadUse the maker's hip and ridge cap; laminates crack when bent.
MistakeStarting ridge caps at the windward end.
InsteadStart at the end away from the prevailing wind so the exposed cap edges face downwind.
MistakeUsing field nails on caps and ridge vents.
InsteadCaps need longer nails, and ridge vents need the long nails the vent maker specifies.
MistakeAdding exhaust without checking intake.
InsteadIntake must be at least equal to exhaust, and soffit vents must actually be open to the attic.
MistakeMixing a ridge vent with box vents or gable vents.
InsteadUse one type of exhaust on an attic space; remove or close the others.
Summary and key terms
- Hip and ridge caps cover the external corners; use the maker's caps, chalk lines and longer nails, laying hips bottom-up and ridges from the downwind end.
- Ventilation keeps the deck cold and dry in winter and cooler in summer; shingle warranties require it.
- The Ontario code requires 1/300 of the insulated ceiling area (1/150 for low slopes or roof joists), with at least 25 per cent at top and 25 per cent at bottom.
- Intake must be at least equal to exhaust, and soffit vents must be clear, with baffles where insulation would block them.
- Do not mix exhaust types on one attic space.
- Cut ridge vent slots to the maker's width and stopping distance without cutting framing.
- Hip and ridge cap
- A shingle piece bent over a hip or ridge to cover the joint between slopes.
- Net free area
- The open area of a vent that air can actually pass through.
- Intake vent
- A vent at or near the eaves that lets outside air into the attic.
- Exhaust vent
- A vent at or near the ridge that lets attic air out.
- Ridge vent
- A continuous vent along the ridge, covered by cap shingles.
- Baffle
- A rafter vent that holds insulation back from the soffit so air can flow under the deck.
- Short-circuiting
- Air flowing between two exhaust vents instead of in from the soffits.
Practice problems
Work each problem on paper first, then reveal the answer to check.
An attic is 80 m². What is the minimum vent area at 1/300?
Show answer
80 ÷ 300 = 0.267 m² = 2,667 cm².
Half of that is to be intake. How many metres of 190 cm²/m soffit vent are needed?
Show answer
1,333 ÷ 190 = 7.0 m.
Why are hip caps laid from the bottom up?
Show answer
So each cap laps the one below and water runs over the laps.
What happens if there is more exhaust than intake?
Show answer
The exhaust draws air from the house through ceiling leaks, bringing moisture into the attic.
Why is the ridge vent slot stopped short of the ends?
Show answer
The vent maker requires it to keep wind-driven rain and snow out at the ends.
Lesson quiz · 5 questions
Score 60% or more to complete this lesson.
Create a free account to save your progress, take quizzes and earn a certificate.