
PHOT-101 · Lesson 7 of 12 · 27 min
Focus and autofocus
A slightly mis-exposed photograph can be corrected; a photograph focused on the wrong place usually cannot. Lesson 3 showed how shallow depth of field can be, sometimes only a few centimetres, and modern cameras can track a bird in flight or an athlete's eye across the frame. Getting focus right means knowing how autofocus works, choosing the mode and area that suit the subject, putting the focus point where it matters, and knowing when to switch to manual. This lesson covers the technologies of autofocus, single and continuous modes, focus areas and subject detection, techniques such as back-button focus and focus-and-recompose (and its hidden error), manual focus and its aids, zone focusing for street photography, and how to check and troubleshoot focus.
What focusing does
Focusing moves lens elements so that the subject's image falls exactly on the sensor. A distant subject needs the lens at its infinity position; closer subjects need the lens elements moved farther from the sensor. The minimum focus distance is the closest a lens can focus. Only one plane, parallel to the sensor, is in perfect focus; depth of field (Lesson 3) extends around it. Every focusing decision is therefore a decision about which distance, and so which part of the subject, matters most.
How autofocus works
Cameras use two main ways to judge focus:
- Contrast detection: the camera moves the lens and watches the contrast of the image at the focus point, stopping where contrast peaks. It is accurate, because it measures the image on the sensor itself, but it has to overshoot the peak to find it, which makes it slower and prone to "hunting" back and forth, especially in low light.
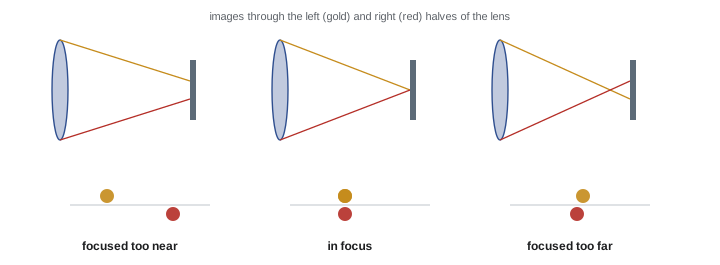
- Phase detection: the camera compares images of the subject seen through opposite sides of the lens. If they are offset, the lens is out of focus, and the direction and size of the offset tell the camera which way and how far to move. It is fast and can track moving subjects. DSLRs use a separate phase-detection sensor; mirrorless cameras build phase-detection pixels into the image sensor, or split every pixel into two halves (dual-pixel autofocus).
Most mirrorless cameras combine both (hybrid autofocus), using phase detection to move quickly near the correct position and contrast detection for final precision. Autofocus needs light and detail: it struggles with plain walls, clear skies, low light and low contrast. Many cameras project an assist light, and phase-detection points are often most sensitive to lines in one direction, so rotating the camera slightly can help.
Focus modes
Cameras offer three main focus modes:
- Single autofocus (AF-S, One-Shot): the camera focuses when you half-press the shutter (or press the AF button) and then locks. Best for still subjects: landscapes, architecture, posed portraits.
- Continuous autofocus (AF-C, AI Servo): the camera keeps refocusing as long as the button is held, predicting the subject's movement. Essential for moving subjects: sport, children, animals, vehicles, and people walking toward you.
- Manual focus (MF): you turn the focus ring. Best when autofocus cannot cope or when you want precise control: macro, astrophotography, video, through glass or foliage, and zone focusing.
Some cameras have an automatic mode that switches between single and continuous when they detect movement; it is convenient but less predictable. Many photographers simply leave the camera in continuous mode with subject detection, which handles still subjects perfectly well, and use manual when needed.
Focus areas and subject detection
The focus area mode decides where in the frame the camera looks for focus:
- Single point: you choose one small point, giving precise control: on an eye, a particular flower, the gap between foreground leaves.
- Zone or group: a cluster of points, which tolerates a subject that moves a little within the zone.
- Wide or automatic area: the camera chooses, usually the nearest or most prominent subject. Convenient but unreliable when the subject is not the nearest object.
- Tracking: you start focus on a subject and the camera follows it as it moves around the frame.
Modern cameras add subject detection, using machine-learning models to recognize and track eyes, faces and bodies of people and animals, birds, vehicles, aircraft and trains. Eye detection has transformed portrait and wedding photography: the camera finds the nearer eye and holds focus on it even as the person moves. It is not infallible. It may choose the wrong person in a group or the wrong eye on a turned head, or lock onto a face in a poster in the background, so watch the indicator and override when necessary.
| Situation | Focus mode | Focus area |
|---|---|---|
| Landscape, architecture | Single (or manual) | Single point at the chosen distance |
| Posed portrait | Continuous or single | Eye detection, or single point on the near eye |
| Children, pets, street | Continuous | Subject detection or zone |
| Field sport | Continuous | Zone or tracking with subject detection |
| Birds in flight | Continuous | Wide or tracking with bird detection |
| Macro, astrophotography | Manual | Magnified live view |
Where to focus
Choosing the focus point is a creative decision. For people and animals, focus on the eyes, and with shallow depth of field, on the nearer eye: viewers forgive a soft ear but not a soft eye. For groups, focus on the middle row, roughly a third of the way into the depth of the group, and stop down (Lesson 3). For landscapes, focus at the hyperfocal distance or on the most important near element. For products and close-ups, focus on the feature the picture is about, such as a watch face or the front of a label, and use focus stacking if everything must be sharp.
Back-button focus
By default, half-pressing the shutter button both focuses and meters. Many photographers move autofocus to a separate button on the back of the camera (often AF-ON), so the shutter button only takes the picture. With back-button focus and continuous AF, you can hold the button to track a moving subject, release it to lock focus on a still one, and shoot freely without the camera refocusing each time you press the shutter. It is popular among sport, wildlife and wedding photographers, and takes a few days of practice to become natural.
Focus and recompose, and its hidden error
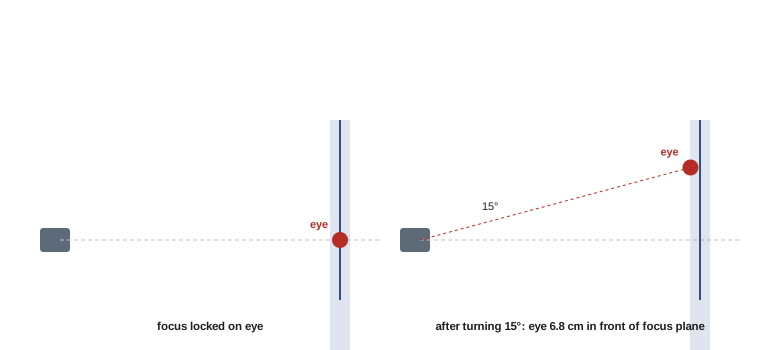
A traditional technique is to focus on the subject with the central point, lock focus, then turn the camera to recompose the shot with the subject off-centre. It works with modest depth of field, but turning the camera swings the plane of focus. The locked focus distance was measured along the line to the subject; after turning, the camera's plane of focus lies at that distance straight ahead, which may be behind the subject. With very shallow depth of field the error can exceed the depth of field.
Worked problem
Cosine error in recomposing
You focus an 85 mm lens at f/1.8 on a person's eye 2.0 m away using the central point, then turn the camera 15° to place the eye near a third of the frame. How far is the plane of focus moved relative to the eye? The total depth of field (Lesson 3, focus at 2.0 m) is about 6 cm.
Show solution
- After turning, the eye lies 15° off the lens axis. Its distance along the axis is 2.0 × cos 15° = 1.932 m.
- The plane of focus stays at 2.0 m along the new axis, so it lies 2.0 − 1.932 = 0.068 m = 6.8 cm behind the eye.
- The depth of field in front of the focus plane is only about 3 cm.
Answer: The plane of focus moves almost 7 cm behind the eye, more than the depth of field in front of it, so the eye is soft and the ears may be sharp. With wide apertures and close subjects, move the focus point to the subject instead of recomposing; modern cameras with eye detection make this easy. At f/8, or with distant subjects, the error is usually harmless.
Manual focus and its aids
Manual focus is precise when the camera helps. Mirrorless cameras offer magnification, enlarging part of the image in the viewfinder so you can judge critical sharpness, and focus peaking, which outlines in-focus edges in a bright colour. Focus peaking is quick but approximate, since it marks everything within a range; magnification is slower but exact. Many lenses focus "by wire", where the ring sends signals to a motor, so the same rotation may move focus by different amounts depending on how fast you turn it; some cameras allow a linear setting that behaves like a mechanical lens.
Use manual focus when autofocus is confused: shooting through a fence or glass, among branches that catch the autofocus, of low-contrast subjects, in very dark scenes, of stars (focus on a bright star with maximum magnification), and for macro work, where it is often easier to set the magnification and rock the camera, or move it on a focusing rail, until the subject comes into focus.
Zone focusing
Street and documentary photographers often pre-focus at a set distance and rely on depth of field to cover subjects within a zone, so they can shoot instantly without waiting for autofocus or raising the camera to the eye. With a 28 mm or 35 mm lens at f/8, focusing at about 3 m keeps everything from roughly 2 to 6 m acceptably sharp on full frame. The photographer then only has to judge distance and timing. Many older manual-focus lenses have depth-of-field scales engraved beside the focus scale for this purpose; with modern lenses, a calculator or the hyperfocal method (Lesson 3) does the job.
Worked problem
Setting a street zone
With a 35 mm lens on full frame at f/8 (c = 0.03 mm), you focus manually at 3.0 m. What zone is sharp?
Show solution
- Hyperfocal distance: H = 35²/(8 × 0.03) + 35 ≈ 5,140 mm.
- Near: 3,000 × 5,140/(5,140 + 2,965) ≈ 1.90 m.
- Far: 3,000 × 5,140/(5,140 − 2,965) ≈ 7.09 m.
Answer: Roughly 1.9 to 7.1 m. Anyone in that band is acceptably sharp, so you can concentrate on composition and timing. At f/11 the zone grows to about 1.7 to 14 m.
Checking and troubleshooting focus
Always check critical focus by magnifying the image to 100 % on the camera's screen; at normal size, slight misfocus is invisible. Common problems and their causes:
- Focus on the background instead of the subject: the camera chose the wrong area; use a smaller area or subject detection.
- Soft subject, nothing sharp: probably camera shake or subject motion, not focus (Lesson 4); check the shutter speed.
- Consistently slightly in front of or behind the subject (with DSLRs or adapted lenses): the lens may need calibration with the camera's AF fine-tune setting.
- Hunting in low light: give the camera a contrasty edge to focus on, use the assist light, or switch to manual.
- Focus breathing: some lenses change their angle of view slightly as they focus, which matters mainly for video and focus stacking.
Common mistakes
MistakeUsing single AF for moving subjects.
InsteadUse continuous AF so the camera tracks the subject.
MistakeLetting the camera choose the focus area in a cluttered scene.
InsteadUse a single point, zone or subject detection on the subject.
MistakeFocusing and recomposing at f/1.4 close up.
InsteadMove the focus point to the subject to avoid cosine error.
MistakeJudging focus on the unmagnified screen.
InsteadZoom to 100 % to check critical focus.
MistakeBlaming focus for every soft picture.
InsteadCheck the shutter speed for shake or motion blur first.
Summary and key terms
- Focusing places one plane of the scene exactly on the sensor; depth of field surrounds it.
- Contrast detection is accurate but slower; phase detection is fast and tracks; hybrids combine both.
- Use single AF for still subjects, continuous AF for moving ones, manual when AF fails.
- Choose focus areas deliberately; subject and eye detection help but can be fooled.
- Focus on the nearer eye for portraits and a third into the depth of a group.
- Focus-and-recompose shifts the plane of focus by d(1 − cos θ); move the point instead at wide apertures.
- Magnification, peaking and zone focusing support manual focus; check focus at 100 %.
- Minimum focus distance
- The closest distance at which a lens can focus.
- Contrast-detection AF
- Autofocus that seeks maximum image contrast.
- Phase-detection AF
- Autofocus that compares images through opposite sides of the lens.
- Single AF
- A mode that focuses once and locks.
- Continuous AF
- A mode that keeps refocusing on a moving subject.
- Subject detection
- Automatic recognition and tracking of eyes, people, animals or vehicles.
- Back-button focus
- Assigning autofocus to a button separate from the shutter release.
- Cosine error
- Focus shift caused by turning the camera after locking focus.
- Focus peaking
- A display that highlights in-focus edges.
- Zone focusing
- Pre-focusing at a distance so a range of distances is acceptably sharp.
Practice problems
Work each problem on paper first, then reveal the answer to check.
Why does contrast-detection autofocus hunt?
Show answer
It must move past the contrast peak to find it.
Which focus mode suits a child running toward you?
Show answer
Continuous autofocus with subject or zone tracking.
Where should you focus for a three-row group photo?
Show answer
On the middle row, about a third into the group's depth, with a small enough aperture.
Name one advantage of back-button focus.
Show answer
You can lock or track focus independently of taking the picture.
Find the focus shift when recomposing 20° on a subject 1.5 m away.
Show answer
1.5 × (1 − cos 20°) ≈ 0.09 m = 9 cm.
Why might eye detection fail at a party?
Show answer
It may pick another person, the wrong eye, or a face in a picture.
Which manual-focus aid is more exact: peaking or magnification?
Show answer
Magnification.
Name three situations where manual focus is better.
Show answer
For example: through glass or a fence, stars, macro, low-contrast subjects, video.
Using the street-zone example, what happens to the zone if you open up to f/4?
Show answer
It shrinks: H ≈ 10.2 m, so about 2.3 to 4.3 m.
A picture is soft all over, including the background. What is the likely cause?
Show answer
Camera shake (too slow a shutter speed), not focus.
Lesson quiz · 5 questions
Score 60% or more to complete this lesson.
Create a free account to save your progress, take quizzes and earn a certificate.