
PHOT-101 · Lesson 6 of 12 · 26 min
Metering, histograms and exposure compensation
Lessons 3 to 5 showed how aperture, shutter speed and ISO combine to set exposure. But what exposure is "correct"? The camera's light meter proposes an answer, and most of the time it is good. It can also be badly wrong in predictable situations: a snowy field turned grey, a bride's dress without detail, a black cat lost in murk, a backlit face in silhouette. This lesson explains how meters work and why they are fooled, the metering modes and when to use each, exposure compensation and exposure lock, the histogram and highlight warnings that let you judge exposure objectively, how to handle scenes whose contrast exceeds what the sensor can record, and how to work in manual exposure with steady light.
What a meter measures
A camera's built-in meter measures the light reflected from the scene through the lens, so it is called a reflected-light meter. It cannot know whether it is looking at a bright subject in dim light or a dark subject in bright light; both reflect the same amount of light. So it assumes every scene averages to a middle grey, a tone reflecting about 12 to 18 % of the light falling on it, roughly the brightness of weathered concrete, green grass or average skin in shade. It then sets an exposure that renders the measured area as that middle grey.
For most scenes, which contain a mix of light and dark tones, this works well. It fails when a scene is mostly lighter or darker than average:
- Bright scenes (snow, sand, white walls, a bride in white) are rendered too dark, as grey, because the meter pulls them down to middle grey. You must add exposure.
- Dark scenes (a black dog, dark clothing, a night street with a few lights) are rendered too light, washed-out and noisy. You must subtract exposure.
Worked problem
How far off is the meter?
You spot-meter a white wall that reflects 90 % of the light, assuming the meter aims for 18 % grey. How much exposure compensation keeps the wall white? What about black velvet reflecting 4 %?
Show solution
- White wall: log₂(90/18) = log₂ 5 ≈ +2.3 stops.
- Black velvet: log₂(4/18) ≈ −2.2 stops.
Answer: Add about 2⅓ stops for the white wall and subtract about 2 stops for the black velvet. Unless compensated, both would come out as the same middle grey. Whole scenes rarely need such large corrections because they contain a range of tones, but snow scenes commonly need +1 to +2 stops.
An incident-light meter, a handheld meter with a white dome, avoids the problem by measuring the light falling on the subject rather than the light reflected from it. Because it ignores the subject's own brightness, it renders white as white and black as black, which is why studio, portrait and film photographers use them. You can mimic it by metering a grey card placed in the subject's light.
Metering modes
Cameras offer several ways of weighting the meter's reading across the frame:
- Matrix, evaluative or multi-zone metering divides the frame into many zones, evaluates brightness, contrast, colour, focus point and sometimes detected faces, and compares the pattern with a database of scenes. It is the best general-purpose mode and handles many awkward scenes, though not all.
- Centre-weighted metering averages the whole frame but gives most weight to the central area; predictable and long-established.
- Spot metering measures only a small circle, often 1 to 3 % of the frame, usually at the centre or the active focus point. It is the precise tool for metering a particular tone, such as a face in a backlit scene or a performer under a spotlight.
- Highlight-weighted metering, on some cameras, sets exposure to avoid clipping the brightest areas, useful for stage performances and backlit subjects.
Know how your camera's default mode behaves, and switch modes deliberately. A good habit: use matrix metering by default and spot metering when the subject's brightness differs strongly from its surroundings.
Exposure compensation and exposure lock
In program, aperture priority and shutter priority modes, exposure compensation (the +/− button or dial) tells the camera to make the image brighter or darker than the meter suggests, in thirds of a stop. The camera then changes the shutter speed, aperture or auto ISO accordingly. +1 means one stop brighter. Typical corrections:
| Scene | Typical compensation |
|---|---|
| Snow, beach, white subjects filling the frame | +1 to +2 |
| Backlit subject against a bright sky (to show the face) | +1 to +2 |
| Pale subject against a dark background | −1 to −2 |
| Dark subject against a light background | +1 |
| Night scenes with lights | −1 to −2 |
| Sunset sky (to keep colour) | −⅓ to −1 |
Exposure lock (AE-L) stores a meter reading so you can recompose without the exposure changing. A common technique is to spot-meter a face, lock the exposure, recompose the frame, and shoot. On many cameras, half-pressing the shutter also locks exposure, and some photographers set a separate button so that exposure and focus can be locked independently.
The histogram
A camera's screen is a poor guide to exposure: its brightness depends on the screen setting and the surrounding light, and a picture that looks fine on a dim screen at night may be badly overexposed. The histogram is objective. It is a graph of how many pixels have each brightness value, from black at the left to white at the right. A well-exposed image of an average scene spreads across most of the range without piling up against either end.
- Pixels piled against the right edge are clipped highlights: pure white with no detail, which cannot be recovered.
- Pixels piled against the left edge are clipped shadows: pure black.
- The shape depends on the scene, not on "correctness". A snow scene should be weighted to the right, a night scene to the left. There is no ideal histogram shape, only histograms that do or do not suit the subject.
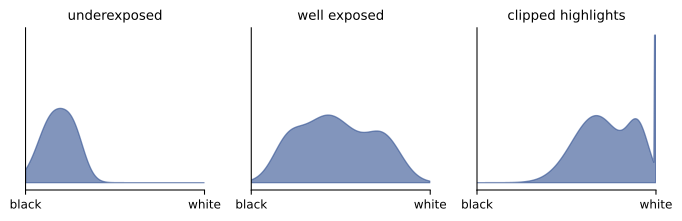
The highlight warning ("blinkies"), which flashes clipped areas on the playback image, shows exactly where detail is lost. Many cameras also show RGB histograms, one per colour channel: a single channel can clip, such as the red in a sunset or a red flower, while the overall brightness histogram looks fine, leaving that area flat and posterized. Mirrorless cameras can display a live histogram and zebra stripes over areas near clipping before you take the picture.
The camera's histogram is calculated from a JPEG preview with the camera's picture style, so it is slightly conservative compared with what a raw file actually holds (Lesson 10). A small amount of "clipping" on the camera may be recoverable in raw processing, but treat that margin as a safety buffer, not a target.
Exposing for the highlights, or to the right
Digital sensors behave differently from film: once a photosite is full, it records pure white, and nothing can bring detail back. Shadows, on the other hand, can be brightened in editing, at the cost of noise. Hence two related strategies for important images, particularly raw files:
- Protect the highlights: expose so that important highlights (a face, a white dress, clouds) are not clipped, and brighten shadows later if needed.
- Expose to the right (ETTR): in low-contrast scenes, give as much exposure as possible without clipping important highlights, pushing the histogram to the right, then darken in processing. Because shadows collect more light, noise is reduced (Lesson 5).
Specular highlights, such as the sun, reflections on chrome and street lamps, are normally allowed to clip; they are brighter than any medium can show.
When the scene has too much contrast
A sunlit landscape with deep shadows, an interior with a bright window, or a backlit portrait may span 15 to 20 stops, more than a sensor can record in one frame (Lesson 5). The photographer has several options:
- Choose what matters and let the rest go: expose for the face and let the sky burn out, or expose for the sky and let the foreground fall into silhouette. Silhouettes against a sunset are made this way, exposing for the sky.
- Wait for different light, change the viewpoint, or move the subject into shade (Lesson 9).
- Add light to the shadows with a reflector or flash (PHOT-102).
- Use a graduated ND filter to darken the sky (Lesson 4).
- Bracket and blend: take several exposures at different settings and merge them into a high dynamic range (HDR) image or blend them by hand. Bracketing is also insurance in tricky light.
Worked problem
Bracketing an interior
An interior with a sunlit window spans about 16 stops from the darkest shadow to the bright scene outside. Your camera records about 12 stops at base ISO. How would you bracket?
Show solution
- The scene exceeds the sensor's range by about 4 stops.
- Take three frames 2 stops apart (−2, 0, +2 EV), which together cover about 16 stops, on a tripod so the frames align.
- Merge them in HDR software or blend by hand, then tone the result to look natural.
Answer: Three frames at −2, 0 and +2 EV. Many cameras automate bracketing; set it to change the shutter speed, not the aperture, so depth of field stays constant. Phones do this automatically, merging bursts of frames, which is why their pictures of windows and skies often look balanced. Overdone HDR, with flat contrast and halos around edges, looks unnatural; aim for an image that matches what a person standing there would remember seeing.
Manual exposure with steady light
Automatic modes adjust exposure for every frame, which is a disadvantage when the light is constant but the subject or framing changes. Photographing a person in a white shirt and then in a black jacket, or framing more or less sky, makes the meter change its reading even though the light has not changed, so the exposure jumps around. In steady light, such as a studio, a consistent overcast day, or a sports arena, manual exposure gives consistent results: set the exposure once from a meter reading of a middle tone or a grey card, check the histogram, and leave it. Professional sports and event photographers often work in manual with auto ISO switched off for exactly this reason.
The camera's exposure indicator, a scale with a marker showing how far the current settings are from the meter's suggestion, still works in manual mode: treat it as advice, and decide for yourself, guided by the histogram.
Common mistakes
MistakeTrusting the meter for snow, sand or white subjects.
InsteadAdd +1 to +2 stops so whites stay white.
MistakeJudging exposure from the brightness of the screen.
InsteadUse the histogram and highlight warnings.
MistakeExpecting every good histogram to look like a bell curve.
InsteadThe histogram should suit the scene; check the ends for clipping.
MistakeLetting important highlights clip to save shadows.
InsteadProtect highlights; shadows can be lifted later.
MistakeUsing automatic exposure in steady light with changing subjects.
InsteadUse manual exposure for consistency.
Summary and key terms
- Reflected-light meters assume the scene averages to middle grey.
- Bright scenes need positive compensation; dark scenes need negative compensation.
- Incident meters and grey cards measure the light itself and avoid the problem.
- Matrix metering suits most scenes; spot metering measures a particular tone.
- Exposure compensation and exposure lock override and hold meter readings.
- The histogram and highlight warnings judge exposure objectively; protect important highlights.
- For high-contrast scenes, choose what matters, change the light, or bracket and blend; in steady light, use manual.
- Reflected-light meter
- A meter measuring light reflected from the subject.
- Middle grey
- The tone, reflecting about 12 to 18 % of light, that meters aim to reproduce.
- Incident-light meter
- A meter measuring the light falling on the subject.
- Matrix metering
- Metering that evaluates many zones of the frame.
- Spot metering
- Metering a small area of the frame.
- Exposure compensation
- An adjustment making the image brighter or darker than the meter suggests.
- Histogram
- A graph of the number of pixels at each brightness level.
- Clipping
- Loss of detail where values reach pure white or black.
- Exposing to the right
- Giving maximum exposure without clipping important highlights.
- Bracketing
- Taking several frames at different exposures.
Practice problems
Work each problem on paper first, then reveal the answer to check.
Why does a snow scene come out grey with the meter's exposure?
Show answer
The meter renders the bright scene as middle grey.
What compensation would you start with for a black dog filling the frame?
Show answer
About −1 to −2 stops.
How many stops brighter than 18 % grey is a surface reflecting 36 %?
Show answer
One stop.
When is spot metering most useful?
Show answer
When the subject's brightness differs strongly from its surroundings, such as a spotlit performer.
A histogram has a tall spike against the right edge. What does it mean?
Show answer
Highlights are clipped.
Why check the RGB histogram for a red flower?
Show answer
The red channel may clip while overall brightness looks fine.
Why is protecting highlights more important than protecting shadows with digital sensors?
Show answer
Clipped highlights contain no data; shadows can be lifted, with some noise.
A scene spans 15 stops and your camera records 12. Suggest a bracket.
Show answer
For example three frames at −1.5, 0 and +1.5 EV, or −2, 0, +2.
Why use manual exposure for a basketball game in a gym?
Show answer
The light is steady; manual keeps exposure consistent as uniforms and backgrounds change.
Name two ways of dealing with a backlit portrait.
Show answer
For example: expose for the face with +1 to +2 compensation, add fill with a reflector or flash, or move the subject.
Lesson quiz · 5 questions
Score 60% or more to complete this lesson.
Create a free account to save your progress, take quizzes and earn a certificate.