
PHOT-101 · Lesson 1 of 12 · 27 min
How a camera works
Every camera, from a phone to a medium-format studio camera, does the same three things: it gathers light from a scene with a lens, forms a sharp image of that scene on a light-sensitive surface, and controls how much light reaches that surface and for how long. Understanding those three jobs is what separates a photographer who makes images on purpose from one who hopes the camera guesses right. This first lesson explains the parts of a camera and what each does, the sensor and how it records colour, the main types of camera, how exposure is controlled, and the shooting modes that hand some decisions to the camera while you keep the ones that matter. Later lessons take each control in turn.
From pinhole to lens
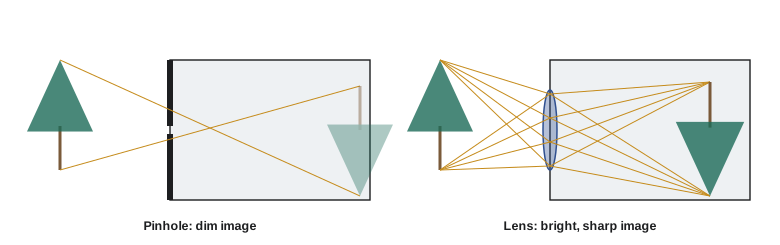
Light travels in straight lines. If a dark box has a tiny hole in one side, light from each point of the scene outside passes through the hole and lands at one point on the opposite wall, forming an upside-down image. This is the camera obscura ("dark room"), known since antiquity and used by painters for centuries. A pinhole image is sharp at every distance, but it is extremely dim, because the hole must be tiny, and enlarging the hole makes the image blur.
A lens solves the problem. It collects light through a much larger opening and bends (refracts) the rays from each point of the subject so that they converge again to a point behind the lens, forming a bright, sharp image. The price is that a lens focuses sharply at only one distance at a time, so a camera must be focused (Lesson 7), and the range of distances that looks acceptably sharp, the depth of field, depends on how wide the opening is (Lesson 3).
The focal length of a lens, in millimetres, is the distance behind the lens at which it forms a sharp image of a very distant subject. It sets the angle of view: short focal lengths see wide, long focal lengths see narrow and magnify distant subjects (Lesson 2).
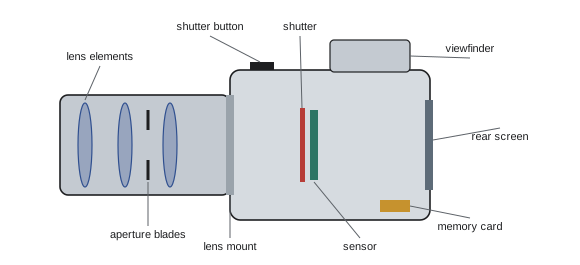
The parts of a camera
Whatever its shape, a camera has the same main parts:
- The lens, with its aperture, an adjustable opening formed by overlapping blades, which controls how much light passes (Lesson 3).
- The shutter, which controls how long the light falls on the sensor (Lesson 4). Most interchangeable-lens cameras have a mechanical shutter of two curtains that travel across the sensor; many cameras can also use an electronic shutter, which simply switches the sensor on and off.
- The sensor, which converts light into an electrical signal and then into a digital image. Its sensitivity can be amplified, which is what the ISO setting does (Lesson 5).
- The viewfinder or screen, through which you frame and focus.
- The processor and memory card, which turn sensor data into image files and store them (Lesson 10).
- The controls: shutter button, dials for exposure settings and modes, focus controls and menus.
The sensor
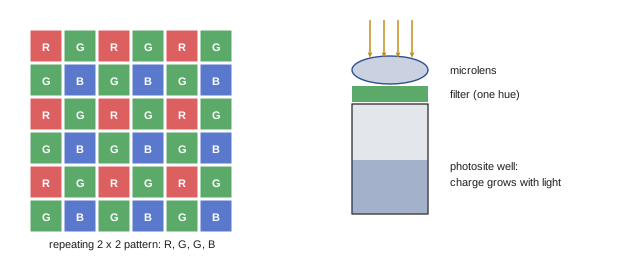
A digital sensor is a grid of millions of light-sensitive sites, called photosites or pixels. Each collects the light that falls on it during the exposure and converts the photons to electrons; the more light, the more charge. After the exposure, the charges are measured, amplified and converted to numbers. A sensor described as 24 megapixels has about 24 million photosites, typically arranged 6,000 across by 4,000 high.
Photosites measure brightness, not colour. To record colour, almost all sensors place a mosaic of tiny red, green and blue filters over the photosites, most often in the Bayer pattern, which has twice as many green filters as red or blue, matching the eye's greater sensitivity to green. Each photosite therefore records only one colour, and the camera's processor estimates the two missing colours at every pixel from its neighbours, a step called demosaicing. Raw files (Lesson 10) store the measurements before this step.
Sensors come in several sizes, and size matters more than megapixel count for many aspects of image quality. A larger sensor collects more total light for the same exposure, which means less visible noise (Lesson 5), and its photosites can be larger. Sensor size also changes the angle of view a given lens gives (Lesson 2) and how much depth of field you get (Lesson 3).
| Format | Typical size (mm) | Crop factor | Typical use |
|---|---|---|---|
| Medium format | 44 × 33 | 0.79 | Studio, landscape, fashion |
| Full frame | 36 × 24 | 1.0 | Professional and enthusiast |
| APS-C | 23.5 × 15.6 | 1.5 (1.6 for Canon) | Enthusiast and many video cameras |
| Micro Four Thirds | 17.3 × 13.0 | 2.0 | Compact interchangeable-lens systems |
| 1-inch type | 13.2 × 8.8 | 2.7 | Premium compacts, drones |
| Large phone main camera | About 9.8 × 7.3 | About 3.6 | Smartphones |
Worked problem
How big is a pixel?
A full-frame camera has a 24-megapixel sensor, 6,000 pixels across a 36 mm width. A phone has a 50-megapixel sensor, 8,160 pixels across a 9.8 mm width. Compare their pixel pitch (the spacing between photosites) and the area of each photosite.
Show solution
- Full frame: 36 mm/6,000 = 0.0060 mm = 6.0 µm.
- Phone: 9.8 mm/8,160 = 0.0012 mm = 1.2 µm.
- Area ratio: (6.0/1.2)² = 25.
Answer: Each full-frame photosite is about 25 times larger in area and collects about 25 times as much light in the same exposure. Phones compensate with computational photography: they capture a burst of frames in a fraction of a second and merge them, averaging away noise and extending dynamic range. That is why phone photos look so good in daylight, and why larger sensors still pull ahead in dim light, for moving subjects that defeat frame merging, and for large prints.
Kinds of camera
Today's main camera types are:
- Smartphones: always with you, fixed wide lenses (often several), small sensors, heavy computational processing, and increasingly capable manual and raw modes.
- Compact cameras: larger sensors or longer zoom lenses than phones in a pocketable body.
- Mirrorless interchangeable-lens cameras: the sensor sees through the lens continuously and shows the image in an electronic viewfinder (EVF) or screen, which previews exposure and white balance before you shoot. Most new professional and enthusiast cameras are mirrorless.
- Digital single-lens reflex (DSLR) cameras: a mirror reflects the image from the lens up into an optical viewfinder, then flips out of the way when you press the shutter. Still widely used, but manufacturers have largely stopped developing new models.
- Medium-format and specialized cameras: larger sensors for maximum detail, plus cameras for specific uses such as action cameras, 360° cameras and film cameras (PHOT-240).
The best camera for learning is one with full manual control of aperture, shutter speed, ISO and focus, and the ability to record raw files. Many phones now meet that standard with a "pro" mode or a third-party app.
Exposure: how much light
A photograph's exposure is the total amount of light that reaches the sensor. Too little gives a dark, noisy image with lost shadow detail (underexposure); too much gives a washed-out image with blank white highlights (overexposure). Three settings control exposure, and each has a side effect that shapes the picture:
- Aperture (f-number): a wider opening admits more light, and makes depth of field shallower.
- Shutter speed: a longer exposure admits more light, and blurs motion.
- ISO: more amplification brightens the image, and adds visible noise.
Photographers measure changes in exposure in stops. One stop is a doubling or halving of the light. Opening the aperture by one stop, doubling the shutter time, or doubling the ISO each brightens the image by one stop; doing one and reversing another keeps the exposure the same. Because all three use the same unit, you can trade one for another: the art of exposure is choosing which side effects you want. That trade-off, often drawn as the exposure triangle, is the subject of Lessons 3 to 6.
Worked problem
Trading stops
A correct exposure is 1/125 s at f/8 and ISO 200. You want to freeze a moving dancer with 1/500 s. What other settings would keep the same exposure?
Show solution
- From 1/125 s to 1/500 s is two stops less light (1/125 → 1/250 → 1/500).
- Recover two stops by opening the aperture two stops (f/8 → f/5.6 → f/4), or raising ISO two stops (200 → 400 → 800), or one of each (f/5.6 and ISO 400).
Answer: For example 1/500 s at f/4 and ISO 200, or 1/500 s at f/8 and ISO 800, or 1/500 s at f/5.6 and ISO 400. All give the same brightness; they differ in depth of field and noise, so the choice depends on the picture you want.
Shooting modes
Cameras offer several exposure modes, which decide which settings you choose and which the camera chooses from its light meter (Lesson 6):
| Mode | You set | Camera sets | Use when |
|---|---|---|---|
| Auto or scene modes | Nothing | Everything | Snapshots; not for learning |
| Program (P) | ISO (or auto ISO) | Aperture and shutter | Fast reaction, with compensation |
| Aperture priority (A or Av) | Aperture | Shutter speed | Controlling depth of field: portraits, landscapes |
| Shutter priority (S or Tv) | Shutter speed | Aperture | Controlling motion: sport, wildlife, panning |
| Manual (M) | Aperture and shutter | Nothing (or ISO with auto ISO) | Studio, flash, steady light, consistent series |
Many working photographers spend most of their time in aperture priority or in manual with auto ISO, and use exposure compensation (Lesson 6) to override the meter when the scene is unusually bright or dark. Fully automatic modes make reasonable pictures but teach nothing, because you never decide what the picture should look like. For this course, use aperture priority, shutter priority and manual.
Holding the camera and caring for it
Sharp pictures start with steady handling. Hold the camera with your right hand on the grip and your left hand cradling the lens from below, elbows tucked against your body, and the viewfinder against your eye if there is one. Press the shutter button smoothly rather than stabbing it, and exhale gently before you shoot. Lean against a wall or rest the camera on something solid when the light is low.
Look after the equipment: keep a cap on the lens when not shooting, change lenses quickly with the camera facing down to keep dust off the sensor, clean lenses with a blower and microfibre cloth rather than a shirt, carry a spare charged battery and empty memory card, and format cards in the camera after their contents are safely backed up (Lesson 10). Learn your camera's menus at home rather than in front of a subject who is waiting.
How this course is organized
The twelve lessons take you from the camera's controls to a finished photo essay:
- Lesson 1 (this lesson): how a camera works.
- Lesson 2: lenses, focal length and perspective.
- Lesson 3: aperture and depth of field.
- Lesson 4: shutter speed and motion.
- Lesson 5: ISO, noise and the exposure value.
- Lesson 6: metering, histograms and exposure compensation.
- Lesson 7: focus and autofocus.
- Lesson 8: white balance and colour.
- Lesson 9: seeing photographically: viewpoint, timing and light.
- Lesson 10: files, raw processing and workflow.
- Lesson 11: photographing people and places: ethics and the law.
- Lesson 12: the photo essay project and critique.
The course builds on the composition principles of VIS-101 and leads to PHOT-102, which concentrates on working with light.
Common mistakes
MistakeJudging a camera mainly by its megapixel count.
InsteadSensor size, lenses and handling matter at least as much.
MistakeLeaving the camera on full auto.
InsteadUse aperture priority, shutter priority or manual so you decide the look of the picture.
MistakeTreating exposure settings as unrelated.
InsteadThink in stops: aperture, shutter and ISO trade against one another.
MistakeHolding the camera at arm's length with one hand.
InsteadBrace it with both hands and elbows against your body.
MistakeFormatting a card before the pictures are backed up.
InsteadBack up first, then format in the camera.
Summary and key terms
- A lens gathers light and focuses an image; focal length sets the angle of view.
- The aperture controls how much light passes; the shutter controls how long.
- The sensor is a grid of photosites under a Bayer colour filter; demosaicing fills in missing colours.
- Larger sensors collect more light and give less noise; phones compensate computationally.
- Exposure is measured in stops; each stop doubles or halves the light.
- Aperture, shutter speed and ISO trade against one another, each with a side effect.
- Aperture priority, shutter priority and manual let you decide the look of the picture.
- Camera obscura
- A dark chamber in which light through a small hole forms an image.
- Focal length
- The distance at which a lens focuses distant objects; it sets the angle of view.
- Aperture
- The adjustable opening in a lens that controls how much light passes.
- Shutter
- The device that controls how long light reaches the sensor.
- Photosite
- A single light-sensitive element of a sensor.
- Bayer filter
- A mosaic of red, green and blue filters over a sensor's photosites.
- Demosaicing
- Estimating full colour at each pixel from a filtered mosaic.
- Crop factor
- The ratio of the full-frame diagonal to a sensor's diagonal.
- Stop
- A doubling or halving of the light reaching the sensor.
- Aperture priority
- A mode in which you set the aperture and the camera sets the shutter speed.
Practice problems
Work each problem on paper first, then reveal the answer to check.
Why is a pinhole image dim, and why does a lens fix that?
Show answer
The hole must be tiny to stay sharp; a lens gathers light through a large opening and focuses it to points.
What are the three settings that control exposure?
Show answer
Aperture, shutter speed and ISO.
A sensor is 23.5 mm wide with 6,000 pixels across. Find the pixel pitch.
Show answer
23.5/6,000 = 0.0039 mm ≈ 3.9 µm.
Why does a Bayer sensor have twice as many green filters?
Show answer
The eye is most sensitive to green, which carries most of the detail we perceive.
What is the crop factor of a sensor whose diagonal is 28.4 mm? (Full frame diagonal 43.3 mm.)
Show answer
43.3/28.4 ≈ 1.5.
How many stops is a change from 1/60 s to 1/15 s?
Show answer
Two stops more light.
You change from ISO 400 to ISO 100. How many stops darker is the image if nothing else changes?
Show answer
Two stops.
Which mode would you choose to control depth of field?
Show answer
Aperture priority (or manual).
Name one advantage of a mirrorless camera's electronic viewfinder.
Show answer
It previews exposure and white balance before you shoot.
Give two habits that help make sharp handheld photos.
Show answer
For example: brace elbows against the body, press the shutter smoothly, lean on something solid.
Lesson quiz · 5 questions
Score 60% or more to complete this lesson.
Create a free account to save your progress, take quizzes and earn a certificate.