
IRW-330 · Lesson 7 of 12 · 25 min
Wall panels and trim
▶ Video coming soon A video version of this lesson is on the way.
On Monday, July 20, 2026, the Brannock building looked like a skeleton: frames, purlins, girts and bracing, with a new concrete slab inside and the crane gone. By Friday, July 24, all four walls were covered in pale grey ribbed steel. Corwin's crew had switched from ironwork to sheet metal work, and the tools changed with it: screw guns, panel shears, nibblers, chalk lines, foam closures and tubes of sealant. This lesson covers the wall panels of a metal building: the panel types and coatings, how panels are handled and cut, how they are laid out and fastened, the closures and trim that seal the walls, and the mistakes that cause leaks and callbacks.
Panel types
Most metal building walls use a through-fastened ribbed panel: a sheet of steel roll-formed into a pattern of major ribs and minor ribs, fastened with exposed screws through the flat parts of the sheet into the girts. The most common profile across North America is often called an R-panel or PBR panel, with major ribs about 300 mm (12 in) apart and a net coverage width of 914 mm (36 in). Other profiles include deeper ribs for long spans and flatter profiles for appearance.
Some buildings use other systems. Concealed-fastener wall panels hide the screws inside the joint for a cleaner look. Insulated metal panels, often called IMPs, are factory-made sandwiches of two steel skins with a foam core, installed with concealed clips; they give a finished, insulated wall in one step and are common on cold storage, food plants and commercial buildings. Liner panels are light panels installed inside a building, over the girts or the insulation, to protect the insulation and give a cleanable inside surface.
The Brannock walls were Northfield's standard R-style panel in 0.46 mm base steel thickness, roughly the thickness sold as 26 gauge, prepainted in a colour Erin Brannock chose from a chip card at the first meeting. The lower 0.9 m (3 ft) of each wall had a darker wainscot panel in the same profile, separated from the upper panels by a small trim strip, so that splashes and machinery scuffs would not show.
Coatings and why they matter
Panel steel is protected by a metallic coating, usually galvanized zinc or an aluminum-zinc alloy sold under names like Galvalume, and on most panels a factory paint system over that. Common paint systems include silicone-modified polyester, which is economical, and PVDF fluoropolymer, which holds its colour longer. The coating and paint are what give the panel its life, and they can be damaged in a moment on site.
- Scratches through the paint and metallic coating expose bare steel that will rust.
- Hot particles from an abrasive saw or grinder embed in the paint and rust within days, leaving orange freckles across a panel.
- Metal shavings, called swarf, left on the panels from drilling and cutting rust on the surface and stain the paint.
- Water trapped between stacked sheets causes white rust or staining.
- Some sealants, cleaners and treated wood attack the coating.
Most manufacturers say plainly that panels must not be cut with abrasive saws or grinders and that swarf must be swept off the panels at the end of each day. Damage of this kind is not covered by the panel warranty, and it is one of the commonest reasons owners refuse to accept a building.
Handling panels
Wall panels for a building like Brannock are 6 to 7 m (20 to 23 ft) long and each weighs 25 to 30 kg (55 to 65 lb). That is not heavy, but a long panel is flexible and acts like a sail. Two people carry each long panel on edge, one at each end, and stand it against the girts. In a breeze, a panel can twist out of a worker's hands or knock someone off a ladder, and in a strong wind a single sheet can be thrown across a site.
Crossbeam's company rule for panels is stricter than for steel: no wall or roof panels are handled when gusts reach about 30 km/h (20 mph), panels are lifted to the roof only in bundles over the frames, and every opened bundle is strapped down or weighted at the end of the day. Cut-resistant gloves and long sleeves are worn, because panel edges cut like knives. These are company rules; the manufacturer's guide governs where it is stricter.
Laying out the walls
Wall panels are installed in one direction around the building, starting at a corner, with each new panel lapping over the last one at its sidelap, the overlapping edge rib. The sheeting plan shows the starting corner and the direction. On a site with a strong prevailing wind, the panels are usually laid so that the exposed edge of each lap faces away from the wind, so wind-driven rain is not pushed into the laps.
The first panel sets the line for the whole wall. If it is out of plumb, every panel after it will run out further, and the last panel at the corner will be a tapered shape. The crew plumbs the first panel carefully with a level on its edge, checks its bottom against the base trim line and its top against the eave strut, and fastens it. Then they measure the coverage as they go: after every few panels, they check that the panels are covering their full net width and that the wall is still plumb, adjusting by pulling or pushing the laps slightly, never by leaving a lap open.
Worked problem
How many sidewall panels?
Each Brannock sidewall is 36 m long, measured to the outside of the girts. The panels cover 914 mm each. How many panels are needed per sidewall, and how wide is the last panel after trimming?
Show solution
- Panels = 36 ÷ 0.914 = 39.4, so 40 panels.
- Forty full panels would cover 40 × 0.914 = 36.56 m.
- The last panel covers 36.0 − 39 × 0.914 = 0.354 m, so about 0.56 m is trimmed off its width.
Answer: Forty panels per sidewall, eighty for both, with the last panel on each wall trimmed lengthwise. The trim is cut along the panel with shears so the cut edge falls under the corner trim. Building lengths that are not whole multiples of the panel coverage are normal.
Fastening
Through-fastened panels are attached with self-drilling screws that have a sealing washer, usually a metal washer bonded to an EPDM rubber washer. At each girt, screws go through the flat of the panel beside the ribs, in a pattern the manufacturer specifies; at each sidelap, stitch screws join the two sheets through the overlapping rib between girts. The fastener schedule on the details gives the screw type, size, length and spacing, and it is part of the structural design, because the screws carry wind suction from the panels to the girts.
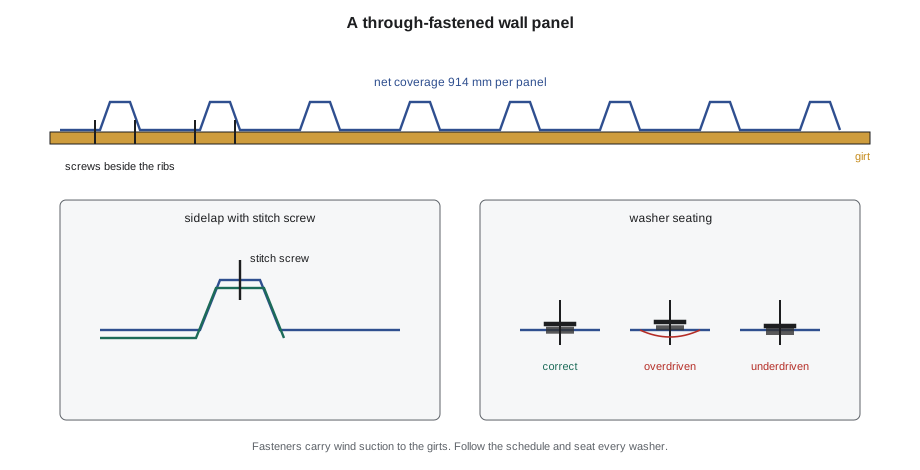
Driving the screw correctly is a skill. The screw gun is set to the right speed and the screw driven straight, perpendicular to the panel, until the washer is snug and slightly compressed, with its edge just visible beyond the metal washer. An overdriven screw crushes the washer and dimples the panel, which lets water in around it. An underdriven screw leaves the washer loose and leaks. A screw driven at an angle seals on one side only.
Worked problem
Counting wall fasteners
The Brannock sidewall panels are fastened at five supports: the base angle, three girts and the eave strut. Northfield's schedule shows five screws per panel at each support and stitch screws at 500 mm (20 in) along each sidelap over the 6.0 m height. How many screws does one sidewall panel need, and how many for both sidewalls' 80 panels?
Show solution
- Screws at supports = 5 supports × 5 = 25.
- Stitch screws = 6.0 m ÷ 0.5 m = 12.
- Per panel = 25 + 12 = 37.
- Two sidewalls = 80 × 37 = 2 960 screws.
Answer: About 2,960 screws for the sidewalls alone, plus the trim screws. The pattern used here is illustrative; the actual schedule for any building, including closer spacing at corners and edges where wind suction is higher, comes from its details.
The crew snaps chalk lines on the panels along each girt before fastening, so the screws hit the girt and run in straight rows. A screw that misses the girt is not left in the panel; it is removed and the hole sealed with an approved oversize screw or rivet and sealant, as the manufacturer allows.
The endwalls
Endwall panels follow the slope of the roof at the top, so each one is a different length. The sheeting plan gives the lengths, or the crew cuts them on site from the rake line. Endwall panels are usually ordered slightly long and cut at the top to the slope with shears, and the cut edge is covered by the rake trim.
Worked problem
An endwall panel length
On the Brannock endwall, the panels start at the eave height of 6.0 m at the corner and rise at 1:12 toward the ridge. What is the height to the roof line at the centre of the tenth panel from the corner, with panels covering 914 mm?
Show solution
- Centre of panel 10 is 9.5 panel widths from the corner: 9.5 × 0.914 = 8.683 m.
- Rise = 8.683 ÷ 12 = 0.724 m.
- Height = 6.0 + 0.724 = 6.724 m.
Answer: About 6.72 m at the panel's centre. The panel is cut along the slope line, so its high edge is a little longer, and the crew marks the cut with a straight edge from the rake line rather than measuring each panel separately.
Cutting panels
Panels are cut with tools that shear the metal rather than grind it: electric shears, nibblers, double-cut snips, or a circular saw with a blade made for cutting coated steel cold. Abrasive cut-off wheels and grinders are not used, because the heat and hot particles damage the coating. Cut edges are placed where the trim covers them whenever possible, and where they are exposed, the manufacturer may call for touch-up paint.
After every cut and every row of screws, the swarf is brushed off the panels with a soft broom. Corwin made sweeping the last job of every day, and on Friday afternoons he walked the walls with a magnet on a stick to find shavings in the panel ribs.
Closures, trim and sealing
Ribbed panels leave gaps where their profile meets a flat surface: at the base angle, at the eave strut, at the tops of openings. Those gaps would let in wind, water, birds and insects. They are filled with closures, foam or rubber strips shaped to the panel profile. An inside closure sits between the panel and the support; an outside closure sits on the outside face under the trim. Sealant tape or butyl mastic goes where the details show, usually at laps and closures.
Trim pieces finish the walls: base trim at the bottom, corner trim at the outside corners, jamb, head and sill trim around openings, and rake and eave trim at the roof edges. Trim is fastened with trim screws or rivets at the spacing shown, lapped in the direction that sheds water, which means upper pieces lap over lower ones and pieces lap away from the prevailing wind. On the Brannock building, the trim went on from August 4 to August 7, after the roof was on, because the eave and rake trim tie the roof and walls together.
Wainscot and wall details
The Brannock walls had a darker wainscot panel along the bottom 0.9 m (3 ft), separated from the upper panels by a small trim strip. A wainscot is installed first, on the base angle and a low girt or a wainscot support, and the upper panels lap over the wainscot trim so water runs outside it. The wainscot height has to line up all around the building, including across door jambs, so the crew snapped a level line around the building before starting and checked it at every corner.
At the corners, the wall panels on the two walls meet under a corner trim. The crew trimmed the last panel on each wall so its edge fell inside the trim's coverage, added outside closures where the profile left gaps, and fastened the corner trim to both walls. Corner trim is one of the most visible pieces on a building and one of the first things an owner looks at; a gap, a bent leg or a crooked line shows from the road.
Wall panels on a building with a heated or humid interior may also need sealant at their sidelaps and at the base, as the details show, to keep air and moisture from moving through the wall. On the unheated Brannock building, sealant tape went only where the details called for it, at the base and around openings.
Common mistakes
MistakeCutting panels with an abrasive saw or grinder.
InsteadUse shears, nibblers or a cold-cut blade made for coated steel.
MistakeLeaving swarf on the panels overnight.
InsteadSweep the panels at the end of every day.
MistakeOverdriving or underdriving screws.
InsteadDrive each screw straight until the washer is snug and just compressed.
MistakeLetting the coverage creep panel by panel.
InsteadPlumb the first panel and check coverage every few panels.
MistakeSkipping closures at the base and eave.
InsteadInstall inside and outside closures where the details show them.
Summary and key terms
- Most metal building walls use through-fastened ribbed panels; other options are concealed-fastener panels, insulated metal panels and liner panels.
- The metallic coating and paint give the panel its life and are easily damaged by scratches, hot particles, swarf and trapped water.
- Panels act as sails; handle them in safe winds, in pairs, with cut-resistant gloves.
- Lay panels from the starting corner in the direction shown, plumb the first panel and check coverage as you go.
- Fasteners carry wind suction; follow the schedule and drive each screw correctly.
- Closures and trim, lapped to shed water, seal the walls.
- Through-fastened panel
- A panel attached with exposed screws through the sheet into the supports.
- Sidelap
- The overlap of one panel's edge rib over the next panel's edge.
- Stitch screw
- A screw that fastens two panels together at a sidelap between supports.
- Coverage
- The net width a panel covers once lapped with its neighbours.
- Closure
- A foam or rubber strip shaped to the panel profile that fills the gaps where the panel meets a flat surface.
- Swarf
- Metal shavings from drilling and cutting that rust and stain panels if not removed.
Practice problems
Work each problem on paper first, then reveal the answer to check.
Why are abrasive saws not used on coated panels?
Show answer
Heat and hot particles damage the coating and cause rust spots.
A 24 m endwall is covered with 914 mm panels. How many panels?
Show answer
24 ÷ 0.914 = 26.3, so 27 panels.
A panel has 4 supports with 5 screws each and 10 stitch screws. How many screws?
Show answer
4 × 5 + 10 = 30.
What is an overdriven screw?
Show answer
One driven too far, crushing the washer and dimpling the panel, so it leaks.
Which way should a trim lap face?
Show answer
Upper pieces over lower, and away from the prevailing wind.
Lesson quiz · 5 questions
Score 60% or more to complete this lesson.
Create a free account to save your progress, take quizzes and earn a certificate.