
CINE-320 · Lesson 5 of 12 · 24 min
Available and minimal light
Most documentary footage is shot in light the filmmakers did not create: daylight through windows, overhead fluorescent tubes in offices, street lights, the glow of phones and televisions, firelight and the harsh sun of midday. The documentary cinematographer's job is to see that light, choose positions and exposures that make the most of it, and add as little as possible. Heavy lighting changes how people behave, takes time to set up, and can make a real space look like a film set. Yet a little light in the right place can transform an image. This lesson covers reading available light, exposing with ND and EV calculations, handling mixed colour temperatures and flicker, and using small, portable units to support rather than replace the existing light. CINE-221 covered lighting design for drama and CINE-202 covered exposure and log; here we apply them to the realities of documentary.
Seeing light
The first skill is observation. When entering a location, experienced documentary cinematographers look at where the light comes from, how hard or soft it is, its colour, how it changes through the day and where people are likely to stand. A single window can provide beautiful soft key light if the subject faces it or sits at an angle to it; the same window behind the subject produces a silhouette. Overhead office lights create dark eye sockets; sitting the subject near a desk with a white surface can bounce light back into the face. Street lights, shop windows and car headlights provide pools of light at night that can be used deliberately.
Because documentary rarely lets the cinematographer move people, the most powerful tool is the camera position. Shooting from the side of a window rather than with the window behind the camera gives modelling and contrast; positioning yourself so the subject is backlit by the sun produces rim light and avoids squinting; choosing a background a stop or two darker than the face separates the subject naturally. Small changes, such as suggesting that an interview take place near a window or opening a curtain, are often acceptable and can improve the image dramatically without staging events.
Measuring light: exposure values
The exposure value (EV) system summarizes the combination of aperture and shutter speed that correctly exposes a scene. At ISO 100, the exposure value is:
where \( N \) is the f-number and \( t \) is the exposure time in seconds. Each increase of 1 EV represents twice as much light. Typical scene brightnesses give a useful mental reference: bright sun on open ground is about EV 15, an overcast day about EV 12, open shade about EV 12 to 13, a brightly lit office about EV 8, a typical home interior by day about EV 6 to 7, a living room at night about EV 4 to 5 and candlelight about EV 2 to 3. At other sensitivities, the settings that correctly expose a scene of brightness \( EV_{100} \) satisfy:
In motion pictures, the shutter speed is usually fixed by the frame rate and shutter angle (1/48 s at 24 fps with a 180° shutter), and aperture is chosen for depth of field. The remaining variables are ISO and ND. Neutral density filters are specified by optical density: each 0.3 of density reduces light by one stop, so ND 0.6 is two stops, ND 0.9 three stops and ND 1.2 four stops.
| Scene | Approximate EV at ISO 100 | Typical approach |
|---|---|---|
| Bright sun, open ground | 15 | Heavy ND, lowest base ISO |
| Overcast exterior | 12 | Moderate ND |
| Bright office | 8 | Little or no ND |
| Home interior by day | 6–7 | Open aperture or higher ISO |
| Living room at night | 4–5 | High base ISO, fast lens |
| Candlelight | 2–3 | Highest usable ISO, fastest lens |
Worked problem
Exposing a sunny exterior with ND
A documentary DP walks outside from an interior with the camera at ISO 800, f/4 and 1/48 s. The scene is in bright sun, about EV 15 at ISO 100. How much ND is needed to keep f/4, and what can the DP do if the built-in ND only provides up to 7 stops?
Show solution
- Settings EV: \( \log_2(4^2 \times 48) = \log_2(768) \approx 9.6 \).
- Required EV for the scene at ISO 800: \( 15 + \log_2(8) = 15 + 3 = 18 \).
- Difference: \( 18 - 9.6 \approx 8.4 \) stops of excess light, or about ND 2.5.
- With only 7 stops of ND, the DP can close down to f/5.6 (1 stop) and switch to a lower base ISO if available (for example ISO 400, another stop), leaving about 6.4 stops for the ND.
Answer: About 8.4 stops of ND would be needed at f/4 and ISO 800; with 7 stops available, stop down slightly or lower the ISO to stay within range.
This example explains why built-in variable ND has become essential. Without it, the operator would need to screw on or drop in filters every time they moved through a doorway, missing action. It also shows why camera and lens choices matter for interiors: a camera with a high second native ISO and a fast lens can work in a living room at night without any added light.
Mixed colour temperatures
Real locations mix light sources of different colours: daylight from windows (around 5,600 K, bluer on overcast days or in shade), tungsten household lamps (around 2,700 to 3,200 K), fluorescent and LED fixtures of varying colour and quality, and coloured signs. The camera can be white balanced for only one, and the others shift toward blue, orange or green. Documentary cinematographers handle mixed light by:
- Choosing a white balance that favours the subject's face and lets other sources go warmer or cooler for atmosphere.
- Turning off or replacing the most problematic sources where possible and acceptable, for example switching off a green fluorescent overhead in favour of window light.
- Positioning the subject so one source dominates the face.
- Shooting log or raw so that balance can be refined in grading (CINE-310).
- Using bi-colour or full-colour portable LEDs that can be matched to the dominant source.
Light quality also matters. Cheap LEDs and some fluorescents have poor colour rendering, producing sickly skin tones that are hard to correct. Metrics such as CRI, TLCI and SSI describe how faithfully a source renders colour; high values (above about 90 to 95) are desirable for any light added to faces.
Flicker
Many artificial light sources pulse with the alternating current that powers them. In both Canada and the United States, mains power is 60 Hz, so fluorescent, discharge and some LED lights flicker at 120 Hz. If the camera's exposure time is not a multiple of the flicker period, successive frames capture different amounts of light and the footage pulses. At 24 fps with a 180° shutter (1/48 s), flicker may appear under such lights. Choosing an exposure time of 1/60 s or 1/120 s, which corresponds to a shutter angle of 144° or 72° at 24 fps, synchronizes with the 120 Hz pulse and eliminates it. When filming abroad in countries with 50 Hz mains, use 1/50 s or 1/100 s instead (a 172.8° or 86.4° shutter at 24 fps). Screens, scoreboards and LED signs can also produce flicker or rolling bands; many cameras offer flicker reduction or fine shutter adjustment to synchronize with them.
Minimal lighting kits
When available light is not enough, documentary crews use small, portable lighting kits that can be set up in minutes and run from batteries. A typical minimal kit might include:
- One or two compact LED panels or point sources with softboxes or diffusion, powered by V-mount or camera batteries.
- A collapsible reflector with white, silver and gold surfaces, and a black side for negative fill.
- Small tube lights that can be hidden in frame or used as practical sources.
- Diffusion material and clips to soften windows or lamps, and gels to correct colour.
- Light stands, clamps and gaffer tape.
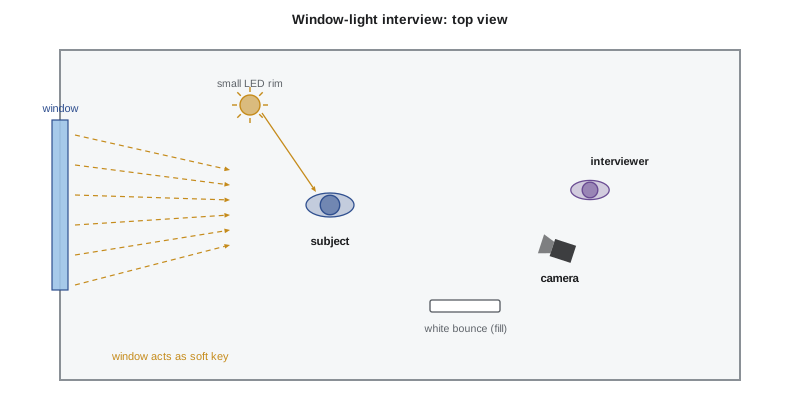
The guiding principle is to enhance rather than replace. Bouncing a small LED off a white ceiling can lift the general level of a room without looking lit. Placing a soft source just out of frame on the same side as the window extends its direction. A small backlight motivated by a lamp in the background adds separation. Practical lights in frame, such as a desk lamp, can be swapped for a bulb of better colour or slightly brighter output. Any added light should look as if it belongs in the space.
Night, low light and noise
Night and low-light shooting test cameras and operators. Modern sensors with high second native ISOs produce clean images at levels that were unusable a decade ago, but noise still rises in the shadows, and underexposure in log can make footage unusable. Expose so that faces sit at the correct level, even if backgrounds go dark; use false colour or waveform to check. Fast lenses (f/1.4 to f/2) gather more light at the cost of shallow depth of field, making focus more difficult. Street lights, shop windows and car interiors become key sources at night. In very low light, accept a grainier, more atmospheric image rather than adding light that changes the scene, unless the story requires clarity.
Ethical limits of lighting
Lighting is never neutral. Adding a light in someone's home changes the atmosphere, can make people self-conscious, and may suggest a mood that was not there. In observational films, many cinematographers refuse to add any light during events and limit lighting to interviews. In sensitive settings such as hospitals, shelters or places of worship, lighting may be inappropriate or forbidden. Discuss the lighting approach with the director and, where appropriate, with subjects and location hosts. The goal is images that are honest to the reality they represent.
Lighting that respects reality
When a small amount of light is added to an observational scene, the test is whether the participants and audience would notice it. A good rule is to match the direction, colour and quality of the existing dominant source and to add no more than a stop or so to the level. Battery-powered units on small stands or clamps can be placed quickly and removed just as quickly. Explain to participants what you are doing, place lights where people will not trip over them, and keep cables and stands out of walkways. In homes, ask before moving furniture or lamps and put everything back exactly as you found it. These courtesies make it more likely that you will be invited back.
Planning for changing daylight
Daylight changes constantly. Clouds pass, the sun moves across windows and the colour of light shifts from the cool blue of early morning to the warm tones of late afternoon. In long interviews and scenes beside windows, these changes can create continuity problems between shots that will be cut together. Sun-tracking apps help predict where the sun will be at any time, and scheduling interviews in rooms facing away from direct sun, or at times when the light is stable, reduces the problem. Diffusing a window with a sheet of diffusion material evens out passing clouds, and recording a reference shot of a grey card at intervals helps the colourist match shots later.
Common mistakes
MistakeLighting every scene as if it were drama.
InsteadUse available light first and add only what the scene needs.
MistakeIgnoring flicker under artificial lights at 1/48 s.
InsteadUse 1/60 s or 1/120 s under 60 Hz sources, 1/50 s or 1/100 s under 50 Hz.
MistakeAdding low-quality LEDs to faces.
InsteadUse high CRI, TLCI or SSI sources and match the dominant colour.
MistakeUnderexposing night footage in log.
InsteadExpose faces correctly and accept dark backgrounds.
MistakeForgetting the camera position as a lighting tool.
InsteadMove the camera so existing light models the subject.
Summary and key terms
- Documentary lighting starts with observing and using existing light.
- Camera position is the strongest tool for shaping available light.
- EV at ISO 100 equals log base 2 of N squared over t; each EV is one stop.
- Each 0.3 of ND density reduces light by one stop.
- Mixed colour temperatures are managed by choosing a balance, controlling sources and grading.
- Under 60 Hz mains, 1/60 s or 1/120 s exposures avoid flicker.
- Minimal kits of small LEDs, reflectors and diffusion enhance rather than replace existing light.
- Available light
- Light already present in a location.
- Exposure value
- A number representing aperture and shutter combinations for a given exposure.
- Optical density
- The logarithmic measure of an ND filter's strength.
- Colour temperature
- The colour of a light source in kelvins.
- CRI
- Colour rendering index, a measure of light quality.
- Flicker
- Brightness variation caused by pulsing light sources.
- Negative fill
- Using black material to deepen shadows.
- Practical light
- A light source visible in frame.
- Bounce light
- Light reflected off a surface to soften and spread it.
- Base ISO
- A sensor's native sensitivity setting.
Practice problems
Work each problem on paper first, then reveal the answer to check.
EV of f/2.8 at 1/50 s?
Show answer
About 8.6.
How many stops is ND 1.5?
Show answer
Five stops.
Required settings EV at ISO 400 for an EV 12 scene?
Show answer
14.
Shutter speed to avoid 120 Hz flicker?
Show answer
1/60 s or 1/120 s.
Shutter angle for 1/60 s at 24 fps?
Show answer
144 degrees.
Name three items in a minimal lighting kit.
Show answer
LED panel, reflector, tube light, diffusion, stands.
Typical EV of a home interior by day?
Show answer
About 6 to 7.
How can you reduce green fluorescent cast?
Show answer
Turn it off, position the subject toward another source, or correct in grading.
What does a reflector's black side provide?
Show answer
Negative fill.
Why might lighting be inappropriate in a hospital?
Show answer
It disrupts patients and may be forbidden.
Lesson quiz · 5 questions
Score 60% or more to complete this lesson.
Create a free account to save your progress, take quizzes and earn a certificate.