
CINE-101 · Lesson 7 of 12 · 24 min
Simple lighting setups for video
Cameras can now record images in very little light, so why light at all? Because light does far more than make an image bright enough. It shapes faces and objects, separates subjects from backgrounds, guides the viewer's eye, sets mood and time of day, and keeps shots consistent so that they cut together. Good lighting is often invisible: the audience simply feels that the scene looks right. This lesson covers the qualities of light as they apply to video, the classic three-point setup and its variations, lighting ratios, working with natural light, LED fixtures and colour quality, mixing colour temperatures, and the practical and safety limits of power on location. Advanced fixtures and techniques follow in later cinematography courses.
The qualities of light
As in photography (PHOT-101, Lesson 9), light is described by its intensity, quality, direction and colour:
- Quality: hard light from a small or distant source (bare sun, an unmodified LED) casts sharp shadows and shows texture; soft light from a large source near the subject (an overcast sky, a large diffusion frame, light bounced off a wall) wraps around faces with gentle shadows. The apparent size of the source relative to the subject, not its wattage, determines softness.
- Direction: front light flattens; side light reveals shape and texture; back light outlines the subject and separates it from the background; top light creates deep eye shadows; light from below looks unnatural and menacing.
- Colour: measured as colour temperature in kelvins: tungsten about 3,200 K (warm), daylight about 5,600 K (cool). Mixing them creates colour casts unless it is controlled.
- Intensity and fall-off: light from a point-like source falls off with the square of distance (the inverse square law). Doubling the distance from a light to a subject cuts the light to a quarter, a loss of 2 stops. Placing a light close to a subject makes it fall off quickly across the frame, creating a dark background; placing it far away lights subject and background more evenly.
Three-point lighting
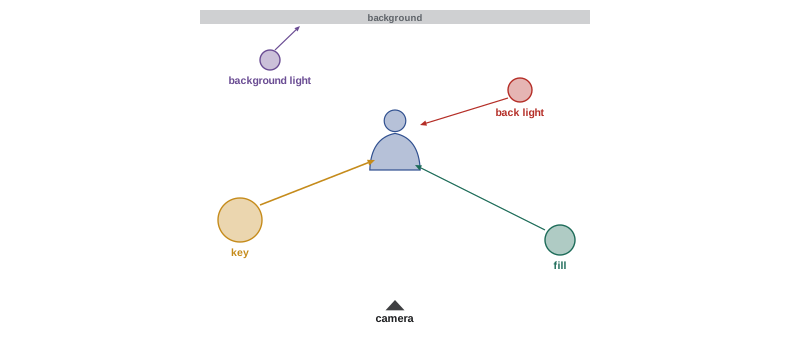
The classic starting point for lighting a person is three-point lighting:
- Key light: the main source, usually placed 30° to 45° to one side of the camera and somewhat above eye level, shaping the face with light and shadow.
- Fill light: a softer, weaker source on the other side, lifting the shadows to the desired level. It may be a light, a reflector or a white wall.
- Back light (rim or hair light): behind the subject, opposite the camera, outlining head and shoulders and separating them from the background.
A fourth light often lights the background, controlling how bright and how separated it looks. Three-point lighting is a framework rather than a formula: the key may be very soft or hard, the fill may be absent for drama, and the back light may come from a window or practical lamp in the scene.
Short and broad lighting
When a subject turns their face partly away from the camera, the key light can be placed on either side. Short lighting places the key on the side of the face turned away from the camera, so the side nearest the camera falls into shadow: it slims the face and looks more dramatic, and it is the default in much film and interview lighting. Broad lighting places the key on the side facing the camera, lighting the larger visible area of the face: it looks open and bright but can flatten. For interviews where the subject looks across the frame toward the interviewer (Lesson 4), placing the key on the side the subject faces, and therefore lighting the far side of the face, gives short lighting naturally.
Lighting ratios
The contrast between the lit and shadow sides of a face is described by the lighting ratio: the light on the key side (key plus fill) compared with the shadow side (fill only). Because each stop is a doubling, ratios translate directly into stops:
| Ratio | Difference | Look |
|---|---|---|
| 2:1 | 1 stop | Bright, soft, commercial, comedy |
| 4:1 | 2 stops | Natural drama, many interviews |
| 8:1 | 3 stops | Dramatic, low key |
| 16:1 and above | 4 stops or more | Very dramatic, film noir |
Ratios can be measured with an incident light meter or read on a waveform monitor (Lesson 2) by comparing the two sides of the face. Cameras that record a standard profile hold less contrast than the eye, so shadows that look gentle on set may appear darker in the recording; judge on a calibrated monitor or with exposure tools.
Worked problem
Setting a fill level
An interview subject's key side reads 70 % on the waveform and the shadow side reads 30 %. The director wants a natural 4:1 look. What should change?
Show solution
- On a standard video profile, a difference of roughly 10 to 15 % on the waveform in the mid-tones corresponds to about one stop, so 70 % versus 30 % is roughly 3 stops: about 8:1.
- For 4:1 (about 2 stops), the shadow side should read around 45 %.
- Raise the fill: move the reflector or fill light closer, increase its output, or use a larger bounce, then check the waveform again.
Answer: Add about one stop of fill until the shadow side reads near 45 %. Doubling the fill light's output, or moving it to about 0.7 of its distance (since light falls off with the square of distance), adds roughly one stop.
Natural light
Daylight is free, beautiful and powerful, and many productions rely on it. A large window is a superb soft key for interiors: place the subject at an angle to it, add a white reflector or a bounce on the shadow side for fill, and use a dark flag or black cloth (negative fill) to deepen shadows when the room's white walls make the light too flat. Outdoors, direct midday sun is hard and high, producing harsh shadows in eye sockets; move subjects into open shade, use a large diffusion frame overhead, or shoot with the sun behind the subject as a back light, filling the face with a reflector. The hours after sunrise and before sunset give warm, low light that flatters faces.
Natural light changes constantly, which threatens continuity: a scene shot over two hours may begin in sun and end in cloud. Plan shooting order around the light, shoot the widest shots (where changes are most visible) when the light is best, and use artificial sources or diffusion to keep conditions consistent between angles.
LED fixtures and colour quality
Most lighting for small productions now uses LEDs: panels, tubes, small point sources and larger units with interchangeable modifiers. They run cool, draw little power, often run on batteries, and many are bi-colour (adjustable from about 2,700 K to 6,500 K) or full-colour RGB. Their light, however, is produced differently from sunlight or tungsten, and cheap LEDs may render skin and colours poorly, with green or magenta casts. Colour quality is described by indices such as the colour rendering index (CRI), the television lighting consistency index (TLCI) and the spectral similarity index (SSI). For skin tones, look for CRI and TLCI of 90 or above, and test unfamiliar fixtures on a face and a colour chart before relying on them.
Mixing colour temperatures
Locations often mix sources: daylight through windows, warm tungsten or LED practical lamps, and cool fluorescent ceiling lights. The camera can be white-balanced for only one, so the others record as colour casts. Options are to switch off or remove unwanted sources, to match sources with coloured gels (a CTO, colour temperature orange, gel warms a daylight source toward tungsten; a CTB, colour temperature blue, cools a tungsten source toward daylight), to set bi-colour LEDs to match the dominant source, or to embrace the mix deliberately, for example warm practicals against cool window light for a dusk mood. Gels and filters on windows can convert daylight on large productions; on small ones, choosing the dominant source and matching the rest to it is usually enough.
Practical lights and motivation
Light in a scene feels natural when it seems to come from sources the audience can see or imagine: a window, a desk lamp, a television, a street light. These visible lamps are called practicals, and they can be fitted with dimmable or brighter bulbs to contribute usefully. Motivated lighting places the main sources so that they agree with the practicals: a key from the direction of the window, a warm fill from the lamp. Even when the actual light comes from a film fixture outside the frame, motivation keeps the image believable.
Power and safety on location
Lights draw power, and location circuits have limits. A standard North American household or office circuit is 120 V, 15 A, and continuous loads should not exceed 80 % of the breaker rating, about 1,440 W. Old tungsten film lights of 650 W to 2,000 W quickly overload such circuits; LEDs drawing 50 to 300 W have made location lighting far easier. Find out which outlets share a circuit, spread loads, use heavy-duty extension cords of adequate gauge, keep cables out of walkways or covered with mats, sandbag every stand, keep hot fixtures away from curtains and people, and never tamper with building wiring. Electrical connections beyond plugging into outlets, such as tie-ins to panels, are work for qualified electricians.
In Canada, use lighting equipment certified for use in Canada (for example bearing CSA, cUL or cETL marks), and on professional sets follow provincial occupational health and safety rules for electrical equipment and temporary power.
A simple interview setup
An interview is the most common lighting task in documentary and corporate work, and a reliable recipe is worth memorizing. Seat the subject a few metres from the background, so that the key light does not spill on it and the background can be controlled separately. Place a large soft key on the side the subject faces (giving short lighting, as above), at about 45° and slightly above eye level; add little or no fill, using the room's reflections or a reflector on the other side for about a 4:1 ratio; add a small back light behind the subject on the shadow side to separate hair and shoulders from the background; and light the background with a practical lamp or a small fixture to create depth, keeping it darker than the face. Check the setup with the subject in place on the monitor and waveform, adjusting until the face is the brightest important element in the frame.
Common mistakes
MistakeRelying on overhead room lights.
InsteadAdd a key from the side to shape faces and avoid eye shadows.
MistakeLighting the subject and background equally by accident.
InsteadControl fall-off and add separation with back light or background control.
MistakeMixing colour temperatures unintentionally.
InsteadRemove, gel or match sources, or mix them deliberately.
MistakeUsing low-CRI LEDs on faces.
InsteadChoose fixtures with CRI and TLCI of 90 or more and test them.
MistakeOverloading location circuits.
InsteadKeep continuous load within about 80 % of the circuit rating and spread loads.
Summary and key terms
- Light shapes, separates, guides attention, sets mood and keeps shots consistent.
- Softness depends on the apparent size of the source; fall-off follows the inverse square law.
- Three-point lighting uses key, fill and back light, often with a background light.
- Short lighting keys the far side of the face; broad lighting the near side.
- Lighting ratios of 2:1, 4:1 and 8:1 correspond to 1, 2 and 3 stops.
- Window light, reflectors, negative fill and timing make natural light work; watch continuity.
- Choose high-quality LEDs, control mixed colour temperatures, motivate light, and respect power limits.
- Key light
- The main light shaping the subject.
- Fill light
- A secondary light lifting shadows.
- Back light
- A light behind the subject creating separation.
- Lighting ratio
- The ratio of light on the key side to the shadow side.
- Negative fill
- A dark surface used to deepen shadows.
- Inverse square law
- Light from a point source falls off with the square of distance.
- Practical
- A light source visible in the shot.
- CTO gel
- An orange gel that warms light toward tungsten colour.
- TLCI
- An index of how well a light renders colour for television cameras.
- Short lighting
- Keying the side of the face turned away from the camera.
Practice problems
Work each problem on paper first, then reveal the answer to check.
What makes a light source soft?
Show answer
A large apparent size relative to the subject.
A light is moved from 1 m to 2 m from the subject. How much light is lost?
Show answer
Three-quarters, 2 stops.
Where is the key light typically placed?
Show answer
About 30° to 45° to one side of the camera and above eye level.
What does a back light do?
Show answer
Outlines the subject and separates it from the background.
How many stops is a 4:1 lighting ratio?
Show answer
2 stops.
What is short lighting?
Show answer
Keying the side of the face turned away from the camera.
How can you deepen shadows in a white room lit by a window?
Show answer
Use negative fill such as a black flag or cloth.
Which gel converts a daylight source toward tungsten?
Show answer
CTO (colour temperature orange).
What minimum CRI or TLCI is advisable for skin?
Show answer
About 90.
What continuous load is safe on a 120 V, 15 A circuit?
Show answer
About 1,440 W (80 %).
Lesson quiz · 5 questions
Score 60% or more to complete this lesson.
Create a free account to save your progress, take quizzes and earn a certificate.