
CINE-101 · Lesson 2 of 12 · 24 min
The camera for video: frame rates, shutter and exposure
The same camera that takes still photographs behaves differently when it records video. The shutter speed, which a photographer changes freely, is now tied to the frame rate and to how motion looks. Exposure is controlled mostly with the aperture, neutral density filters and ISO, and it is judged with tools such as zebras and waveforms rather than a single histogram. Settings such as resolution, codec and bitrate determine image quality and how much storage a shoot needs. This lesson covers frame rates, the shutter and the 180-degree rule, flicker, exposure control and exposure tools, white balance for video, and the recording settings that every shoot must decide in advance.
Frame rates
Video is a sequence of still frames recorded and played back at a fixed rate, measured in frames per second (fps). The choice of frame rate shapes how motion looks and must match the project's delivery standard:
- 24 fps (in practice often 23.976 fps): the cinema standard, giving the familiar "film look" with a little motion blur and slight judder on fast pans.
- 30 fps (29.97 fps): the traditional television and online standard in North America, Japan and other regions whose television system grew from 60 Hz electrical supplies; motion looks slightly smoother and more "video".
- 25 fps: the standard in Europe and other 50 Hz regions.
- 50 or 60 fps (59.94 fps): smooth motion for sports, live events and gaming content, and the basis for gentle slow motion.
- High frame rates (100, 120, 240 fps and more): recorded for slow motion. Footage shot at 120 fps and played back at 24 fps runs five times slower.
The fractional rates (23.976, 29.97, 59.94) are a legacy of colour television, which slowed the original rates by 0.1 % in the 1950s; they are still the norm in North American broadcast and on many cameras. The important practical rule is consistency: choose the project frame rate before the shoot and record everything at it (or at a planned multiple for slow motion), because mixing rates causes stutter or conversion problems in the edit.
Canada and the United States share the same television standards (originally NTSC, now ATSC digital television) and the same 60 Hz electrical supply, so 29.97 and 59.94 fps are standard for broadcast, while 23.976 fps is widely used for drama, commercials and online content.
Slow motion
To create slow motion, record at a higher frame rate than the playback rate and conform the footage to the project rate. The slowdown factor is the recording rate divided by the playback rate:
A two-second jump recorded at 120 fps contains 240 frames; played at 24 fps it lasts 10 seconds. High frame rates need more light (the shutter must be faster, see below), often reduce resolution or image quality on consumer cameras, and fill storage quickly. Software can also create slow motion by inventing frames between recorded ones, but the results are less convincing with complex motion.
The shutter and the 180-degree rule
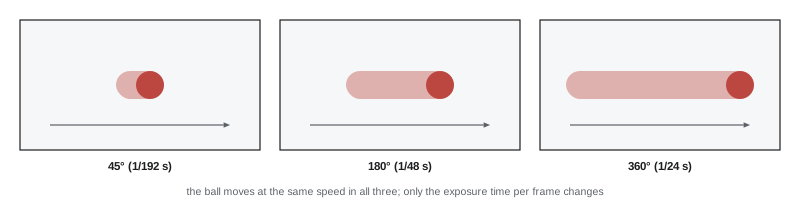
In video, the shutter speed determines how much motion blur each frame contains, and therefore how natural movement looks when the frames play in sequence. Film cameras used a rotating disc shutter, and the open portion of the disc, measured in degrees, set the exposure time. A 180° shutter is open for half of each frame interval, giving an exposure time of 1/(2 × frame rate): 1/48 s at 24 fps (cameras usually offer 1/50 s), 1/60 s at 30 fps. This is the 180-degree rule, and it produces motion blur that audiences perceive as natural.
A faster shutter (a smaller angle, such as 45° or 1/200 s at 24 fps) produces crisp, staccato motion with little blur, used for action and battle scenes and sometimes to create unease. A slower shutter (a larger angle, up to 360°, or 1/24 s at 24 fps) produces smeared, dreamy motion. Both are legitimate choices, but they should be deliberate, not the accidental result of using the shutter to control exposure, as a photographer would.
Flicker
Many light sources flicker invisibly at twice the electrical supply frequency: 120 times a second in 60 Hz regions such as Canada and the United States, 100 times in 50 Hz regions. Cheap LED lamps, fluorescent tubes and some street lights flicker strongly. If the camera's exposure time is not a whole multiple of the flicker period, successive frames catch different amounts of light and the image pulses or shows rolling bands. In 60 Hz regions, shutter speeds of 1/60 s or 1/120 s avoid flicker; 1/50 s at 24 fps may flicker under some lights. Many cameras offer fine shutter adjustments (sometimes called clear scan or synchro scan) to match a flickering source, and quality film and television lights are designed to be flicker-free. Always test under location lights, and watch screens in the shot, which can show rolling bars for the same reason.
Controlling exposure
With the shutter fixed by the frame rate, exposure is controlled with three tools:
- Aperture: as in photography, but changing it also changes depth of field, which is usually chosen for creative reasons. Many cinematographers pick an aperture for the look and leave it.
- Neutral density (ND) filters: grey filters that reduce light without changing colour, allowing a wide aperture and the correct shutter in bright conditions. Strength is given in stops or as optical density: ND 0.3 is 1 stop, ND 0.6 is 2 stops, ND 0.9 is 3 stops; the equivalent labels ND2, ND4 and ND8 give the light reduction factor. Variable ND filters are convenient but can produce colour shifts and patterns at their strongest settings.
- ISO (or gain): sets the sensor's amplification. Each camera has a base (native) ISO where it gives its best dynamic range; some have two native ISOs. Raising ISO above the native value increases noise; video cameras sometimes express gain in decibels, where 6 dB is one stop.
Worked problem
Exposing in bright sun
You are shooting at 24 fps with a 180° shutter (1/50 s) in bright sun, and you want a shallow depth of field at f/2.8. The camera's native ISO is 100. By the sunny 16 rule (PHOT-101, Lesson 5), correct exposure at ISO 100 is about f/16 at 1/100 s. How much ND do you need?
Show solution
- Aperture: from f/16 to f/2.8 is 5 stops more light (f/16, 11, 8, 5.6, 4, 2.8).
- Shutter: from 1/100 s to 1/50 s is 1 stop more light.
- Total: 6 stops too much light, so you need 6 stops of ND: ND 1.8 (ND64).
Answer: A 6-stop ND filter (ND 1.8) gives correct exposure at f/2.8, 1/50 s and ISO 100. Without ND, you would have to stop down to about f/16, losing the shallow depth of field, or raise the shutter speed to about 1/3200 s, giving staccato motion. This is why ND filters are essential for video outdoors.
Exposure tools
The camera's screen is a poor guide to exposure, especially outdoors and when its brightness has been changed. Video cameras offer objective tools:
- Zebras: diagonal stripes over parts of the image above a chosen brightness. Set at 95 to 100 %, they warn of clipped highlights; set around 70 % (on a standard Rec. 709 picture profile), they help place light skin tones.
- Waveform monitor: a graph showing the brightness of every part of the image from left to right, on a scale from 0 (black) to 100 (white), measured in IRE or percent. It shows exactly where highlights clip and where shadows crush, and where faces sit. Typical targets on a standard profile are skin around 60 to 70 % for light skin and lower for darker skin, a white shirt below 90 to 95 %, and black near 0 to 5 %.
- False colour: replaces the image with colours that represent brightness bands (for example blue for underexposed, green for middle grey, pink for skin, red for clipping), making exposure easy to read at a glance.
- Histogram: as in photography, but less precise for locating specific subjects.
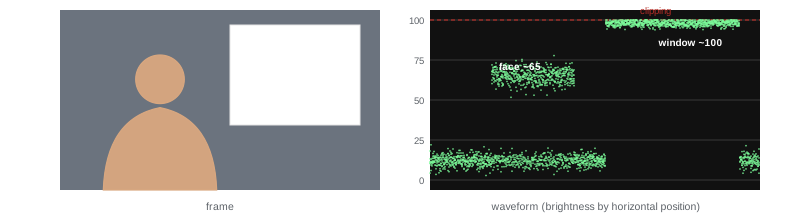
Exposure for video has less margin than for raw photographs. Most cameras record compressed video in which clipped highlights are gone for good and underexposed shadows become noisy when brightened. Protect the most important part of the image, usually faces, and decide deliberately what may clip, such as a window or the sky.
White balance for video
Automatic white balance is useful for snapshots but dangerous for video, because it can shift colour during a shot as the framing changes, and different shots of the same scene may not match. Set white balance manually: choose a preset (about 3,200 K for tungsten light, 5,600 K for daylight), dial in a Kelvin value, or take a custom reading from a white or grey card in the scene's light. Keep the same setting for all shots of a scene unless the light changes, so that shots match in the edit. Colour can be adjusted in post-production, but only within limits, especially with compressed recordings.
Resolution, codecs and storage
Before the shoot, choose recording settings that match the delivery and the post-production workflow:
- Resolution and aspect ratio: HD (1920 × 1080) or UHD 4K (3840 × 2160) in 16:9 for most work; vertical 9:16 for some social platforms. Recording at higher resolution than delivery allows reframing in the edit.
- Codec: how the video is compressed. Long-GOP codecs such as H.264 and H.265 (HEVC) make small files by storing differences between frames, but they are harder for editing software to decode and are less robust in grading. Intra-frame codecs such as Apple ProRes and Avid DNxHR compress each frame separately, making larger files that edit smoothly and grade better.
- Bitrate: the amount of data per second, in megabits per second (Mbps). Higher bitrates preserve more detail, especially in complex, moving scenes.
- Picture profile: a standard (Rec. 709) profile looks finished straight from the camera; log profiles record a flat image with more dynamic range for grading later, at the cost of more work and more careful exposure (covered in CINE-202).
Storage is easy to calculate: gigabytes per hour ≈ bitrate in Mbps × 3,600 / 8,000, or about 0.45 × Mbps. A 100 Mbps recording uses about 45 GB per hour; a 700 Mbps ProRes recording about 315 GB per hour. Plan cards, drives and backups accordingly (Lesson 10).
A pre-shoot camera checklist
Because so many settings interact, professionals check them in a fixed order before every shoot and after every battery or card change, since some cameras reset settings unexpectedly. A practical checklist: project frame rate and resolution; codec, bitrate and picture profile; shutter angle or speed; white balance (manual); ISO at or near native; ND filters ready; exposure tools (zebras or waveform) enabled; audio input settings and levels if recording sound in camera (Lesson 8); timecode set; card formatted in the camera after its previous contents were confirmed backed up; batteries charged and spares in the bag; lens clean. A two-minute check prevents the most painful mistakes in video, such as discovering in the edit that a whole interview was shot at the wrong frame rate or with automatic white balance drifting.
Common mistakes
MistakeUsing the shutter speed to control exposure.
InsteadKeep the shutter near 180° and control exposure with aperture, ND and ISO.
MistakeMixing frame rates without a plan.
InsteadChoose the project frame rate first and shoot everything to match.
MistakeJudging exposure by the camera screen.
InsteadUse zebras, a waveform or false colour.
MistakeLeaving white balance on automatic.
InsteadSet white balance manually and keep it consistent within a scene.
MistakeIgnoring flicker until the edit.
InsteadTest under location lights and use flicker-safe shutter speeds.
Summary and key terms
- Common frame rates are 24 (23.976), 25, 30 (29.97) and 60 (59.94) fps; choose one per project.
- Slow motion = recording fps ÷ playback fps.
- The 180-degree rule sets the shutter to 1/(2 × fps) for natural motion blur.
- Lights flicker at twice the mains frequency; use flicker-safe shutter speeds.
- Exposure is controlled with aperture, ND filters and ISO; ND 0.3 per stop.
- Zebras, waveforms and false colour judge exposure objectively.
- Set white balance manually; choose resolution, codec, bitrate and profile before the shoot.
- Frame rate
- The number of frames recorded or played per second.
- Conform
- To play footage at a different rate than it was recorded, for slow or fast motion.
- Shutter angle
- The fraction of each frame interval during which the shutter is open, in degrees.
- 180-degree rule
- Using an exposure time of half the frame interval.
- Flicker
- Pulsing brightness caused by light sources and shutter timing.
- ND filter
- A neutral density filter that reduces light without changing colour.
- Native ISO
- The sensitivity at which a camera gives its best image quality.
- Zebras
- Stripes marking areas above a set brightness.
- Waveform monitor
- A display of image brightness by horizontal position.
- Codec
- The method used to compress and decompress video.
Practice problems
Work each problem on paper first, then reveal the answer to check.
What shutter speed follows the 180-degree rule at 30 fps?
Show answer
1/60 s.
What exposure time does a 90° shutter give at 24 fps?
Show answer
90/360 × 1/24 = 1/96 s.
How slow is 240 fps footage played at 24 fps?
Show answer
Ten times slower.
How long does a 3-second action shot at 120 fps last when played at 30 fps?
Show answer
12 seconds.
At what frequency do lights flicker in Canada and the United States?
Show answer
120 Hz.
How many stops is an ND 1.2 filter?
Show answer
4 stops.
You need 3 stops less light. Which ND?
Show answer
ND 0.9 (ND8).
What zebra setting warns of clipping?
Show answer
About 95 to 100 %.
How much storage does one hour at 200 Mbps need?
Show answer
About 90 GB.
Why is automatic white balance risky for video?
Show answer
It can shift during a shot and make shots of one scene mismatch.
Lesson quiz · 5 questions
Score 60% or more to complete this lesson.
Create a free account to save your progress, take quizzes and earn a certificate.