
CINE-101 · Lesson 11 of 12 · 24 min
Editing and finishing
Editing is where a film is finally written. The editor takes hours of footage, much of it repetitive, flawed or unexpected, and shapes it into a story with a rhythm, an emotional arc and a clear meaning. Then sound, colour, titles and delivery turn the edit into a finished product. Everything shot in earlier lessons, coverage, continuity, clean sound, room tone, is judged here. This lesson covers organizing footage, the stages of an edit, the principles that guide cutting decisions, common types of cuts and transitions, sound editing and mixing to loudness standards, basic colour correction, titles and captions, and exporting for delivery. Advanced editing theory is developed in a later editing course.
Organizing the material
Good editing starts with good organization. When footage arrives, the editor or assistant:
- Ingests the media from verified backups (Lesson 10) into the project, keeping the original folder structure.
- Creates proxies if needed: lightweight copies of high-resolution or long-GOP footage that play smoothly during editing, relinked to the originals for the final output.
- Synchronizes picture with separately recorded sound, using timecode, slates or waveform matching (Lesson 8).
- Organizes clips into bins (folders) by scene, with names or metadata showing scene, shot and take, and marks circled takes from the camera and script reports.
- Watches all the footage at least once, taking notes on performances, problems and moments that stand out.
A well-organized project lets the editor find any take in seconds; a disorganized one wastes hours and hides good material.
Stages of the edit
An edit develops in stages:
- Assembly: all the scenes put together in script order with the chosen takes, usually long and rough. It shows what was shot.
- Rough cut: the story is shaped: scenes are trimmed, reordered or removed, performances chosen, and the overall structure established. Rough cuts are watched with the director and often with test viewers.
- Fine cut: timing is refined frame by frame, transitions smoothed, and the rhythm polished.
- Picture lock: the picture edit is final, so that sound, music, colour and visual effects can be finished to an unchanging timeline. Changing the picture after lock creates costly rework for every finishing department.
Most first assemblies are far too long. Cutting is not just removing mistakes; it is choosing what the story needs. A scene that took a day to shoot may be shortened to a few lines or removed entirely if the film is better without it.
What makes a good cut
The editor Walter Murch, in his book In the Blink of an Eye, proposed a ranking of the criteria for an ideal cut, with weights suggesting their relative importance: emotion (51 %), story (23 %), rhythm (10 %), eye trace (7 %), two-dimensional plane of the screen (5 %) and three-dimensional continuity of space (4 %). His point is that a cut which is true to the emotion of the moment and advances the story is worth keeping even if it breaks continuity or screen direction, while a technically perfect cut that kills the emotion is not. Beginners often focus on the lower criteria, matching continuity perfectly, at the expense of the higher ones.
Practical guidelines follow:
- Cut for a reason: new information, a reaction, a change of emphasis or rhythm.
- Cut on action or on a look (Lesson 5); a character's glance off-screen motivates a cut to what they see.
- Choose the best performance moment, then make the cut work around it.
- Let moments breathe: reactions and pauses carry emotion, and cutting too quickly can rush the audience past them.
- Remove anything that does not serve the scene, including favourite shots.
Types of cuts and transitions
- Straight cut: one shot replaces another instantly; the overwhelming majority of cuts.
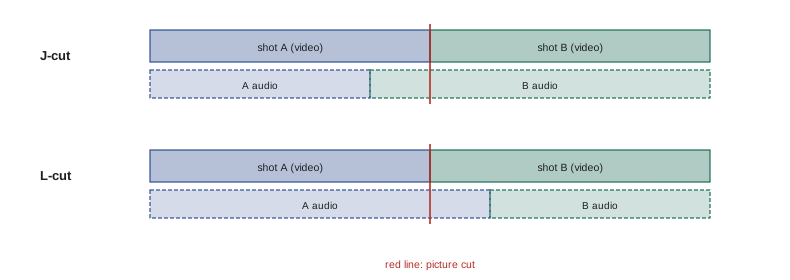
- J-cut and L-cut: the sound of the next shot begins before its picture (J-cut), or the sound of the previous shot continues over the next picture (L-cut). These split edits make dialogue scenes flow naturally, because in life we often hear before we look.
- Match cut: a cut between two shots linked by shape, movement or idea, such as a spinning wheel becoming a spinning coin.
- Cross-cutting (parallel editing): alternating between two actions happening at the same time in different places, building tension or comparison.
- Montage: a sequence of short shots compressing time or ideas, often set to music.
- Cutaway: a cut to related material (Lesson 5) that bridges an edit or shortens an interview answer.
- Jump cut: a deliberate cut within a continuous shot that skips time, now common in interviews and online video to remove pauses, used for energy or disorientation.
- Dissolve, fade and wipe: gradual transitions. A dissolve suggests the passage of time or a connection; a fade to or from black marks a beginning, end or major break. Decorative transitions (spins, page turns) rarely help and usually look amateurish.
Sound editing and mixing
Sound editing builds the soundtrack in layers, usually on separate tracks: dialogue, sound effects (including Foley, the recreated sounds of footsteps, clothing and props), ambience, and music. The dialogue editor chooses the best microphone track for each line, smooths the background between shots with room tone (Lesson 8), and removes noises. Effects and ambience give the world depth and continuity across cuts. Music sets mood and pace but must be licensed (Lesson 9) and should support rather than dictate the emotion.
Mixing balances these layers so that dialogue is always intelligible, music and effects support it, and the overall level meets the delivery standard. Loudness is measured over the whole programme in LUFS (loudness units relative to full scale, also written LKFS), a measure that reflects how loud the material sounds rather than its peaks.
In Canada, the CRTC requires broadcasters to follow the ATSC A/85 recommended practice for loudness, so television programmes are normally delivered at an integrated loudness of −24 LKFS, with true peaks around −2 dBTP. Streaming platforms set their own targets, commonly around −14 to −16 LUFS for online video, and normalize louder material down.
Listen to the mix on good headphones and on ordinary speakers such as a phone or laptop, because most viewers will hear it that way.
Colour correction and grading
Colour work has two stages. Colour correction makes shots technically right and consistent: correct exposure and white balance, matching shots within a scene so the cut is invisible, and keeping skin tones natural. Grading then creates the look: warmer or cooler, more or less contrast, stylized colour for mood or period. Use the editing software's scopes (waveform, vectorscope and parade) rather than trusting your eyes on an uncalibrated screen; the vectorscope has a skin tone line along which most skin tones fall, whatever their darkness. Footage shot in a standard profile (Lesson 2) needs only modest adjustments; log footage needs a conversion to the display standard, often with a LUT (look-up table), before grading.
Worked problem
Tightening a rough cut
Your rough cut of a short documentary is 6 minutes long, and the festival limit is 4 minutes. The film has an opening montage (50 s), three interview sections (1 min 40 s, 2 min, 1 min 10 s) and an ending (20 s). How do you approach the cut?
Show solution
- Identify the core story: what must the audience understand and feel by the end? Mark the moments that carry it.
- Shorten interview answers by removing repetition and hesitations, covering the cuts with cutaways or using deliberate jump cuts; aim to remove about a third of each section.
- Tighten the opening montage to about 25 to 30 seconds; openings are often too long.
- Watch the new cut from the start without stopping, ideally with a fresh viewer, and note where attention drops.
Answer: Reducing each interview section by about a third and halving the montage brings the film close to 4 minutes, and usually makes it stronger. Cutting the whole film proportionally, rather than dropping the ending or a whole section, keeps the structure while increasing its pace.
Titles, captions and accessibility
Titles and graphics include the main title, lower thirds identifying speakers, and end credits. Use legible fonts at sufficient size, keep text within title-safe areas (Lesson 4), leave it on screen long enough to be read twice, and check spelling of every name. Captions (subtitles of dialogue and important sounds) are essential for accessibility and are widely used by viewers watching without sound. Closed captions can be switched on and off by the viewer; open captions are burned into the picture.
In Canada, the CRTC requires broadcasters to caption programming according to its quality standards, and accessibility laws such as the Accessible Canada Act and provincial laws (for example Ontario's AODA) increasingly require accessible video, including captions, for organizations and online content.
Export and delivery
The final step is exporting files that meet each destination's specifications. A common approach is to export a high-quality master (for example ProRes 422 HQ at the project resolution and frame rate, with a separate stereo mix and, if required, separate tracks for dialogue, music and effects), then create delivery files from it: H.264 or H.265 MP4 files for online platforms at their recommended bitrates, files for festivals in their required formats, and vertical or square versions for social media. Check every delivery file by watching it from beginning to end, listening for audio problems and looking for glitches, before sending it. Archive the project, media, master and deliverables with clear labels, following the same 3-2-1 approach as on set.
Feedback screenings
Editors become so familiar with their material that they can no longer see it as an audience does. Screenings for fresh viewers, a few classmates or friends who have not seen the footage, reveal where the story is unclear, where attention drops and which moments land. Watch the audience as much as the screen, note when they shift, look at phones or laugh unexpectedly, and ask open questions afterward: what was the film about, which moments stayed with them, where were they confused? Viewers' explanations of why something did not work are often wrong, but their reactions are reliable signals. Make changes, then screen again if time allows.
Finally, keep versions. Save the project under a new name at each major stage (assembly, rough cut, each fine cut, picture lock), export a reference file of each cut, and note what changed. If a later change does not work, you can return to an earlier version instead of trying to rebuild it from memory, and the history of the edit is useful when reflecting on the project.
Common mistakes
MistakeEditing from disorganized footage.
InsteadSync, label and bin footage, and watch it all before cutting.
MistakeKeeping scenes because they were hard to shoot.
InsteadKeep only what serves the story and emotion.
MistakeUsing decorative transitions.
InsteadRely on straight cuts, split edits and motivated dissolves or fades.
MistakeMixing only on studio headphones and ignoring loudness targets.
InsteadMix to the delivery loudness standard and check on ordinary speakers.
MistakeChanging the picture after lock.
InsteadLock picture before sound, colour and effects are finished.
Summary and key terms
- Organize, sync and watch all footage before editing.
- Edits move from assembly to rough cut, fine cut and picture lock.
- Murch's criteria rank emotion and story above rhythm and continuity.
- Straight cuts dominate; J- and L-cuts, match cuts, cross-cutting and montage add flow and meaning.
- Sound editing layers dialogue, effects, ambience and music; mixes meet loudness standards.
- Colour correction matches shots; grading creates the look, guided by scopes.
- Add accessible titles and captions, export a master and check every deliverable.
- Proxy
- A lightweight copy of footage used for smooth editing.
- Bin
- A folder of clips in an editing project.
- Rough cut
- An early edit establishing structure and performances.
- Picture lock
- The point at which the picture edit is final.
- J-cut
- An edit where the next shot's sound starts before its picture.
- L-cut
- An edit where the previous shot's sound continues over the next picture.
- Match cut
- A cut linking shots by shape, movement or idea.
- LUFS
- Loudness units relative to full scale.
- Colour grading
- Creative adjustment of colour and contrast to create a look.
- Closed captions
- Captions that viewers can switch on or off.
Practice problems
Work each problem on paper first, then reveal the answer to check.
What are proxies used for?
Show answer
Smooth editing of heavy footage, relinked to originals for output.
Name the four stages of an edit.
Show answer
Assembly, rough cut, fine cut, picture lock.
Why is changing the picture after lock costly?
Show answer
Sound, music, colour and effects must all be reworked.
Which criterion ranks highest in Murch's rule of six?
Show answer
Emotion.
What is an L-cut?
Show answer
The previous shot's sound continues over the next shot's picture.
When is a jump cut acceptable?
Show answer
When used deliberately, for example to remove pauses in interviews or create energy.
What loudness is standard for television delivery in your country?
Show answer
−24 LKFS under ATSC A/85, required by the CRTC.
What is the difference between colour correction and grading?
Show answer
Correction makes shots accurate and consistent; grading creates the creative look.
How long should titles stay on screen?
Show answer
Long enough to be read twice.
What should you do with every delivery file before sending it?
Show answer
Watch and listen to it from beginning to end.
Lesson quiz · 5 questions
Score 60% or more to complete this lesson.
Create a free account to save your progress, take quizzes and earn a certificate.