
ARCH-101 · Lesson 12 of 12 · 23 min
Final project: a small dwelling
The last five weeks of the term belong to the final project. Visser pins up a single printed sheet beside Margit's letter, which has hung on the studio wall since the first day, its corners now curled and covered in pencil notes. The sheet is the final brief. 'Everything you have done this term,' she says, 'the program, the measurements, the routes, the structure, the sun, the thresholds, the sections, the precedents, the iterations, the story and the reviews, comes together now. You are not starting again. You are finishing.' Margit will attend the final review. So will Tomas Okonkwo, two architects from practice and a structural engineer from the city's parks department. Wren, Callum, Ingrid and Joon-ho each have a design that has survived a midterm review and several rounds of revision. Now each must become a complete and convincing proposal for a house that one particular woman and her son could live in.
The brief
The final project is a small, single-storey dwelling for Margit Halvorsen and her son Elias on the upper terrace of Kestrel Point. The brief consolidates what the students learned and agreed with Margit during the term.
- Program: the spaces in the revised area schedule from Exercise 1, as amended after the client review, with a total net area of about 76 m² and a gross area of no more than 100 m², plus a covered porch of about 18 m².
- Accessibility: every space, including the porch, the bathroom, the workroom and the sun terrace, fully usable by Margit in her wheelchair, with level thresholds, turning spaces of 1500 mm minimum and 1800 mm in the main rooms where possible, reachable storage and controls, and windows she can see out of and operate while seated.
- Site: within the setbacks of 6 m from the road and 3 m from the retaining wall, one storey, a roof no higher than 6 m, with parking for one car and a sheltered route to the door.
- Climate: living spaces oriented to the winter sun, shelter from the north-west wind, summer shading, natural cross-ventilation and an entry protected from drifting snow.
- Structure: a clear, believable structural system appropriate to a small house, with spans and member depths checked by the rules of thumb in Lesson 4.
- Character: a house that sees the river and does not feel like a hospital; a home that fits Margit's daily life, displays her pots and holds her books.
Schedule
The five weeks are planned backward from the final review, with fixed check points, so that work is spread evenly rather than crammed into a final charrette.
| Week | Focus | Check point |
|---|---|---|
| 1 | Resolve the plan and section at 1:100; confirm structure and site placement | Desk crit: plan, two sections, site plan |
| 2 | Develop rooms at 1:50: furniture, clearances, windows, built-ins | Pin-up: room plans and interior elevations |
| 3 | Wall section and key details at 1:20; materials; final model begun | Desk crit: wall section, material board |
| 4 | Final drawings, diagrams and storyboard; model completed | Peer review: full draft wall |
| 5 | Revisions from peer review; layout; rehearsal | Final review with Margit and critics |
Visser reminds the students of the iteration lesson: the first week still allows real change, but by week three the plan should be fixed so that the detailed work is not wasted. A change of mind in week four should be considered very carefully and made only if the house would be clearly better for Margit.
Deliverables
- A site plan at 1:200 showing the house, porch, terrace, parking, path, trees, retaining wall, setbacks, sun and wind.
- A floor plan at 1:50 with furniture, turning circles in the main rooms, door swings, windows and room names and areas.
- Two building sections and one site section at 1:50, with Margit drawn in, sun angles, ground, frost and snow.
- Four elevations at 1:100, showing materials.
- A wall section at 1:20 through the south wall, window and roof overhang.
- The set of five explanatory diagrams and the eight-frame storyboard from Lesson 10, updated.
- At least three eye-level interior views drawn from Margit's seated height.
- A model at 1:50 with a removable roof, showing the terrace and retaining wall.
- A design narrative of about five hundred words and an updated area schedule.
- A process sheet showing the main iterations of the term.
Assessment
The work is assessed in five equally weighted areas, each with a question the reviewers will ask:
- Program and accessibility: does the house meet the program and make every space easy for Margit to use?
- Site and climate: does the house respond to the terrace, the sun, the wind, the snow and the view?
- Space, structure and section: are the spaces well proportioned, the structure clear and the section rich?
- Development and process: does the work show genuine iteration, and does the final design respond to review?
- Communication and narrative: do the drawings, model and words tell a clear and honest story?
A model solution: Ingrid's house
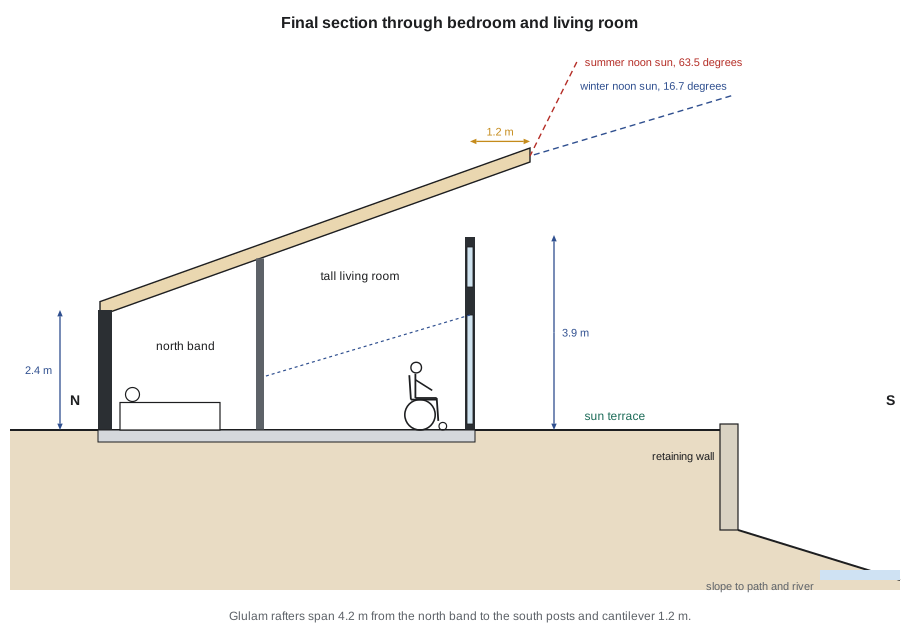
Ingrid's final design is a useful example of how the term's lessons combine. It is a single bar 13.2 m long and 7.2 m deep, running east-west along the terrace, toward its west end, with its long south face looking across a sun terrace to the river. The plan has two zones. The north zone, 3.0 m deep, is a thick band of private and service rooms under the low side of a shed roof: from west to east, Margit's bedroom, the bathroom, a storage and mechanical room, Elias's bedroom and the mudroom. The south zone, 4.2 m deep, is a continuous sequence of living spaces under the tall side of the roof: the living room at the west, the kitchen and dining in the middle, a short book hall by the entry and the workroom at the east end.
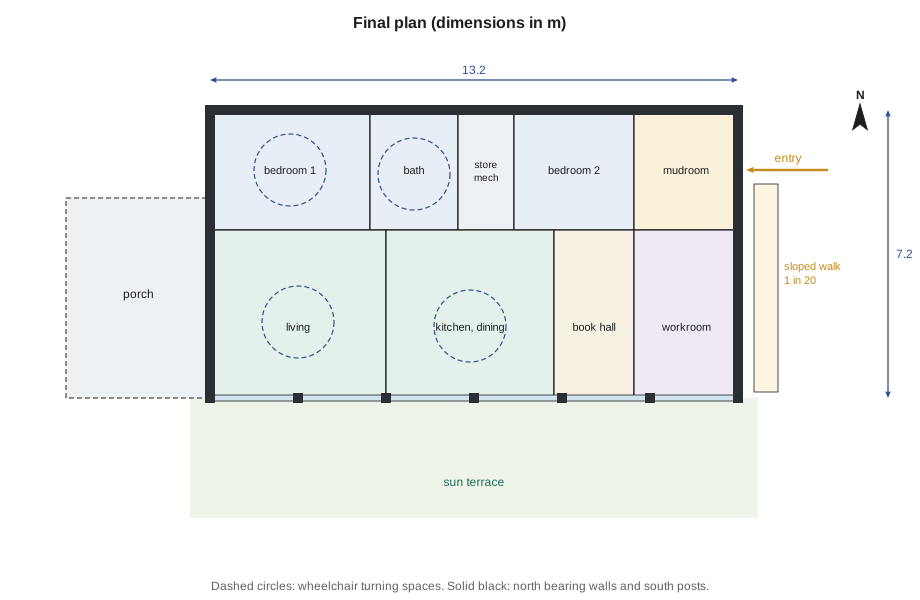
Each move answers something learned earlier. The entry is at the east end, beside the parking, so Margit rolls from the car under the porch roof along a 9 m sloped walk at 1 in 20, sheltered by the house from the north-west wind (Lessons 5 and 6). The mudroom has a heated tile floor, a bench at transfer height, an outward-swinging exterior door and an automatic sliding inner door (Lesson 6). The workroom opens directly from the mudroom, so clay and boots never cross the house, and it has a north roof light for even light (Lessons 1, 3 and 7). The book hall, 2.0 m wide, lined with low shelves for books and high open shelves for Margit's pots as she asked at the client review, leads from the entry to the kitchen and its window frames the first glimpse of the river (Lessons 3, 6 and 11).
The kitchen has a U-shaped counter with knee space at the sink and part of the work surface, a wall oven with a side-opening door, front-control cooktop and an island with an aisle of 1.5 m on both sides, so the kitchen forms a small loop (Lessons 2 and 3). The living room has a window seat between four exposed posts along the south wall, under a lowered ceiling, where Margit reads in the morning sun; the window sills are 600 mm above the floor (Lessons 2, 4 and 7). Elias's room is separated from the living room by the full depth of the kitchen and from Margit's by the bathroom and storage, with double stud walls carried up to the roof sheathing and a solid door (Lessons 1, 7 and 11).
The structure is a solid north band of insulated wood-frame bearing walls, with a line of glulam posts along the south window wall; glulam rafters span about 4.2 m from the north band to the south line and cantilever about 1.2 m beyond it as the summer overhang (Lessons 4 and 5). The roof rises from about 2.4 m at the north wall to about 3.9 m at the south, with clerestory windows above the south glazing (Lesson 7). The porch, about 18 m², extends from the west end, screened in summer and facing the evening sun; the sun terrace between the house and the retaining wall is the sheltered strip where the park workers ate their lunch on the January visit (Lesson 5).
Checking the design
Before the final review, each student checks the design against the brief with the tools developed during the term. The checks are simple, but they often catch problems that are invisible in a well-drawn set.
# Final checks for Ingrid's house against the brief
rooms = {   # name: (width, depth) in m
    "bedroom 1": (4.0, 3.0), "bath": (2.2, 3.0), "store_mech": (1.4, 3.0),
    "bedroom 2": (3.0, 3.0), "mudroom": (2.6, 3.0),
    "living": (4.4, 4.2), "kitchen_dining": (4.2, 4.2), "book hall": (2.0, 4.2), "workroom": (2.6, 4.2),
}
areas = {k: w * d for k, (w, d) in rooms.items()}
gross = 13.2 * 7.2
print(f"gross area {gross:.1f} m2 (limit 100)  {'ok' if gross <= 100 else 'over'}")
print(f"sum of rooms {sum(areas.values()):.1f} m2 (check against gross: plan closes)")
circ = areas["book hall"]
print(f"circulation (book hall) {circ:.1f} m2 = {100 * circ / gross:.0f} out of every 100 units of gross area")
perimeter = 2 * (13.2 + 7.2)
print(f"perimeter {perimeter:.1f} m; perimeter per unit of floor {perimeter / gross:.3f}")
side = gross ** 0.5
print(f"(a square of the same area would have {4 * side / gross:.3f})")
glass = {"south": 14.0, "east": 2.5, "west": 4.0, "north": 2.0}   # window area, m2
total = sum(glass.values())
for k, v in glass.items():
    print(f"  {k:<5} glass {v:5.1f} m2 = {100 * v / total:3.0f} out of every 100")
print(f"glazing / floor = {total / gross:.2f}")gross area 95.0 m2 (limit 100) ok sum of rooms 95.0 m2 (check against gross: plan closes) circulation (book hall) 8.4 m2 = 9 out of every 100 units of gross area perimeter 40.8 m; perimeter per unit of floor 0.429 (a square of the same area would have 0.410) south glass 14.0 m2 = 62 out of every 100 east glass 2.5 m2 = 11 out of every 100 west glass 4.0 m2 = 18 out of every 100 north glass 2.0 m2 = 9 out of every 100 glazing / floor = 0.24
The house is within the gross area limit, and its plan closes: the rooms account for the whole rectangle. Circulation is less than a tenth of the floor, because the book hall is short and the kitchen, dining and living rooms connect directly. The bar's perimeter is longer than a square's would be, the price of giving every main room a south view; Ingrid compensates with a well-insulated envelope, a solid north wall and a south-heavy distribution of glass, with about two-thirds of the windows facing the sun.
The accessibility check is done by drawing, not calculation: every door's clear opening and latch-side space, every turning circle with furniture in place, every reach to shelves, switches and window controls, and the full route from the car to every room. Ingrid finds one failure: the turning circle in the bathroom overlaps the toilet's transfer space when the shower seat is folded down. She moves the seat to the end wall of the shower, which solves it.
Presenting the final project
The final review is the culmination of the term's work, and its preparation follows Lesson 11. Each student has fifteen minutes: about seven to present and eight for discussion. Ingrid's presentation follows her narrative. She starts with one sentence: 'This is a long, low house that turns its back to the winter wind and opens its face to the river and the sun, with a wall of books and pots that Margit passes every time she comes home.' Then she shows the site plan and the sun, walks the reviewers along the route from the car to the window seat with eye-level drawings, shows the plan and the section side by side, points to the model with its roof lifted, names two trade-offs and asks the reviewers two questions she wants their help with.
For Margit, the students bring the model to her height on a low table, so she can look into it from her chair, and place the eye-level drawings at her eye level on the wall. This simple courtesy, Visser points out afterward, is itself a demonstration of the term's subject: designing for the person who is actually there.
Reflection
After the final review, each student writes a short reflection: what they learned, what they would do differently, and what they want to carry into the next studio, Design Studio III, which turns to larger buildings shaped by site and program. Reflection turns experience into knowledge. Callum writes that he learned to start with three ideas instead of one, and that a client's question about a snowstorm can matter more than a beautiful roof. Wren writes that she learned to commit. Joon-ho writes about the tracing of Margit's day, which he plans to draw for every building he ever designs. Ingrid writes about the critic who asked her for one sentence.
Margit's own comment at the end of the review is the one the students remember. She looks for a long time at all four models on their low tables, and then says that any of them would be a better home than the apartment she lives in now, but that what moved her most was that, in every one of them, somebody had thought about where she would put her cup of tea in the morning. The program from the first week, it turns out, was there all along.
Worked problem
Responding to a final review question
During Ingrid's review, the engineer asks: 'Your glulam rafters cantilever 1.2 m past the south posts to make the overhang. What happens to that cantilever under a heavy snow load, and how is the roof held down in a summer windstorm?' How should Ingrid answer?
Show solution
- Acknowledge the question as a good one, and explain the structural idea: the rafters are continuous over the south posts, so the back span of about 4.2 m counterbalances the cantilever.
- Note the rule of thumb: a cantilever of up to about a third of the back span is usually practical for continuous wood rafters, and 1.2 m on 4.2 m is within that.
- Explain that snow tends to drift and slide on a shed roof, and that the low north side, where it collects, is over the solid bearing walls.
- For wind uplift, state that the rafters will be tied to the posts and the posts to the foundation with steel connectors, so the roof cannot lift.
- Ask the engineer whether there is anything about the snow load on the overhang she should study further, and write down the answer.
Answer: Explain the structural principle, show the rule of thumb, address snow and uplift directly, and turn the question into advice. Confident, specific answers to technical questions build trust in the design.
Exercise 12: the final project
This exercise is the final project and occupies the last five weeks of the term.
- Follow the schedule and complete every deliverable listed in this lesson.
- At each weekly check point, bring the work required and a list of questions.
- Run the area, compactness and glazing checks, and the full accessibility check by drawing, before the peer review in week four.
- Prepare and rehearse a seven-minute presentation that begins with a one-sentence idea.
- After the final review, write a reflection of about three hundred words.
- Deliverable: the complete final project wall and model, the narrative, the process sheet and the reflection.
Self-critique checklist
- Does every space meet the program and work for Margit in her chair?
- Does the house respond to the terrace, sun, wind, snow and view?
- Is the structure clear, and the section rich and accurate?
- Does my process sheet show genuine iteration and response to review?
- Can I state the idea in one sentence, and do the drawings prove it?
- Would Margit know where to put her cup of tea in the morning?
Common mistakes
MistakeStarting a new design in the final weeks.
InsteadDevelop and resolve the scheme that has survived review.
MistakeLeaving the model until the last few days.
InsteadBegin it in week three; a rushed model undermines the whole presentation.
MistakeChecking accessibility only with the furniture removed.
InsteadDraw turning circles and clear spaces with every fixture and piece of furniture in place.
MistakePresenting a list of features.
InsteadLead with the idea, follow the route and let the drawings tell the story.
MistakeForgetting the client in the final presentation.
InsteadShow the work at the height and in the form the client can read.
Summary and key terms
- The final project brings together program, ergonomics, circulation, structure, site, thresholds, section, precedent, iteration, narrative and review.
- A clear brief and a backward-planned schedule with weekly check points spread the work evenly.
- Deliverables include site plan, plan, sections, elevations, a wall section, diagrams, storyboard, interior views, a model and a narrative.
- Simple checks of area, circulation, compactness, glazing and accessibility catch problems before the review.
- Reflection after the review turns the term's experience into lasting knowledge.
- Brief
- The statement of requirements for a design project.
- Check point
- A scheduled review of progress at a set stage of the work.
- Wall section
- A large-scale section through one wall showing its construction.
- Cantilever
- A structural member that projects beyond its support.
- Reflection
- A written review of what was learned and what to do differently.
Practice problems
Work each problem on paper first, then reveal the answer to check.
Ingrid's house is 13.2 by 7.2 m. What is its gross area, and is it within the brief?
Show answer
95.0 m², within the 100 m² limit.
Why does the workroom open directly from the mudroom?
Show answer
So clay, boots and materials never cross the living spaces.
Why do about two-thirds of the house's windows face south?
Show answer
To collect winter sun and give the main rooms their view, while limiting heat loss through north, east and west glass.
What did Ingrid change after the accessibility check?
Show answer
She moved the folding shower seat so it no longer blocked the turning circle and the toilet's transfer space.
Name the five assessment areas of the final project.
Show answer
Program and accessibility; site and climate; space, structure and section; development and process; communication and narrative.
Lesson quiz · 5 questions
Score 60% or more to complete this lesson.
Create a free account to save your progress, take quizzes and earn a certificate.