
APP-310 · Lesson 11 of 12 · 23 min
Installing built-in appliances
▶ Video coming soon A video version of this lesson is on the way.
Penfold's shop has a training bay: a short run of base cabinets with a laminate countertop, a sink with a valve and drain underneath, and a junction box on the wall behind the dishwasher space. On Friday, November 13, after his first lead call that morning, Kiran installed a dishwasher in it for the third water night while Dee and Harriet watched and said nothing until he had finished. He remembered most of it. He forgot to check the height range before sliding the machine in, and had to pull it out again to adjust the legs, and he started to wrap tape on the compression fitting before Dee cleared her throat. "You saw what that did on November 4," she said, remembering the APP-110 call in east Mountain where a taped compression fitting had leaked and the drain hose had no high loop. "An installation is the one job where every mistake is ours."
This lesson covers installing a built-in dishwasher from start to finish, installing a food waste disposer, and the checks that apply to every built-in appliance. It also restates where an appliance installation ends and plumbing or electrical work begins. The maker's installation instructions govern every step; what follows is the common pattern.
Before starting
An installation starts before the old appliance is moved. The technician reads the new appliance's installation instructions, and checks that the site provides what they require: an opening of the right size, a hot water supply with an accessible shutoff valve, a drain connection with room for a high loop or an air gap, and an electrical supply of the right type, either a junction box for a hard-wired connection or a receptacle for a cord kit, on a circuit of the rating the instructions require. If any of these is missing or wrong, it is noted before work begins, because providing it is a plumber's or electrician's job. Penfold's rule is to connect to what is there and never to add a valve, drain, receptacle, switch or circuit.
Removing an old dishwasher follows the safety routine of every lesson in this course: switch off its circuit at the panel and prove it dead at the junction box or receptacle, close the supply valve, put a towel and shallow pan under the connections, disconnect the supply and drain, remove the screws holding the machine to the counter or cabinets, lower the legs, and slide it out on cardboard to protect the floor. The drain hose and supply line are inspected; old rubber supply hoses and corroded fittings are replaced, not reused.
The opening
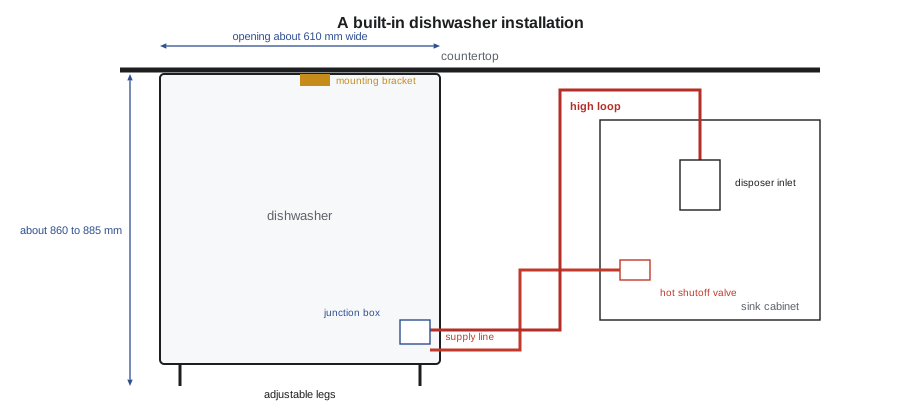
Built-in dishwashers fit a standard opening, commonly about 610 mm (24 in) wide and at least the same deep (typical; the instructions give exact sizes), with a height range set by adjustable legs. The countertop overhang, the floor level and any tile or flooring added since the old machine went in all affect the height.
Worked problem
Checking the opening
A dishwasher is 597 mm wide and its legs adjust its height from 860 to 885 mm. The opening measures 610 mm wide, and the underside of the countertop is 870 mm above the finished floor. Will it fit, and how much side clearance will there be?
Show solution
- Width clearance: 610 − 597 = 13 mm in total, about 6.5 mm each side.
- Height: 870 mm lies between 860 and 885 mm, so the legs can set it.
- Legs need to raise the machine 870 − 860 = 10 mm above its lowest setting, less a few millimetres so it slides under the counter.
Answer: It fits. The technician sets the legs a little low, slides the machine in, then raises it until the top just meets the counter and the door clears the counter edge. If the floor has been raised with new tile so the opening is below the lowest height, the machine cannot go in without changes to the flooring or counter.
Connecting the water supply
Most dishwashers take hot water through a supply line, often braided stainless steel, from the hot shutoff valve under the sink. At the dishwasher end, a 90° elbow screws into the inlet valve's threaded port and accepts the supply line. The instructions specify the fittings. Pipe threads on the elbow are sealed with the thread sealant or tape the instructions name; compression fittings seal by their ferrule or gasket and must never be taped or doped, because that stops them seating and causes leaks like the November 4 one. Fittings are tightened to the instructions' guidance, not as tight as possible, and the supply line is routed so it is not kinked, crushed under the machine or touching the drain pump.
Before the machine is pushed fully home, the technician opens the valve and checks every supply joint for leaks with a dry paper towel. If the house shutoff valve leaks, will not close or has no room for the supply line, the work stops for a plumber.
Connecting the drain
The drain hose runs from the dishwasher to the sink drain: to a wye branch on the sink tailpiece above the trap, or to the dishwasher inlet on a food waste disposer after its knockout plug is removed (lesson 6). The hose must have either a high loop, raised and fastened as high as possible to the underside of the countertop or the cabinet, or a deck-mounted air gap, as the instructions and the local plumbing code require. The Ontario Building Code's plumbing part and some municipal rules set the requirement; where an air gap is required, it is fitted by a plumber if a new hole in the sink or counter is needed. The hose is clamped at each end and checked for kinks behind the machine as it is pushed in.
Connecting the power
Dishwashers connect either by hard-wiring in the junction box at the front corner of the machine, with the house cable brought in through a cable clamp and joined with wire connectors, the ground wire to the green screw, or by a cord kit plugged into a receptacle in the sink cabinet, where the instructions and local code allow. The circuit must be the type and rating the instructions require, often a dedicated 15 or 20 A, 120 V circuit (typical). Ontario's electrical code sets the circuit and protection rules, and Penfold connects only to an existing, suitable supply; new circuits and receptacles are for a licensed electrical contractor under an Electrical Safety Authority notification.
Worked problem
A shared circuit
A customer's dishwasher and disposer are both on one 15 A circuit. The dishwasher plate gives 10.5 A and the disposer draws about 6.2 A when grinding. If both run together, what is the load, and what does it mean?
Show solution
- Total current:
- \[10.5 + 6.2 = 16.7 \text{ A}\]
- The circuit is rated 15 A.
Answer: The load exceeds the circuit rating, so the breaker may trip whenever the disposer runs during the dishwasher's heating. The installation instructions for most dishwashers call for their own circuit. The technician tells the customer and recommends an electrician, rather than changing the breaker.
Securing, levelling and finishing
Once connected, the machine is pushed fully into the opening, checked for level side to side and front to back with a level on the door frame or tub, and fastened with its mounting brackets: to the underside of the countertop for wood or laminate, or to the side cabinets for stone counters that must not be drilled. An unsecured dishwasher can tip forward when the door is opened and a loaded rack pulled out. The door is opened and closed to check that it latches without rubbing, that the tub is square in the opening, and, on panel-ready models with a custom wood front, that the door springs are set for the panel's weight so the door stays where it is put and does not fall open.
The final checks are a test run and a leak inspection. The technician runs a short cycle or the diagnostic test, checks the fill and drain, looks under the machine with the toe-kick off for any water, confirms that the drain is not siphoning, refits the toe-kick and insulation blanket, and shows the customer the controls, the filter, the rinse aid and the use and care guide. The installation is recorded with the model and serial numbers, the supply, drain and electrical arrangements, and anything noted for the customer to have a plumber or electrician correct.
| Check | What to look for |
|---|---|
| Opening and height | Machine fits; legs within their range |
| Supply | Valve accessible; no tape on compression fittings; no leaks; line not kinked |
| Drain | High loop or air gap; knockout plug removed; clamps tight; no kinks |
| Power | Correct circuit; ground connected; junction box cover on; protection as required |
| Securing | Brackets fastened; level; door latches square; springs set |
| Test | Fill, drain and heat in a cycle; no water under the machine |
| Records and handover | Model and serial recorded; customer shown filter and rinse aid |
Installing a disposer
Replacing a disposer follows a similar pattern. With the circuit off and proven dead, the old unit is supported and released from its mounting ring, the discharge tube and dishwasher hose are disconnected, and the cord or wiring is removed. If the new disposer uses the same mounting system, the existing sink flange may be reused; otherwise the new flange is fitted with plumber's putty or the gasket supplied, as the instructions say. The knockout plug is removed if a dishwasher will drain into it, the discharge tube is fitted to the trap, the cord kit or wiring is connected with its ground, and the unit is hung and locked on the ring. A test with running water checks for leaks at the flange, the dishwasher inlet and the discharge tube, and a test of the dishwasher drain confirms the knockout is clear.
Other built-ins, such as compactors, warming drawers, dishwasher drawers and plumbed steam ovens (lesson 7), follow their own instructions, but the same principles apply: confirm the opening and supplies, connect only to what is provided, secure the appliance, test it and leave a record.
Removing and disposing of old appliances
Most installations include taking the old appliance away. Penfold sends old dishwashers, disposers and compactors to Quarrington Metal Recovery, its scrap metal and appliance recycler, as APP-110 described. Dishwashers contain no refrigerant, but they do contain a control board, a motor and sometimes a small amount of water that drains out when the machine is tilted; the technician drains the sump into a pan and caps the hoses before carrying it out. Old water heaters, if a plumber has replaced one, are handled by the plumber. Customers sometimes ask the installer to leave the old machine in the garage or basement; that is their choice, but the technician makes sure its cord is unplugged and its water lines are capped so it cannot leak.
Panel-ready doors and custom fronts
Panel-ready dishwashers, compactors and refrigerator drawers take a wooden or metal front made to match the cabinets. The installation instructions give the panel's size, weight range and the template for its mounting screws. On a dishwasher, the door springs must be set for the panel's weight so the door balances: too weak and it falls open hard; too strong and it springs closed. Some machines have springs in several strengths, chosen from a table by panel weight. The panel must not cover the door's vent or interfere with the automatic door opening if the machine has it, and it must clear the cabinet doors and drawers on each side.
Handing over to the customer
The last part of an installation is often the most remembered. Dee shows the customer how to start a cycle, where the filter is and how to clean it, where to add rinse aid and how to set its dose, how to set the water hardness if the machine asks for it, and what normal noises and cycle times to expect. She leaves the use and care guide and the installation instructions with the customer, and asks them to keep the tech sheet where it was found inside the machine. She also explains what she found that needs another trade, such as a shared circuit, a sticking shutoff valve or a missing air gap required by local code, and writes it on the ticket so there is no misunderstanding later about who was responsible for what.
Common mistakes
MistakeSliding the machine in before checking the height range.
InsteadMeasure the opening and set the legs first.
MistakeTaping or doping a compression fitting.
InsteadCompression fittings seal on their ferrule or gasket; only pipe threads get sealant.
MistakeLeaving a dishwasher unsecured.
InsteadFasten the brackets; an unsecured machine can tip forward.
MistakeConnecting to a new disposer without removing the knockout plug.
InsteadKnock it out and remove the disc first.
MistakeAdding a receptacle or valve to make an installation work.
InsteadNote the shortfall and refer it to an electrician or plumber.
Summary and key terms
- Read the instructions and check the opening, supply, drain and power before starting.
- Remove old units with the circuit off and proven dead and the valve closed.
- Set the legs from the measured opening height before sliding the machine in.
- Seal pipe threads only; never tape compression fittings.
- Every drain hose needs a high loop or air gap, as the instructions and code require.
- Connect power only to an existing circuit of the required type; new circuits are an electrician's work.
- Secure, level and square the machine; set door springs for custom panels.
- Test for fill, drain and leaks, and record the installation.
- Supply line
- The hose or tube from the shutoff valve to the appliance.
- Compression fitting
- A fitting that seals by squeezing a ferrule or gasket.
- Mounting bracket
- A bracket that fastens a dishwasher to the counter or cabinets.
- Cord kit
- A power cord accessory for connecting an appliance to a receptacle.
- Junction box
- The enclosure where the house wiring is joined to the appliance.
- Wye branch
- A Y-shaped drain fitting that accepts the dishwasher hose.
- Panel-ready
- An appliance designed to take a custom cabinet door panel.
- Toe-kick
- The removable panel at the base of the appliance.
Practice problems
Work each problem on paper first, then reveal the answer to check.
A dishwasher adjusts from 860 to 885 mm and the opening is 870 mm high. Will it fit?
Show answer
Yes; the opening is within the leg range.
Why must a compression fitting never be taped?
Show answer
It stops the fitting seating and causes leaks.
A dishwasher at 10.5 A and a disposer at 6.2 A share a 15 A circuit. What is the problem?
Show answer
Together they draw 16.7 A, over the circuit rating.
Why must a dishwasher be fastened to the counter or cabinets?
Show answer
Otherwise it can tip forward when the door is opened and a rack pulled out.
The house has no shutoff valve under the sink. What does the technician do?
Show answer
Stop and refer the valve to a plumber.
Lesson quiz · 5 questions
Score 60% or more to complete this lesson.
Create a free account to save your progress, take quizzes and earn a certificate.