
APP-210 · Lesson 8 of 12 · 21 min
Ice makers and water dispensers
▶ Video coming soon A video version of this lesson is on the way.
Dee's case file from Tuesday, October 6 was a side-by-side whose ice maker had stopped and whose dispenser trickled. The customer had already bought a new ice maker online and was ready to have it fitted. Dee asked to try one thing first. She pulled out the water filter, which had a date written on it in marker from fourteen months earlier, fitted the bypass plug that came with the refrigerator, and ran the dispenser into a measuring jug. With the bypass, the dispenser filled about 750 mL (25 fl oz) in 30 seconds; with the old filter back in, it barely managed a third of that. A new filter, a flush, and the ice maker made its first harvest within the hour. The customer kept the new ice maker in its box as a spare. "Water problems first," Dee had written at the bottom. "Then the ice maker."
Ice makers and water dispensers cause more service calls than almost any other part of a refrigerator. Most of those calls are not about the ice maker itself but about the water reaching it: supply pressure, the filter, the inlet valve, the tubing and freezing. This lesson follows the water from the house supply to the ice bin and the glass, covers how a typical ice maker works and how to test it, and lists the faults found most often. Commercial ice machines and undercounter ice makers, which work on a different principle, are covered in APP-330.
The water path
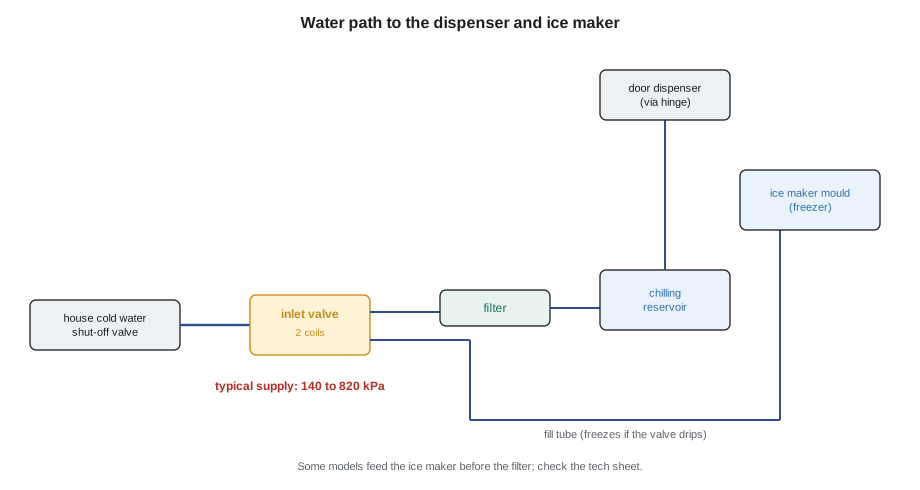
The water supply to a refrigerator is usually a small copper or braided stainless line from a shut-off valve on a cold water pipe behind the unit or under the sink. At the refrigerator it connects to the water inlet valve, a solenoid valve on the back of the cabinet in the machine compartment. From the valve, tubing carries water to the filter, which may be inside the fresh food section, in the base grille or at the back, then to a water reservoir or tank in the fresh food section that chills the drinking water, then to the dispenser in the door. A separate outlet on the valve, or a second valve, feeds the ice maker through a fill tube into the freezer or the ice compartment.
Saddle valves, which clamp onto a pipe and pierce it with a needle, were once common for refrigerator supply lines. Many makers and plumbing codes now discourage or prohibit them, because they clog and leak, and recommend a proper tee and shut-off valve. A technician who finds a saddle valve feeding a slow or leaking supply should advise the customer to have a plumber fit a proper valve.
Supply pressure and the inlet valve
Most refrigerator inlet valves are designed for a supply pressure within a range given on the installation instructions, typically from about 140 kPa (20 psi) at the low end to about 820 kPa (120 psi) at the high end. Below the minimum, the valve may not open fully and the ice maker underfills, giving small, hollow or no ice. Homes on wells, in older buildings with corroded pipes or with a reverse-osmosis filter under the sink often have low pressure at the refrigerator. Above the maximum, valves can leak or fail and a pressure-reducing valve is needed.
The inlet valve is a solenoid valve: a coil, energized by the ice maker or the board, lifts a plunger and lets water through a small rubber diaphragm. Each coil typically reads a few hundred ohms to about 1,500 Ω, and APP-120 showed how to test them. The valve has a fine screen at its inlet that catches sediment, and a clogged screen slows the flow just as a clogged filter does. A valve that drips when it should be closed lets water keep flowing into the ice maker, which overfills, freezes into a block and can jam the mechanism or spill water into the freezer.
Worked problem
Checking the flow rate
On a Tuesday night exercise, Hiro has Kiran time how long the ice maker's inlet valve takes to deliver a fill. The ice maker's specification calls for about 140 mL (4.7 fl oz) per fill, delivered in about 7.5 seconds. Kiran energizes the valve in service mode for 7.5 seconds into a measuring cup, with the supply at normal pressure, and collects 140 mL (4.7 fl oz). What flow rate is the valve passing, and what would a fill of only 80 mL (2.7 fl oz) in the same time suggest?
Show solution
- Flow rate: 140 mL ÷ 7.5 s = 18.7 mL/s, or 18.7 × 60 ÷ 1,000 = about 1.1 L/min.
- That matches the specification, so the supply, the filter and the valve are passing the right flow.
- A fill of 80 mL in 7.5 s is only 80 ÷ 140 = about 57 in 100 of the required amount.
- That would point to low supply pressure, a clogged filter, a blocked valve screen or a kinked tube.
Answer: The valve is passing about 1.1 L/min (0.29 gal/min), as specified. An underfill of that size sends you to the water supply before the ice maker.
Filters
Refrigerator water filters remove sediment, chlorine taste and, depending on the filter, some other contaminants. They are rated for a volume of water or a period of time, commonly about six months, and many refrigerators show a filter reminder based on time or volume. An old filter clogs and slows the flow to both the dispenser and the ice maker. Most refrigerators come with a bypass plug that fits in place of the filter for testing, as Dee used. After fitting a new filter, the dispenser is run for a few minutes, as the instructions direct, to flush carbon fines and air out of the system.
Only filters certified for the refrigerator should be fitted. Low-cost imitation filters may not fit or seal properly, may not filter as claimed and have caused leaks. Filters certified to the NSF/ANSI standards for drinking water treatment carry the certification mark and the standards they meet.
How a typical ice maker works
Most refrigerator ice makers, whether in the freezer or in an insulated compartment cooled by freezer air, follow the same cycle. Water fills a mould with several cavities. The water freezes. When a thermostat or thermistor on the mould shows the ice has frozen, typically at around −9 °C (16 °F) on many designs, the ice maker starts its harvest: a heater under the mould warms it slightly to loosen the cubes, and a motor turns ejector arms or twists the mould to push the cubes out into the bin. As the cycle finishes, the ice maker energizes the inlet valve for a set time to refill the mould. A shut-off arm or an optical sensor stops the ice maker when the bin is full.
A typical household ice maker makes somewhere between about 1 and 2 kg (2 and 4 lb) of ice a day, depending on the model, the freezer temperature and how often the door opens. Customers often expect more, especially after a party, and a new ice maker takes a day or so to fill an empty bin. An ice maker in a freezer running warmer than about −15 °C (5 °F) may make ice slowly or not at all, because the mould thermostat never reaches its harvest temperature.
Some ice makers, especially older modular types, have a test that starts a harvest on demand: a jumper across two test points, a button or a service-mode command. Others are controlled from the main board. The tech sheet gives the method, and a forced harvest shows whether the motor, heater and valve are working, separately from whether the mould is getting cold enough.
Common ice maker faults
No ice, with an empty mould: usually a water problem, the supply shut off, a frozen fill tube, a clogged filter, a blocked valve screen or a failed valve coil. A frozen fill tube is common: if the valve drips, or the fill tube heater on models that have one fails, water freezes in the tube where it enters the cold compartment and blocks it. Thawing the tube with warm water, never a heat gun, and fixing the drip or heater cures it.
No ice, with a full mould of frozen ice: the ice maker is not harvesting. The freezer may be too warm for the mould sensor to call for harvest; the shut-off arm may be stuck up; or the motor, the heater or the module has failed. Small, hollow or crescent-shaped cubes usually mean an underfill, and the water path is the first suspect. Ice that clumps in the bin usually means the ice is melting and refreezing, which can come from a freezer that is too warm, a door left ajar, a dispenser door that does not seal or, in a fresh-food-section ice maker, a failed ice compartment fan or duct.
| Symptom | Likely causes | First checks |
|---|---|---|
| No ice; mould empty | No water: supply, filter, valve, frozen fill tube | Bypass the filter; time a fill; look at the fill tube |
| No ice; mould full and frozen | Not harvesting: warm freezer, shut-off arm, motor or heater | Freezer temperature; arm position; forced harvest |
| Small or hollow cubes | Underfill: low pressure, clogged filter or valve screen | Measure the fill volume |
| Ice clumped in bin | Melting and refreezing | Freezer temperature; dispenser door seal; ice compartment fan |
| Water overflowing or ice block in mould | Leaking inlet valve or overfill | Watch the valve when off; check fill time |
| Slow dispenser water | Filter, pressure or valve screen | Bypass plug and timed flow |
The dispenser
The dispenser in the door has its own parts: switches or pads that the glass presses, a door or flap that opens the ice chute, often worked by a solenoid or small motor, a heater around the chute to stop it frosting, and, for crushed ice, an auger motor in the ice bin that turns a crusher. Water to the dispenser comes from the reservoir through a tube that runs through the door hinge, so a door that has been removed for moving needs that tube disconnected and reconnected correctly, as the installation instructions show. A water line pinched or cut at the hinge is a frequent result of a careless door removal.
Leaks around the dispenser, water on the floor in front of the refrigerator, or ice on the freezer floor below the chute usually come from the dispenser chute flap not sealing, from a cracked reservoir or from a fitting that was not pushed fully home after a repair. Check every push-in fitting you have disturbed, and leave the refrigerator long enough after the repair to see that it stays dry.
Water supply connections inside and on the refrigerator, from the end of the supply line, are part of the appliance technician's work. Installing a new water supply pipe or valve in the house plumbing is plumbing work under the Ontario Building Code and local rules, and is for a licensed plumber when the work goes beyond connecting the appliance.
New installations and water quality
Many water problems begin at installation. A new refrigerator with a dispenser must be connected to a cold water supply with the correct fitting and tubing, the line flushed before it is connected so that debris from the pipes does not reach the valve screen, and the system run until the air is purged, as the installation instructions direct. Air left in the line makes the dispenser spit and sputter and the ice maker underfill for the first few cycles, which customers often report as a fault in the first week. Plastic supply tubing must be kept away from the hot compressor and the condenser fan, and pushed fully into its fittings.
Water quality matters too. Hard water leaves scale in the valve, the reservoir and the ice maker fill cup over time, and sediment from old pipes clogs the valve screen. Ice with a bad taste or smell usually comes from the water or from food odours absorbed by the ice in the bin, not from the ice maker; a new filter, a cleaned bin and covering strong-smelling foods are the usual remedies. Cloudy ice is normal for a household ice maker, because it freezes quickly and traps air.
Common mistakes
MistakeReplacing the ice maker on a no-ice call without checking the water.
InsteadBypass the filter and time a fill first; most no-ice calls are water problems.
MistakeThawing a frozen fill tube with a heat gun.
InsteadUse warm water; then find the drip or heater fault that froze it.
MistakeFitting an imitation filter.
InsteadUse a filter certified for the model; poor filters leak and may not filter.
MistakeForgetting to flush a new filter.
InsteadRun the dispenser as the instructions direct to clear air and carbon fines.
MistakeJudging an ice maker within an hour of starting it.
InsteadA new or restarted ice maker needs time; check the freezer temperature and wait for a harvest or force one.
MistakeLeaving disturbed fittings unchecked.
InsteadPush every fitting home and watch for leaks before you leave.
Summary and key terms
- Most ice maker and dispenser problems are about the water reaching them.
- Typical supply pressure range is about 140 to 820 kPa (20 to 120 psi); check the instructions.
- A bypass plug and a timed fill quickly split the filter from the rest of the water path.
- The inlet valve is a solenoid valve with a screen; it can clog, fail open-circuit or drip.
- An ice maker fills, freezes, heats, ejects and refills; a sensor or arm stops it when the bin is full.
- A warm freezer or a stuck shut-off arm stops harvests.
- Small or hollow cubes usually mean an underfill.
- Dispenser water lines run through the door hinge and must be reconnected correctly.
- Water inlet valve
- The solenoid valve on the back of the refrigerator that lets water into the dispenser or ice maker.
- Bypass plug
- A plug that fits in place of the water filter so water flows without filtering, used for testing.
- Reservoir
- A tank or coil in the fresh food section that chills drinking water before the dispenser.
- Fill tube
- The tube that carries water from the inlet valve into the ice maker mould.
- Mould
- The tray of cavities in which the ice maker freezes water into cubes.
- Harvest
- The part of the ice maker cycle that loosens and ejects the frozen cubes.
- Shut-off arm
- A wire arm or optical sensor that stops the ice maker when the bin is full.
- Auger motor
- The motor that turns the auger in the ice bin to feed or crush ice for the dispenser.
Practice problems
Work each problem on paper first, then reveal the answer to check.
What should be checked first on a no-ice call with an empty mould?
Show answer
The water: supply, filter, valve screen and fill tube.
The ice maker fills 80 mL (2.7 fl oz) against 140 mL (4.7 fl oz) specified. What fraction is that?
Show answer
About 57 in 100: an underfill.
What does a full mould of frozen ice that never harvests suggest?
Show answer
A warm freezer, a stuck shut-off arm, or a failed motor, heater or module.
How should a frozen fill tube be thawed?
Show answer
With warm water, never a heat gun; then find what froze it.
Why must a dispenser water line be handled carefully when a door is removed?
Show answer
It runs through the hinge and can be pinched or cut.
Lesson quiz · 5 questions
Score 60% or more to complete this lesson.
Create a free account to save your progress, take quizzes and earn a certificate.