
ROOF-120 · Lesson 9 of 12 · 26 min
Fasteners and adhesives
▶ Video coming soon A video version of this lesson is on the way.
Keisha Grant had a habit Rory found annoying until he understood it. Every hour or so on a shingle job, she would walk over to wherever he was nailing, lift the edge of a fresh shingle with her pry bar and look underneath. The first time, she found three nails driven so deep the heads had cut through the shingle, and one crooked nail with half its head standing up. "Your gun pressure is too high, and you're nailing on the run," she said. "Those four nails are holding nothing. The first good storm, this shingle is in the neighbor's yard."
Fasteners and adhesives are what keep a roof on the building. Every shingle, sheet of membrane, insulation board and piece of flashing depends on them to resist wind, gravity and movement for decades. Most wind failures are not caused by weak materials but by too few fasteners, the wrong fasteners, fasteners in the wrong place or adhesives applied badly. This lesson covers nails, screws, plates, rivets and cleats, the main roofing adhesives, and how to install each so it actually holds.
How fasteners fail
A fastener can fail in several ways, and each points to a different cause:
- Pull-out: the fastener pulls out of the deck. The deck is too thin, rotten or soft, the fastener is too short, or the wrong type was used for the deck.
- Pull-through: the material tears over the fastener head, which stays in the deck. The head or plate is too small, overdriven or placed in the wrong spot.
- Shear: the fastener bends or snaps sideways, as when roof panels or copings slide with thermal movement.
- Corrosion: the fastener rusts away, often from moisture trapped in the roof or contact with a dissimilar metal.
- Backing out: nails or screws work loose over time from deck movement, wet-dry cycles in wood or panel movement.
A good installer chooses the right fastener for the material and deck, drives it to the right depth, and places it where the instructions say.
Roofing nails
Asphalt shingles, underlayments, base sheets on wood decks and many flashings are held with roofing nails: short, large-headed nails with a corrosion-resistant coating, usually hot-dipped galvanized, or made of aluminum, stainless steel or copper for special uses.
The Residential Code of Ohio (following the International Residential Code) describes shingle fasteners in your own words like this: galvanized steel, stainless steel, aluminum or copper roofing nails with a shank of at least 12 gauge (0.105 in) and a head at least 3/8 in across, long enough to go at least 3/4 in into the sheathing or right through it where the sheathing is thinner. Shingle manufacturers' instructions add to this, so read the wrapper.
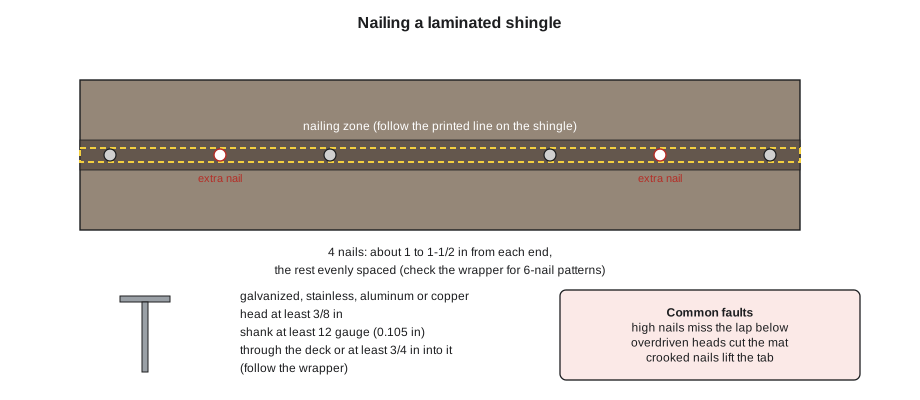
Where a nail goes matters as much as what nail it is. Each laminated shingle has a nailing zone, often marked by a printed line or strip, where the nail passes through both layers of the shingle and through the top of the shingle in the course below. A nail placed too high misses the underlying course and holds only one layer; a nail too low shows under the next course or goes through the exposed part. The usual pattern is four nails per shingle, with six (or more) required in high-wind areas, on steep slopes and to get the manufacturer's highest wind warranty.
Driving the nail correctly matters too. The head should sit snug against the shingle surface, flat, not cutting in and not standing proud:
| Fault | What it does | Cause |
|---|---|---|
| Overdriven | head cuts into or through the shingle; holding power drops sharply | gun pressure too high; soft deck |
| Underdriven | head stands proud; lifts the shingle above, prevents sealing, can wear through | pressure too low; nailing over a gap or a knot |
| Crooked (angled) | one side of the head cuts in, the other stands up | gun not held square to the roof |
| High nail | misses the course below; shingle held by one layer | nailing above the nailing zone |
| Missing nail | remaining nails carry more load | nailing on the run, gun skips |
| Short nail | too little penetration into the deck | wrong nail for the deck or for a thicker product |
Pneumatic coil nailers make nailing fast, and they make bad nailing fast too. Set the pressure on a test piece at the start of the day, adjust it when you move between decks or when the weather changes the air temperature, and use a gun with a depth adjustment. As ROOF-110 explained, use a full sequential trigger and keep your free hand clear.
Worked problem
Choosing a nail length
A re-roof goes over new 5/8 in (0.625 in) plywood. At the nailing zone, the nail passes through about 5/16 in (0.31 in) of shingle (two layers of the laminated shingle plus the course below) and a thin underlayment. The manufacturer wants the nail to go 3/4 in into the deck or right through it. Nails come in 1 in, 1-1/4 in and 1-1/2 in lengths. What is the shortest length that works?
Show solution
- Material above the deck ≈ 0.31 in, rounded up to 0.33 in for the underlayment.
- For 3/4 in penetration into the deck, the nail must be at least 0.33 + 0.75 = 1.08 in long.
- A 1 in nail is too short; a 1-1/4 in nail gives about 0.92 in into the deck.
Answer: A 1-1/4 in nail. On a thicker deck or with a heavy shingle, check again: the wrapper's penetration rule, not habit, sets the length.
Worked problem
Nails for the Linden Street roof
Keisha's roof needs 18.8 squares of laminated shingles, about 65 shingles per square. How many nails are needed at 4 per shingle, and at 6 per shingle? Coils hold 120 nails.
Show solution
- Shingles = 18.8 × 65 = 1,222.
- At 4 nails: 1,222 × 4 = 4,888 nails; coils = 4,888 ÷ 120 ≈ 40.7, so 41 coils.
- At 6 nails: 1,222 × 6 = 7,332 nails; coils = 7,332 ÷ 120 ≈ 61.1, so 62 coils.
Answer: About 4,890 nails (41 coils) at 4 per shingle or about 7,330 (62 coils) at 6 per shingle, before starter, ridge caps and underlayment. Ridgecap nails 6 per shingle on every roof, so the second number goes on the truck.
Other nails on a steep roof include cap nails, which have a wide plastic or metal washer and are used to hold synthetic underlayments (most synthetic makers require them, because a bare nail head tears through the sheet in wind); ring-shank nails for deck panels, which grip much better than smooth nails; and stainless or copper nails for copper and some specialty roofs.
Screws and plates
Low-slope roofs are held down mainly with screws and plates driven into the deck. A roofing screw has a coarse or fine thread matched to the deck, a drill or sharp point, and a corrosion-resistant coating. Corrosion resistance is proven by standard tests, such as the cyclic acid-rain test referenced by FM Approvals, and the manufacturer's literature says which coatings pass. Common types include:
- Insulation and membrane screws for steel and wood decks, in several diameters, with heavier screws for higher loads.
- Fasteners for concrete, which need a pre-drilled hole and a hammer-in or screw-in anchor.
- Special fasteners for gypsum, lightweight concrete and cementitious wood fiber decks, with large threads or expanding barbs.
The screw always works with a plate, which spreads the load so the membrane or board does not tear over the screw head:
- Insulation plates: flat plates, usually about 3 in across, round or square, used to hold insulation and cover boards.
- Seam plates (batten plates or barbed plates): smaller, stronger plates with barbs that grip the membrane in the seam of a mechanically attached roof.
- Induction weld plates: coated plates bonded to the membrane from above with an induction tool.
Screws must be driven straight and to the right depth. An overdriven screw strips its thread in the deck or dishes the plate into the insulation; an underdriven screw leaves the plate loose, and the head can later wear through the membrane. Screw guns with a depth-sensing clutch help. Screws into steel deck go into the top flanges and must pass the required distance through the steel, as you calculated in lesson 3.
On re-roofing jobs, the existing deck may be weaker than when it was new. Ridgecap's commercial specifications usually require field pull-out tests: a calibrated tester pulls sample fasteners out of the deck at several locations, and the results show whether the specified fastener and pattern will work. A common reference for this is the roofing industry test method ANSI/SPRI FX-1. Low or erratic results mean stopping and asking the designer, not adding a few extra screws.
Fasteners for sheet metal
Flashings and edge metal are held with ring-shank or annular-thread nails, screws with sealing washers, rivets and cleats. Each must match the metal (as lesson 8 explained) and allow for movement. Exposed screws in sheet metal use a bonded washer, usually EPDM rubber under a metal cap, which seals the hole when tightened just enough to compress the washer slightly. Too tight squeezes the washer out and splits it; too loose leaves a leak. Pop rivets join sheet metal parts; they must be the same metal as the sheet or stainless steel. For edge metal on low-slope roofs, the fastener type and spacing are part of the tested edge system, so follow the manufacturer's detail exactly.
Adhesives
Adhesives hold roofs together without holes. They are used to bond membranes to insulation, insulation to decks, plies to each other, and flashings to walls and curbs. The main roofing adhesives are:
| Adhesive | How it works | Used for | Watch for |
|---|---|---|---|
| Hot asphalt | melted, mopped, cools to bond | BUR plies, mod-bit base sheets, insulation on some decks | EVT range; burns; not for polystyrene without cover board |
| Cold-process bitumen adhesive | solvent or emulsion bitumen that sets as it cures | mod-bit and felt plies without heat | cure time; temperature limits; solvent fumes |
| Bonding (contact) adhesive | applied to both surfaces, left to dry to the touch, then pressed together | adhering single-ply sheets and flashings | open time; touch-dry test; rolling pressure |
| Low-rise foam adhesive | two-part polyurethane applied in beads that expand slightly and cure | insulation and cover boards to decks and to each other | bead spacing; walk boards in; temperature |
| Self-adhering sheets | factory-applied adhesive under a release film | underlayment, flashings, air and vapor barriers | clean, dry, primed surface; minimum temperature; rolling |
| Primers | thin coats that prepare a surface for adhesion | concrete, metal, old membranes, tape seams | must match the adhesive or tape system |
Every adhesive bond depends on the same basics:
- A clean, dry, sound surface. Dust, frost, dew, oil and loose old material prevent bonding. On a cold morning, a membrane can look dry while carrying a thin film of frost or dew.
- The right temperature. Most adhesives have a minimum application temperature, for both the air and the surface. Below it, they cure slowly or not at all. Store them warm in cold weather.
- The right amount. Coverage rates are given on the label. Too little leaves dry spots; too much traps solvent that weakens the bond.
- The right timing. Contact adhesives must be left until they are dry to the touch (no strings when touched with a knuckle) but not past their open time. Foam adhesives must have the boards set and walked in while the beads are still fresh.
- Pressure. Membranes and tapes are rolled firmly after placing to bring the surfaces into full contact.
Worked problem
Ordering bonding adhesive
A 6,500 ft² EPDM roof is to be fully adhered. The bonding adhesive label gives a coverage of about 60 ft² of finished, bonded area per gallon (with adhesive on both surfaces). Pails hold 5 gal. How many pails are needed?
Show solution
- Adhesive = 6,500 ÷ 60 ≈ 108.3 gal.
- Pails = 108.3 ÷ 5 ≈ 21.7, so 22 pails.
Answer: 22 pails for the field, plus separate flashing adhesive and a small allowance for a rough or porous surface.
Foam adhesive bead spacing is set by the manufacturer and the wind design: beads are placed closer together in the perimeter and corners than in the field of the roof, just as fasteners are. A common pattern is beads about 12 in apart in the field and closer at edges and corners, but the job specification rules.
Solvent-based adhesives and primers are flammable and give off vapors. Keep them away from torches, kettles and hot-air welders; stop rooftop air intakes from drawing in fumes (as ROOF-110 explained); store and dispose of them as their safety data sheets direct; and never use them in a closed space without ventilation. Water-based versions avoid much of that but must not freeze and need warmer, drier weather to cure.
Mechanical fastening or adhesive?
Designers choose between mechanical fastening and adhesives, or a mix of both, for reasons such as:
| Factor | Mechanical fastening | Adhesive |
|---|---|---|
| Speed and weather | fast; works in most weather | slower; limited by cold, damp and wind |
| Wind performance | concentrated loads at each fastener; sheet can flutter | load spread over the whole surface |
| Holes in deck | many, each a small air leak and thermal bridge | none through the air barrier |
| Deck types | needs a deck that holds fasteners | works on concrete and other hard-to-fasten decks |
| Noise and disruption | screw guns can be loud and drill through to occupied spaces | quieter, no penetrations |
| Removal later | easier to strip | harder to tear off |
Neither is better everywhere. What matters is that the method matches a tested assembly and that it is installed exactly as tested.
Quality checks
Keisha's habit of lifting shingles is a quality check every crew should do. On steep roofs, check nailing early on each slope and whenever someone new picks up a gun. On low-slope roofs, count fasteners per board against the pattern, check plates are snug and level, and pull-test adhesive bonds with a small test patch or by trying to lift a board corner after the adhesive has cured. Record what you checked. Fixing a nailing problem on the first ten bundles costs minutes; fixing it after a storm costs a roof.
By the end of that week, Rory had turned his gun pressure down, slowed his pace, and started lifting his own shingles every hour before Keisha could get to them.
Common mistakes
MistakeLeaving nailer pressure where it was yesterday.
InsteadSet the pressure on a test piece each day and adjust it when the deck, product or temperature changes.
MistakeNailing above the nailing zone.
InsteadNail within the marked zone so each nail passes through both shingle layers and the course below.
MistakeHolding synthetic underlayment with bare nails or staples.
InsteadUse the cap fasteners the underlayment maker requires.
MistakeApplying contact adhesive and closing the bond while it is still wet.
InsteadWait until it is dry to the touch, but close it within its open time, then roll it firmly.
MistakeAdding extra screws when deck pull-out tests are low.
InsteadStop and report; the designer must choose a different fastener, pattern or method.
Summary and key terms
- Fasteners fail by pull-out, pull-through, shear, corrosion or backing out; each points to a cause.
- Roofing nails must meet code minimums for head, shank and penetration and the shingle maker's rules.
- Nail in the nailing zone, flush and square, with the specified number per shingle.
- Low-slope roofs use coated screws with insulation or seam plates, driven to the right depth into the right part of the deck.
- Field pull-out tests confirm fasteners on re-roofs.
- Adhesives need clean, dry, warm surfaces, the right amount, the right timing and firm pressure.
- Fastening method must match a tested assembly.
- Pull-out
- Failure in which a fastener pulls out of the deck.
- Pull-through
- Failure in which the material tears over a fastener head.
- Nailing zone
- The marked band on a shingle where nails must be placed.
- Cap nail
- A nail with a wide plastic or metal cap, used to hold underlayment.
- Seam plate
- A barbed plate that holds a membrane in the seam of a mechanically attached roof.
- Pull-out test
- A field test that measures the force needed to pull a fastener from the deck.
- Contact adhesive
- An adhesive applied to both surfaces and allowed to dry to the touch before bonding.
- Open time
- The time during which an adhesive can still form a good bond after it is applied.
Practice problems
Work each problem on paper first, then reveal the answer to check.
Name two ways a fastener can fail.
Show answer
For example, pull-out from the deck and pull-through of the material.
A roof needs 20 squares at 65 shingles per square and 6 nails each. How many nails?
Show answer
20 × 65 × 6 = 7,800 nails.
What happens when a shingle nail is overdriven?
Show answer
The head cuts into the shingle and the holding power drops.
What does a field pull-out test check?
Show answer
Whether the deck holds the specified fastener well enough.
A bonding adhesive covers 60 ft² per gallon. How many gallons for 3,600 ft²?
Show answer
3,600 ÷ 60 = 60 gal.
Lesson quiz · 5 questions
Score 60% or more to complete this lesson.
Create a free account to save your progress, take quizzes and earn a certificate.