
IRW-330 · Lesson 4 of 12 · 23 min
Erecting primary frames
▶ Video coming soon A video version of this lesson is on the way.
Corwin's daily report for Tuesday, July 7, 2026, was one line longer than most: "First bay up and braced 2:40 p.m. Nobody left the frames until the cables were tight." The Brannock steel had arrived the day before on three flatbeds, and the crew had spent Monday checking the shipment, staging the pieces and laying out the first frames on cribbing. On Tuesday morning a 50 ton hydraulic crane from Summitline Crane Rental arrived with its operator, Marisa Kettering, and the crew stood the first rigid frame.
This lesson follows the frame erection from July 7 to July 14. It covers staging the steel, choosing the first bay, standing and bracing columns, assembling and lifting rafters, making the frame connections, adding frames bay by bay, and the hazard that controls all of it: an unbraced frame in the wind.
Staging the steel
A metal building package arrives in bundles of secondary members, crates of fasteners and accessories, bundles of panels and trim, and the primary frame pieces loose on the trucks. Staging decides how fast the job goes. Corwin's crew placed each frame's columns and rafter halves on cribbing near the frame line where they would be used, with the connection ends lined up and the outside flanges facing the way they would face in the building, so that each piece could be rigged and lifted without being turned. Secondary framing was stacked by bay, and panels and trim were kept on blocking, off the ground, with one end raised so rain would drain off.
Panels stored flat in the rain trap water between sheets, and the water causes white rust on galvanized steel and staining on the paint. Most manufacturers say panel bundles must be stored on an incline, covered if they will wait more than a short time, and opened only when they are about to be installed.
Before lifting anything, the crew checked every frame piece's part mark against the cross section and the shipping list, looked for bent flanges from shipping, and confirmed that the bolt bags held the grades and lengths the drawings called for. A frame piece that is bent cannot be straightened on site without the manufacturer's approval.
The first bay
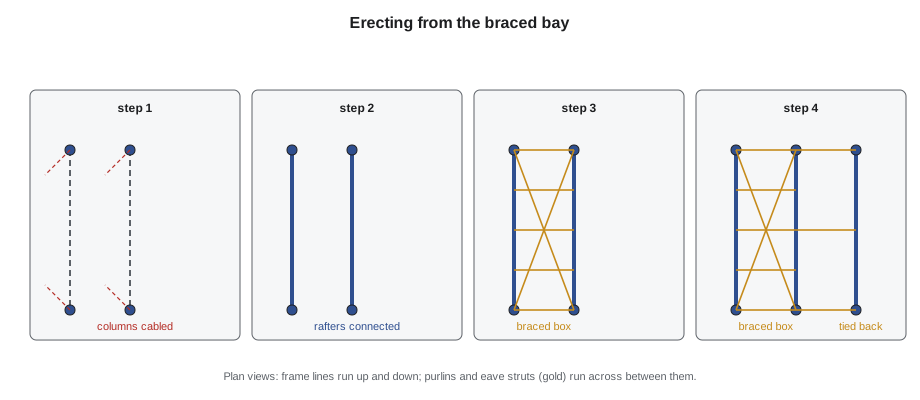
A metal building is erected from a braced bay. The roof and wall bracing in the drawings is located in particular bays, often an end bay or the first interior bay. Erection starts with the two frames on either side of a braced bay, because those two frames, with their eave struts, purlins and the permanent bracing between them, form a stable box. Every frame that follows is tied back to that box with purlins and girts until the next braced bay is reached.
On the Brannock building the drawings showed rod bracing in the roof and both sidewalls in bay 2–3, between frame lines 2 and 3, and again in bay 5–6. Corwin started at frame line 2 rather than at the bearing endwall at line 1, because the bearing endwall is the least stable part of the building until the girts and its own bracing are on.
Setting and bracing the columns
Rigid frame columns are usually tapered, narrow at the base and deep at the knee. They are set on their anchor rods with the crane, the nuts run on, and the column guyed or braced before the crane lets go. Metal building columns are designed as pinned at the base, which means the base connection holds the column in place but does not hold it upright on its own. A free-standing column on four rods can fall over in a light wind.
OSHA's steel erection standard requires that columns be anchored before the hoisting line is released, and Northfield's erection guide added that each column must be braced with two temporary cables or a braced strut: one line along the building and one across it, tied to deadmen, anchors in the footing or the next column. Corwin used wire rope come-along cable kits with turnbuckles, rated and inspected like any rigging.
The crew set both columns of frame 2 and both of frame 3, guyed each, and set the eave struts between the column tops at lines 2 and 3 on each sidewall. The eave struts gave the first two frames a connection along the building before the rafters went up.
Assembling and lifting the rafters
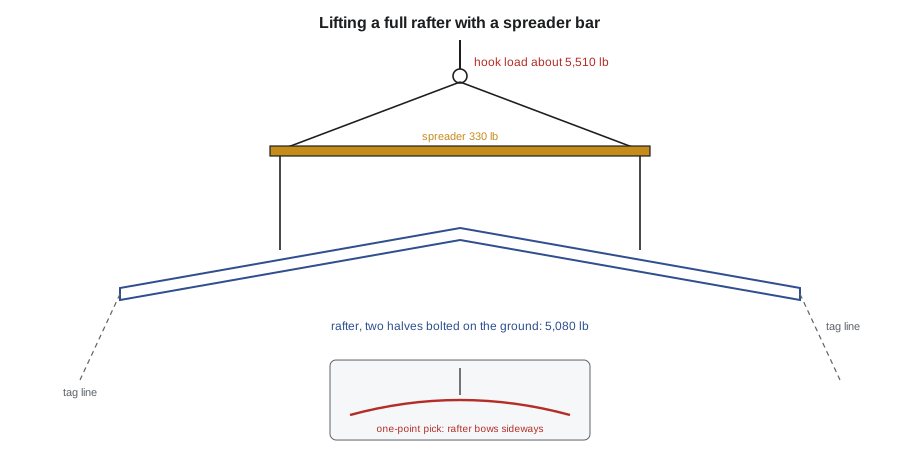
On a narrow building, rafters can be lifted in halves and bolted together at the ridge in the air. On a building as wide as Brannock, the usual method is to bolt the two rafter halves together on the ground, on cribbing at the right height so the ridge splice can be made properly, and lift the whole rafter as one piece. A full 80 ft rafter is long and flexible; lifted from a single point at its middle, it can bend sideways and buckle, a failure called lateral-torsional buckling. It must be lifted with a spreader bar or a two-point hitch at the lift points the manufacturer recommends, usually near the quarter points.
Worked problem
The hook load for a full rafter
Each Brannock rafter half weighs 2,540 lb. The spreader bar weighs 330 lb and the slings, shackles and hook block attachments weigh 100 lb. What is the load on the crane hook when a full rafter is lifted?
Show solution
- Rafter = 2 × 2,540 = 5,080 lb.
- Hook load = 5,080 + 330 + 100 = 5,510 lb.
Answer: About 5,510 lb. Marisa checked it against the crane chart at the radius for the far sidewall, with the deductions her chart requires, and found plenty of capacity. On a metal building the lifts are light; the danger is not the crane's capacity but the rafter's stability and the wind on its large side.
Tag lines at both ends let the crew turn and steady the rafter. As it came over the columns, Juno and Tobin, on aerial lifts at each knee, guided the end plates onto the column connection with drift pins, ran in the first bolts and called for the crane to hold. Corwin stayed on the ground, where he could see both knees and the ridge at once.
Making the frame connections
Rigid frame connections are usually bolted end-plate connections: a thick plate welded to the end of the rafter bolts to a plate on the column at the knee, and two rafter end plates bolt together at the ridge. They carry bending moment, which is what makes the frame rigid. The bolts are high-strength structural bolts, and the manufacturer's notes say whether they are to be pretensioned and by which method, usually turn-of-nut or twist-off tension-control bolts, as covered in IRW-210.
Before the crane released each rafter, the crew installed the bolts Northfield's guide called for at each knee and ridge connection. OSHA's section on systems-engineered metal buildings requires that, before the hoisting equipment is released, at least 50 in 100 of the bolts, or the number the manufacturer specifies if that is greater, be installed and tightened on both sides of the web next to each flange of a rigid frame connection.
Worked problem
How many bolts before release?
A Brannock knee connection has 12 bolts, 6 near the top flange and 6 near the bottom flange, 3 on each side of the web at each flange. Northfield's guide asks for at least 8 bolts before release, and OSHA asks for at least half on both sides of the web at each flange. How many bolts must be in and snug before Marisa lets go?
Show solution
- Half of 12 = 6 bolts, which must include bolts on both sides of the web at both flanges.
- The manufacturer asks for 8, which is more than 6.
- Use the greater number: 8 bolts, placed so that both sides of the web at both flanges have bolts.
Answer: Eight bolts, spread across both flanges and both sides of the web, are installed and snug before release. The remaining bolts go in before the frame is loaded, and all of them are pretensioned once the frame is plumbed, as the notes require.
After both frames of the first bay were connected, the crew installed the permanent rod bracing in the roof and both sidewalls of bay 2–3, the eave struts and enough purlins to hold the rafters at the right spacing. Then they plumbed and squared the box. Lesson 6 explains how the bracing is tensioned to bring the frames plumb. Only when the box was plumb and the bracing was snug did the crew remove the temporary cables from frames 2 and 3. That was 2:40 p.m. on July 7.
Adding frames bay by bay
With a stable box, each new frame is set the same way: columns guyed, rafter lifted and connected, and then tied back to the box with at least the purlins and eave struts the erection guide requires before the crane releases it. The manufacturer's guide usually says how many purlins are needed in each bay before the next frame goes up, and whether temporary bracing is needed until the next braced bay. Flange braces, the small angles that run from the purlins and girts to the inside flange of the frames, are part of the frame's stability and go in as soon as the purlins they connect to are in place.
On Wednesday, July 8, the crew set frames 4 and 5, and on Thursday, July 9, frames 6 and 7, the endwall rigid frame. Bay 5–6 was the second braced bay, and once its bracing was installed the crew removed the temporary cables from frames 4 and 5. Frame 7 kept its cables until its endwall columns and girts were in, because its far side had no bay beyond it.
Wind: the controlling hazard
A partly erected metal building is most at risk from wind. A single standing frame has a large side area and almost no strength along the building. A bay with purlins but without its bracing can rack. The highest risk is the gap between setting a frame and tying it back to braced steel. Every metal building manufacturer's guide warns about wind, and almost every metal building collapse during erection has involved wind on frames that were not yet fully braced.
Crossbeam's rule for metal buildings, which Corwin wrote at the top of each day's job hazard analysis, was that no frame was set when gusts were forecast or measured above 25 mph, that no frame was left overnight without its temporary cables, and that the crane did not release a frame until the purlins or cables the guide required were in. These are company rules; the manufacturer's guide and the crane's own wind limits govern if they are stricter.
On Friday, July 10, the forecast showed a line of thunderstorms arriving in the afternoon. Corwin stopped setting steel at noon, had the crew add a second set of temporary cables to frame 7, check every turnbuckle, tie down the panel bundles and lower the aerial lifts. The storm brought gusts that the farm's weather station recorded at well over the company limit. On Monday every frame was exactly where it had been left.
Wind also limits work at height on the frames themselves. Crew members on aerial lifts or on the frames lower or stop when the wind picks up, because a gust can push a rafter or a person sideways. Lesson 6 and lesson 11 return to how the permanent bracing and the finished system make the building strong.
Plumbing and the bearing endwall
On Monday, July 13, the crew built the bearing endwall at frame line 1: the endwall columns on their rods, including the column at the corrected rod group repaired the week before, the endwall rafter beam bolted to the column tops, and the endwall girts. On Tuesday, July 14, they plumbed the whole building using the bracing and the temporary cables, checking each column with a level and a laser and the eave struts for straightness, and tightened every frame bolt to the method in the notes. Lesson 11 covers the plumbness tolerances.
Communication during the lift
Every frame lift on the Brannock job used one signal person, Corwin, standing where Marisa could see him and he could see both knees and the ridge. The crew on the aerial lifts used radios to tell Corwin what they needed, and Corwin gave Marisa the signals. One voice to the operator kept the lifts calm, as IRW-120 taught.
Common mistakes
MistakeStarting erection at an unbraced endwall.
InsteadStart at the frames on either side of a braced bay.
MistakeReleasing a column with no guying.
InsteadGuy or brace each column in both directions before the crane lets go.
MistakeLifting a long rafter from one point.
InsteadUse a spreader bar or two-point hitch at the manufacturer's lift points.
MistakeReleasing a rafter with only a bolt or two in each connection.
InsteadInstall the bolts the manufacturer and the rules require, on both sides of the web at each flange.
MistakeLeaving frames overnight without temporary cables.
InsteadEvery frame not yet tied to braced steel keeps its cables until it is.
Summary and key terms
- Stage each frame's pieces near its line, oriented as they will be installed, and keep panels drained and off the ground.
- Erect from the frames on either side of a braced bay, which form a stable box.
- Guy every column in both directions before releasing it.
- Lift long rafters with a spreader bar or two-point hitch to prevent lateral-torsional buckling.
- Install at least half the bolts, or the manufacturer's number if greater, on both sides of the web at each flange before release.
- Wind on unbraced frames is the controlling hazard; set frames only in safe winds and leave nothing unbraced.
- Braced bay
- A bay with permanent roof and wall bracing, used as the starting point for erection.
- Guying
- Bracing a column or frame temporarily with cables tied to anchors.
- Spreader bar
- A beam hung from the hook that supports a load at two points, keeping slings vertical.
- Lateral-torsional buckling
- Sideways bending and twisting of a long, slender beam under load.
- End-plate connection
- A bolted moment connection made of thick plates welded to the ends of the members.
- Flange brace
- A small angle from a purlin or girt to the inside flange of a frame that keeps the flange from buckling.
Practice problems
Work each problem on paper first, then reveal the answer to check.
Why is erection started at a braced bay?
Show answer
Its two frames and permanent bracing form a stable box that later frames tie back to.
Two rafter halves weigh 2,160 lb each; the spreader is 260 lb and rigging 90 lb. Hook load?
Show answer
2 × 2,160 + 260 + 90 = 4,670 lb.
Why is a long rafter lifted with a spreader?
Show answer
To keep it from buckling sideways.
When may temporary cables be removed from the first two frames?
Show answer
When the bay's permanent bracing, eave struts and purlins are in and the box is plumb.
What should the crew do when strong gusts are forecast?
Show answer
Stop setting steel, add temporary cables, check turnbuckles and tie down loose material.
Lesson quiz · 5 questions
Score 60% or more to complete this lesson.
Create a free account to save your progress, take quizzes and earn a certificate.