
IRW-130 · Lesson 9 of 12 · 24 min
Placing slab and beam steel
▶ Video coming soon A video version of this lesson is on the way.
At Harrow Square, the parkade Crossbeam's rod gang built earlier in 2026, each suspended level was a sea of steel: beams between the columns, a thick slab over everything, drop panels at the columns and a ramp curling down through the middle. Tobias showed the apprentices a photograph taken from the crane cab on the morning of the level 1 pour. From above, the steel looked like graph paper. "Every one of those lines is a decision somebody made in an office," he said. "Every one of them is also a bar somebody carried, laid down and tied, in the right layer, in the right order. The order is the trick."
This lesson covers the steel in suspended slabs and beams: one-way and two-way slabs, bottom and top steel, the sequence of placing beams and slabs together, openings and edges, walking on mats and the tolerances the placement must meet.
One-way and two-way slabs
A one-way slab spans in one direction between beams or walls, like a plank. Its main bars run across the span, at the bottom between supports and at the top over them, with lighter distribution bars at right angles to hold them in place and control cracking. A two-way slab is supported on all four sides or directly on columns and bends in both directions, so it has main bars both ways, in both the bottom and top layers.
Flat slabs and flat plates, common in parking structures and apartment buildings, are two-way slabs carried directly on columns with no beams. Their steel is concentrated in column strips, the bands of slab running along the column lines, and lighter in middle strips between them. Top steel over the columns is heavy, because that is where the slab hogs most. Drop panels, thickenings of the slab around each column, add depth and often carry their own bars. Placing drawings for these slabs show bands of bars of different spacings and lengths, and the placer must keep each band in its own area.
Bottom steel and top steel
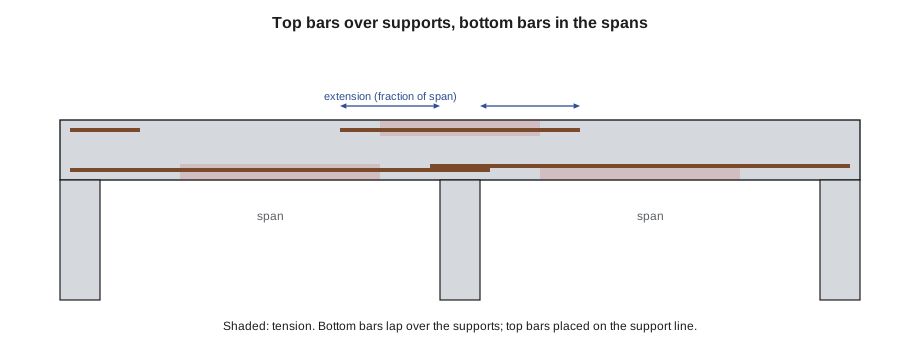
Bottom bars in a slab or beam run through the middle of each span and usually extend into or over the supports. Top bars sit over the supports and extend a distance into each span, set by the designer, often shown as a fraction of the span or as a dimension. A placer who cuts the top bars short, or centers them on the wrong line, leaves the slab weak exactly where it hogs.
Worked problem
How far top bars extend
The drawings show top bars over an interior beam extending 0.3 times the clear span into each side. The clear span on each side is 26 ft. How far does the top steel extend from the face of the beam into each span, and how long are the top bars if the beam is 16 in wide?
Show solution
- Extension = 0.3 × 26 = 7.8 ft from each face.
- Bar length = 7.8 + 1.33 + 7.8 ≈ 16.9 ft, about 16 ft 11 in.
Answer: 7.8 ft into each span and bars about 16 ft 11 in long, centered on the beam. The placer marks the beam centerline on the forms and centers every top bar on it.
Beam steel
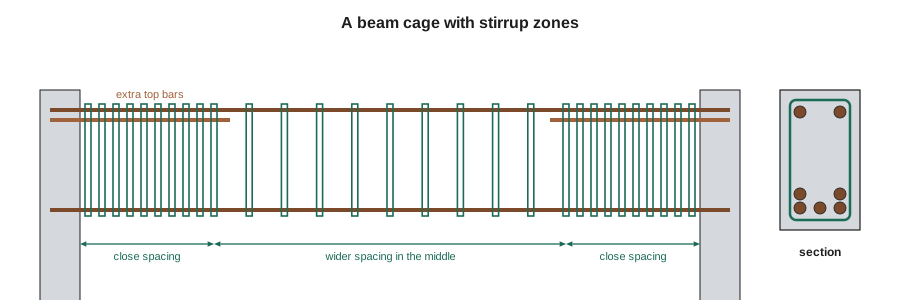
A beam cage has bottom bars, top bars and stirrups. The bottom bars carry tension at mid-span. The top bars carry tension over the supports and hold up the stirrups between. Extra top bars over the supports, sometimes called negative steel, and extra bottom bars at mid-span are added where the drawings show them. Stirrups are spaced closely near the supports and more widely in the middle, as lesson 1 explained.
Worked problem
Counting stirrups in spacing zones
A beam has a clear span of 26 ft between support faces. The drawing shows the first stirrup 2 in from each face, stirrups at 6 in for the first 5 ft from each face, and at a maximum of 12 in in the middle. How many stirrups are needed?
Show solution
- End zone: stirrups at 2, 8, 14 … up to 56 in: (56 − 2) ÷ 6 + 1 = 10 stirrups at each end.
- Middle length between the last end stirrups = 312 − 2 × 56 = 200 in.
- Spaces at 12 maximum = 200 ÷ 12 ≈ 16.7, rounded up to 17; stirrups between = 17 − 1 = 16.
- Total = 10 + 10 + 16 = 36.
Answer: 36 stirrups. In the middle zone the actual spacing is 200 ÷ 17 ≈ 11.8 in, within the 12 in maximum. The end stirrups are counted once, as part of the end zones.
Beam cages are either built in place in the beam forms, by setting the stirrups on bolsters, threading the bottom bars through them and lifting the top bars into place, or built on horses beside the forms and dropped in with the crane. In-place building is usual for long beams that run through many columns; prefabricated cages suit short, heavy beams and repeating bays.
The placing sequence
A beam-and-slab floor is placed in layers, from the bottom up, and the order matters because each layer must sit on, or pass under, the one before. A typical sequence is this.
- Beam cages in the beam forms, with their top bars left loose or out where slab bars must pass under them.
- Slab bottom bars in the outer direction, on bolsters, then the inner bottom direction.
- Column dowels and vertical bars through the slab, and any embeds, sleeves and blockouts from other trades.
- Beam top bars and extra top bars over supports, set and tied once the slab bottom steel is in.
- Support bars or high chairs for the slab top mat, then the slab top bars, inner direction first and outer direction last, so the outer layer is nearest the top surface as the section shows.
Where two beams cross, or a beam meets a column, the bars of one must pass over or under the bars of the other. The detailer has worked out which goes over, and the placer follows the detail, because the depth of each bar has been counted on in the design. A congested joint where bars will not fit is a stop-and-ask, not a job for a sledgehammer.
Openings, edges and steps
Openings in slabs for stairs, shafts, ducts and pipes interrupt bars just as wall openings do. The bars cut by the opening stop at the cover from its edge, and trim bars along each side and diagonal bars across the corners replace them, as shown on the drawings. Small sleeves for pipes are usually placed between bars by spreading the bars slightly, within the limits on the drawings; larger openings always have their own detail.
Slab edges, where the slab ends at the perimeter or at an expansion joint, usually have U-bars or hooked bars that wrap the edge, and edge beams. Steps in the slab, such as the drop where a parking deck meets a ramp, have their own bent bars. Construction joints, where one pour stops and the next begins, need the bars to run through the bulkhead by the lap length, or dowels, so the steel is continuous across the joint.
Walking on mats
Rodbusters spend their days walking on steel, and so do the finishers, the pump hose crew and the inspectors. Bars underfoot are slippery, especially when wet or frosty, and every step is on a round bar between gaps. The rules are simple.
- Walk on the bars, not on the supports, and step where bars cross when possible.
- Do not walk on top mats before they are fully supported and tied.
- Use walk boards, planks laid across the mat, for paths that will be used heavily, such as the route of the pump hose.
- Wear boots with good soles and keep ties tidy so that tails do not catch boots.
- Watch the edges: a slab edge with no guardrail is a fall hazard, and fall protection rules apply on a slab form just as on a deck.
Every footstep is also a chance to push a bar down. Bent support legs, flattened top mats and bars kicked out of position are found and fixed before the inspection, not after it.
Placing tolerances
ACI 117 sets the tolerances for placing reinforcement in the United States. For the depth of the steel in a member and for cover, the tolerance is plus or minus 3/8 in in members 8 in deep or less and plus or minus 1/2 in in deeper members, but cover may not be reduced by more than one third of the specified cover. Bar spacing and the ends of bars have their own tolerances. The specification for each job may tighten them further. In practice, Crossbeam places to the drawing dimension, and the tolerance is the allowance for the real world, not a target.
Slabs on composite deck and on grade
Not every slab is a formed concrete slab. On steel buildings like Ashcroft, floors are concrete on composite metal deck, and their reinforcing is light: welded wire or small bars for crack control, plus extra top bars over the girders and around columns where the drawings show them. The deck carries the wet concrete; the steel controls cracking and helps the slab act with the beams. Lesson 10 covers the mesh.
Slabs on grade, such as a basement floor or a parking level on the ground, sit on a granular base and a vapor barrier. They have little or no structural steel, unless they carry heavy loads or span soft ground, and their steel, if any, is mesh or light bars on supports placed at the height the drawings show. A slab on grade with steel lying on the vapor barrier is a slab with no effective steel.
Beam cages built in place
Building a long beam cage in place in its forms goes in a steady order. Stirrups are set out along the beam at the spacing zones, standing on beam bolsters. The bottom bars are threaded through the stirrups from one end and laid on the bolsters. The top bars are lifted into the tops of the stirrups and tied. Then the stirrups are moved to their exact marks and tied to the main bars at every corner. Marking the stirrup positions on the forms with paint or crayon before starting saves counting twice.
Worked problem
Stirrups for a short beam
A beam has a clear span of 16 ft with the first stirrup 2 in from each face and stirrups at a maximum of 8 in throughout. How many stirrups?
Show solution
- Distance between end stirrups = 192 − 2 × 2 = 188 in.
- Spaces = 188 ÷ 8 = 23.5, rounded up to 24.
- Stirrups = 24 + 1 = 25.
Answer: 25 stirrups at an actual spacing of 188 ÷ 24 ≈ 7.8 in.
Embeds, sleeves and other trades
A suspended slab is full of things that are not rebar: electrical conduit and boxes, plumbing sleeves, floor drains, post-tensioning tendons on some jobs, embed plates for steel connections, inserts for hangers and blockouts for openings. Each trade places its own items, and the order matters. Conduit run on top of the bottom mat must not push the bars down or take up the cover; sleeves must not cut bars; embed plates need clear space for their studs. The general contractor coordinates the sequence, and the rod gang's job is to place its steel as drawn and report any item that forces a bar out of position, rather than move the bar quietly.
Slabs also need care at their edges for the pour itself. Edge forms, screed rails and bulkheads are set by the formers; the rod gang makes sure the slab's edge bars and U-bars are at the cover from the edge form and that nothing has been pushed against it. A bar touching the edge form is a bar with no cover on the face that will see the weather.
Common mistakes
MistakePlacing top bars off the support line or cutting them short.
InsteadMark the support centerline and extend top bars the full distance shown.
MistakeSpreading stirrups evenly instead of by zone.
InsteadCount and place stirrups zone by zone at the spacings shown.
MistakePlacing the slab top mat layers in the wrong order.
InsteadFollow the section so the outer layer is nearest the surface.
MistakeForcing bars through a congested joint.
InsteadFollow the detail; stop and ask if the bars will not fit.
MistakeWalking on top mats before they are supported and tied.
InsteadFinish supports and ties first, and use walk boards for heavy routes.
Summary and key terms
- One-way slabs have main bars across the span; two-way slabs and flat plates have main bars both ways, banded in column and middle strips.
- Bottom bars run through the spans; top bars sit over supports and extend into the spans as shown.
- Beam cages have bottom bars, top bars, extra bars at supports and stirrups spaced by zone.
- Place from the bottom up: beam cages, slab bottom, dowels and embeds, beam top bars, slab top mat.
- Openings get trim bars; edges, steps and construction joints get their own details.
- Walk on bars, not supports; use walk boards; and treat tolerances as allowances, not targets.
- One-way slab
- A slab that spans in one direction between supports.
- Two-way slab
- A slab that bends in both directions and has main bars both ways.
- Flat plate
- A two-way slab carried directly on columns without beams.
- Column strip
- The band of a flat slab running along a column line, with heavier steel.
- Drop panel
- A thickening of a flat slab around a column.
- Negative steel
- Top bars over supports, where the member hogs.
- Walk board
- A plank laid across a mat to give a safe walking path and protect the steel.
- Construction joint
- A planned joint where one pour stops and the next begins.
Practice problems
Work each problem on paper first, then reveal the answer to check.
Top bars extend 0.25 of a 20 ft clear span each side of a 12 in beam. How long are they?
Show answer
5 + 1 + 5 = 11 ft.
A beam end zone has stirrups from 2 in to 38 in at 6 in. How many?
Show answer
(38 − 2) ÷ 6 + 1 = 7.
Which slab layer goes in last?
Show answer
The outer top layer, nearest the top surface.
What goes around a slab opening?
Show answer
Trim bars along each side and diagonal bars at the corners.
Under ACI 117, by how much may cover be reduced at most?
Show answer
One third of the specified cover.
Lesson quiz · 5 questions
Score 60% or more to complete this lesson.
Create a free account to save your progress, take quizzes and earn a certificate.