
AUTO-320 · Lesson 11 of 12 · 21 min
A/C service: recovery, evacuation and recharge
Courier van 1 comes back from a gravel route east of Denver in the spring with no air conditioning. Marcus Bell heard a sharp crack from the front of the van on the highway when a loaded gravel truck passed him going the other way, and by the next afternoon the vents were blowing warm. Kiran finds the cause in a minute: a stone has punched a small hole through the condenser's lower tubes, and the area around it is wet with oil. The van uses R-1234yf. The repair is a new condenser, but the job Marty wants her to learn from it is everything around the part: identifying and recovering what is left of the refrigerant, replacing the right amount of oil, evacuating the system properly, charging it by weight and proving that it does not leak.
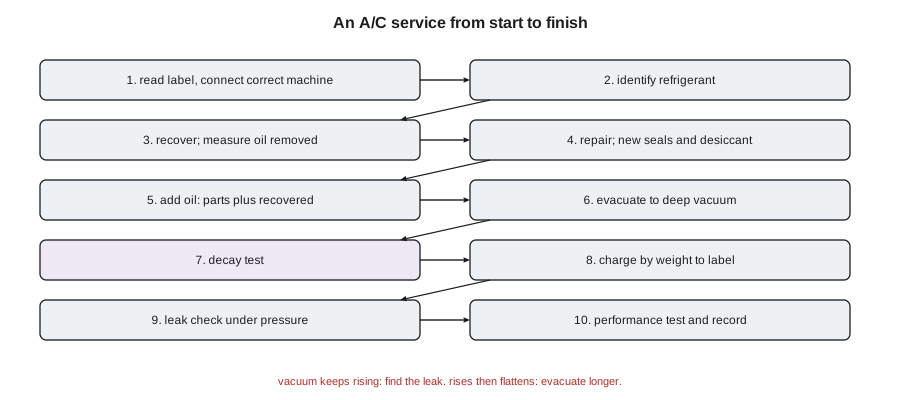
This lesson walks through that procedure from start to finish. The steps are the same for R-134a and R-1234yf systems, using the correct machine for each, with the extra precautions for R-1234yf from Lesson 3 and the rules from Lesson 4. It also covers leak detection, because finding the leak comes before every recharge.
Finding leaks
Most systems that have lost cooling have lost refrigerant, and refrigerant does not wear out or get used up; if it is gone, it leaked. Leaks show up in four places: at fittings and O-rings, at the compressor's shaft seal, in heat exchangers damaged by stones or corrosion, and in hoses that rub or crack. Oily dirt around a fitting is a strong clue, because oil travels with the refrigerant and stays behind when the refrigerant escapes. A technician has four main methods to find a leak.
- An electronic leak detector draws air past a sensor that responds to refrigerant. Detectors are made and certified for specific refrigerants, and R-1234yf systems need a detector rated for it. The probe is moved slowly, about 1 to 2 in per second, below each fitting and component, because refrigerant is heavier than air and sinks.
- A fluorescent dye, added to the system in a measured small amount, travels with the oil and glows yellow-green under an ultraviolet lamp where it leaks out. Many new vehicles have dye in their systems from the factory. Dye must be approved for the refrigerant and oil, and too much dye can affect the oil.
- Pressure testing with dry nitrogen, or with a trace gas of 95 percent nitrogen and 5 percent hydrogen, on an empty system lets a technician pressurize the circuit without using refrigerant and find leaks with soap solution or a hydrogen detector. The nitrogen is released afterward, which is allowed because it is not a refrigerant. The test pressure must not exceed the maker's limit.
- Soap solution brushed onto a suspect fitting bubbles at a leak. It works best for larger leaks and to confirm a leak found another way.
Van 1's leak needs no search, but Marty has Kiran check the whole system with the electronic detector anyway once it is repaired, because a stone that holes a condenser may also have damaged something next to it, and because a system that leaked once might have a second, slower leak that the obvious one hid.
Step one: identify and recover
Kiran reads the under-hood label: R-1234yf, a charge of 1.37 lb, and a specified PAG oil for R-1234yf. She connects the R-1234yf service machine, whose quick couplers fit only R-1234yf ports, and lets it run its identifier on the remaining refrigerant. The sample is pure. The machine then recovers the refrigerant: it draws it out through its filters, separates the oil that comes out with it into a measured bottle, and stores the refrigerant in its internal tank. When the system reaches a vacuum, the machine waits a few minutes and checks whether the pressure rises; a rise means refrigerant was still boiling out of the oil, and it recovers again. Only when the pressure stays low is the system considered recovered.
The machine reports 3.0 oz of refrigerant recovered, far less than the charge, which fits a system that has been leaking for a day, and 0.4 fl oz of oil. That oil amount matters. Oil that leaves the system during recovery has to be replaced, or the compressor will gradually run short.
Step two: repair and replace the oil
With the system at atmospheric pressure, Kiran removes the condenser. Its line fittings use new O-rings of the type specified for R-1234yf, lightly coated with the specified oil, and every opening is capped as soon as it is opened, because PAG oil and the desiccant absorb moisture from the air quickly. The receiver-drier is built into the condenser's side, so the new condenser comes with a new desiccant cartridge, which stays capped until the last moment.
Every component holds some oil in its passages, and the service information gives the amount to add when each part is replaced. A new compressor usually arrives filled with the full system charge of oil, and the service information tells the technician how much to drain from it so that the system ends up with the correct total. For a condenser, a fixed amount is added; for a hose or line, a smaller amount. Oil recovered by the machine is added back as well. Too little oil wears the compressor; too much reduces cooling, because oil coats the inside of the heat exchangers and takes up space.
# Oil to add after a repair: maker's amount per replaced part plus oil removed during recovery (illustrative)
per_part_ml = {"condenser": 30, "receiver-drier cartridge": 10, "evaporator": 40, "hose or line": 10, "accumulator": 60}
replaced = ["condenser", "receiver-drier cartridge"]
recovered_ml = 12
add_ml = sum(per_part_ml[p] for p in replaced) + recovered_ml
for p in replaced:
    print(f"  {p:<26} {per_part_ml[p] / 29.57:4.2f} fl oz")
print(f"  {'recovered by the machine':<26} {recovered_ml / 29.57:4.2f} fl oz")
print(f"oil to inject: {add_ml / 29.57:.1f} fl oz of the specified PAG oil for R-1234yf")condenser 1.01 fl oz receiver-drier cartridge 0.34 fl oz recovered by the machine 0.41 fl oz oil to inject: 1.8 fl oz of the specified PAG oil for R-1234yf
The oil can be added directly into the new condenser before installation, or injected by the service machine after evacuation, depending on the service information and the machine. Ridgeline's R-1234yf machine injects oil from a sealed bottle, which keeps the oil dry. For hybrid and electric vehicles, Lesson 10's warning applies: the oil must be the specified insulating oil, injected from a dedicated container.
If a compressor has failed internally, the job grows. Metal debris from the compressor spreads through the system, so the expansion device or orifice tube is replaced, the condenser is often replaced because microchannel condensers cannot be flushed reliably, the other components and lines are flushed with an approved flush solvent and dried with nitrogen, the accumulator or drier is replaced, and the oil is balanced for the whole system. The new compressor's warranty usually depends on that being done.
Step three: evacuate and check for leaks
Before charging, the system is evacuated: the machine's vacuum pump removes air and moisture. Air in a system takes up condenser space and raises the high-side pressure; moisture forms acids and can freeze at the expansion device. Under a deep vacuum, water boils at room temperature and is pumped out as vapor. Vacuum is measured in microns of mercury, where 760,000 microns is atmospheric pressure at sea level, and a well-evacuated system typically reaches 500 microns or less. Makers and machine standards set an evacuation time, often 15 to 30 minutes for a clean, tight system, longer if the system was open for a long time or in humid weather.
At the end of evacuation, the machine closes off the pump and watches the vacuum for several minutes. This decay test is a leak test and a dryness test in one. If the pressure rises quickly and keeps rising, air is entering through a leak. If it rises a little and then flattens out, moisture is still boiling out of the system and it needs more evacuation. If it barely rises, the system is tight and dry. A decay test cannot find small leaks that only open under pressure, which is why a leak check under refrigerant pressure follows the charge.
# Vacuum decay test after evacuation: what does the rise in microns say? (illustrative limits)
tests = [
    ("van 1 after condenser", [420, 455, 480, 495, 505, 510, 512]),
    ("example: leak", [450, 900, 1400, 1950, 2500, 3050, 3600]),
    ("example: moisture", [480, 760, 940, 1040, 1090, 1110, 1120]),
]
for name, readings in tests:
    rise = readings[-1] - readings[0]
    last_step = readings[-1] - readings[-2]
    if rise < 150:
        verdict = "tight and dry: charge it"
    elif last_step > 300:
        verdict = "still rising steadily: a leak, find it"
    else:
        verdict = "rose then flattened: moisture, evacuate longer"
print(f"{name:<22} start {readings[0]:5} microns, after 6 min {readings[-1]:5}, rise {rise:5}: {verdict}")van 1 after condenser start 420 microns, after 6 min 512, rise 92: tight and dry: charge it example: leak start 450 microns, after 6 min 3600, rise 3150: still rising steadily: a leak, find it example: moisture start 480 microns, after 6 min 1120, rise 640: rose then flattened: moisture, evacuate longer
Van 1's system reaches a little over 400 microns in 30 minutes and holds within 100 microns over six minutes. It is tight and dry.
Step four: charge by weight
The only accurate way to charge a modern system is by weight, to the amount on the label. Modern systems hold so little refrigerant that being wrong by 50 grams, a little under two ounces, can change cooling noticeably, and pressures alone cannot show an exact charge because they depend on the temperatures and airflow at the time. The service machine weighs out the charge from its tank and pushes it into the system, usually through the high side with the engine off, and accounts for the refrigerant left in its hoses. SAE standards for these machines set limits on how accurately they must charge, and machines are checked and calibrated on a schedule. If the full charge will not go in with the engine off, the machine finishes through the low side with the engine running and the air conditioning on.
# Charging by weight: compare the machine's reported charge with the label and the allowed tolerance
label_g = 620
tolerance_g = 15          # shop target for machine accuracy (illustrative)
charged_g = 617
error = charged_g - label_g
print(f"label {label_g / 453.6:.2f} lb, charged {charged_g / 453.6:.2f} lb, error {error / 28.35:+.2f} oz")
print("within tolerance" if abs(error) <= tolerance_g else "outside tolerance: recover and recharge")
for err in (-100, -50, +50, +100):
print(f" a {err / 28.35:+5.1f} oz error would be {100 * err / label_g:+5.1f} % of this system's charge")label 1.37 lb, charged 1.36 lb, error -0.11 oz within tolerance a -3.5 oz error would be -16.1 % of this system's charge a -1.8 oz error would be -8.1 % of this system's charge a +1.8 oz error would be +8.1 % of this system's charge a +3.5 oz error would be +16.1 % of this system's charge
Step five: leak check and performance test
With the system charged and the engine off, Kiran checks every fitting she touched, the new condenser and the rest of the system with the R-1234yf electronic detector. Nothing registers. She then runs the performance test from Lesson 1: doors closed, engine at the specified speed, air conditioning on maximum, blower on high, recirculation as the chart specifies. She records the outside temperature and humidity, the center vent temperature and the pressures, and compares them with the maker's chart for those conditions. Vent temperature is within the chart's range, the pressures are where the chart expects them for the ambient temperature at Ridgeline's altitude, and the subcooling she measures at the condenser outlet is in the normal range. She records the refrigerant recovered, the oil added, the charge, the evacuation result and the leak test on the repair order, as Lesson 4 requires.
One last step follows a deep vacuum and a new desiccant: the scan tool. Some vehicles need the climate control module's learned values or the compressor's learned control reset after a repair, and many need any refrigerant-related codes cleared and the system's self-checks run. Van 1 needs neither, but Kiran checks the service information anyway, because that is the habit Marty wants her to have.
What not to do
Marty finishes with a list of shortcuts that cause most of the comebacks he has seen. Topping up by gauge pressure rather than weight leaves systems over- or undercharged. Adding refrigerant to a leaking system wastes refrigerant and money and breaks the rules. Skipping the oil for replaced parts slowly kills compressors. Leaving parts uncapped lets moisture into the oil and desiccant. Using the wrong oil, the wrong O-rings or a universal dye can damage seals and compressors. Mixing refrigerants, even a little, ruins the charge and the machine. And skipping the decay test means a system that leaks air into itself under vacuum leaks refrigerant out under pressure, a week later, back in the bay.
Worked problem
Pressures look right but the charge is low
A technician tops up a system until the low-side gauge reads 35 psi at idle on a mild evening. The next hot afternoon the vents are warm. Why?
Show solution
- Pressures depend on outside temperature, humidity, airflow and engine speed, not just the charge.
- A system can show a normal low-side pressure on a mild evening while still being short of refrigerant.
- On a hot afternoon, with a high heat load, the shortage shows as high superheat and poor cooling.
- The cure is to recover, find and fix the leak, evacuate and charge by weight to the label.
Answer: Charging by pressure is not accurate; charge by weight to the label.
Common mistakes
MistakeRecharging without finding the leak.
InsteadFind and repair the leak first.
MistakeCharging by gauge pressure.
InsteadCharge by weight to the label using a certified machine.
MistakeForgetting the oil for replaced parts and recovered oil.
InsteadAdd the maker's amount for each part plus the oil the machine recovered.
MistakeSkipping the vacuum decay test.
InsteadHold the vacuum and read the rise to check for leaks and moisture.
MistakeLeaving new parts and the desiccant uncapped.
InsteadKeep everything capped until it is installed.
Summary and key terms
- Find leaks with an electronic detector, dye, nitrogen or trace gas testing, or soap.
- Identify the refrigerant, then recover until the system holds a vacuum.
- Replace O-rings and desiccant, and keep parts and oil capped.
- Add oil for each part replaced plus the oil recovered.
- Evacuate to a deep vacuum and use a decay test to check for leaks and moisture.
- Charge by weight to the label, then leak-check under pressure.
- Finish with a performance test against the maker's chart and a full record.
- Recovery machine
- Equipment that removes, cleans and stores refrigerant and measures recovered oil.
- Evacuation
- Removing air and moisture from a system with a vacuum pump before charging.
- Micron
- A unit of vacuum: a thousandth of a millimeter of mercury.
- Vacuum decay test
- Watching how fast the vacuum rises after evacuation to detect leaks or moisture.
- Charge by weight
- Filling a system with the exact mass of refrigerant on the label.
- UV dye
- A fluorescent additive that shows leaks under an ultraviolet lamp.
- Trace gas
- A nitrogen and hydrogen mixture used to pressure-test an empty system for leaks.
Practice problems
Work each problem on paper first, then reveal the answer to check.
Why is the electronic leak detector's probe moved below the fittings?
Show answer
Refrigerant is heavier than air and sinks.
What does a vacuum that rises and then levels off indicate?
Show answer
Moisture still boiling out; evacuate longer.
Why must the oil recovered by the machine be added back?
Show answer
It left the system with the refrigerant; without it the compressor runs short.
Why are modern systems charged by weight?
Show answer
They hold so little refrigerant that small errors matter, and pressures depend on conditions.
Lesson quiz · 5 questions
Score 60% or more to complete this lesson.
Create a free account to save your progress, take quizzes and earn a certificate.