
APT-120 · Lesson 5 of 12 · 25 min
Reading exploded views and illustrations
▶ Video coming soon A video version of this lesson is on the way.
On Friday, October 2, a technician named Wen Okafor-Lund brought a broken plastic clip to the back counter and set it down next to Talia's keyboard. "Door trim panel, rear left, Arden. Two of these broke when I took the panel off. I need the clip, not the panel." The catalog's parts list for the rear door trim showed eleven lines, and three of them were clips. Talia opened the illustration, found the panel, followed the callout lines to the clips, and matched the one that sat along the bottom edge, callout 7, with the broken one in her hand. "That's the one," Wen said. "Two, please, and one spare."
Most of the parts in a catalog are found through its illustrations. An exploded view is a drawing that shows an assembly pulled apart along the directions in which it comes apart, with each part in its correct position relative to the others and a number pointing to it. This lesson explains how exploded views are drawn and numbered, how to follow callouts to the parts list, how assemblies and their components are shown, how to read left, right, front and rear, and what the common symbols and notes mean.
What an exploded view shows
An exploded view is drawn as if the assembly had been taken apart and each part moved a short distance along the line it would travel during disassembly. Bolts are pulled out of their holes along their axis; a cover is lifted off its housing; a bearing slides off its shaft. Thin dashed or solid center lines often connect parts to show how they line up when assembled. The result shows every part, the order in which the parts go together, and where each one sits.
Exploded views are usually drawn in isometric or a similar three-quarter view, which shows three faces of an object at once. They are not drawn to a uniform scale: small parts such as clips and washers are drawn large enough to recognize, and large parts may be shortened. So the drawing shows shape, position and order, but not size. A parts technician never measures a part from the drawing.
Callouts and the parts list
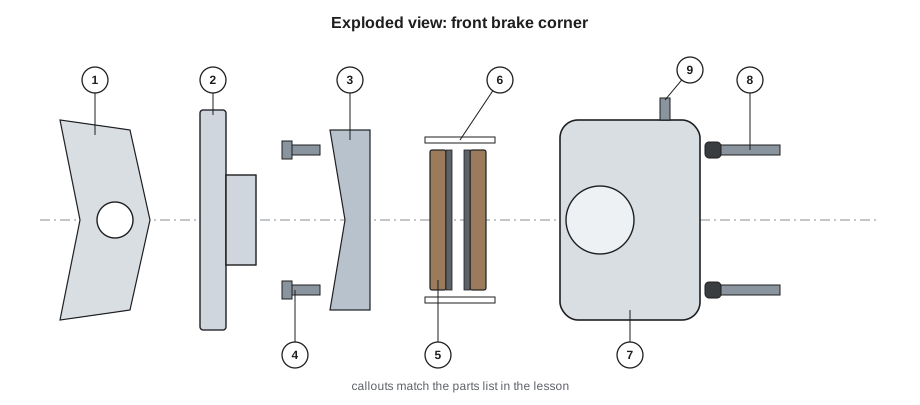
Each part in the view has a callout: a number, sometimes in a circle or box, connected to the part by a thin leader line. The callout number links the part to a line in the parts list beside or below the illustration (lesson 4). Callout numbers are not part numbers. They are used only on that one illustration, and the same number on a different illustration means a different part.
Following a callout correctly takes care. Leader lines can be long and can cross other parts, and in a busy illustration two leaders may end close together. The safe habit is to trace the leader from the number all the way to the part with the cursor or a finger, and then to confirm by reading the description on the parts list line.
| Callout | Description | Qty | Notes |
|---|---|---|---|
| 1 | Knuckle, steering, front, left | 1 | Side-specific |
| 2 | Rotor, brake, front | 1 | Same both sides |
| 3 | Bracket, caliper | 1 | Side-specific |
| 4 | Bolt, caliper bracket | 2 | Single use |
| 5 | Pad set, brake, front | 1 | Includes 6 |
| 6 | Clip, pad | 4 | Included in 5; also sold separately |
| 7 | Caliper, brake, front, left | 1 | Includes 8, 9 |
| 8 | Pin, guide, with boot | 2 | Included in 7; kit available |
| 9 | Screw, bleeder | 1 | Included in 7 |
Assemblies, components and "included in"
Many parts are sold both as a complete assembly and as individual components. A caliper may be sold complete, with its guide pins, boots and bleeder screw, while the guide pins and boots are also sold as a kit for repairs. Catalogs show the relationship in several ways:
- Brackets or a bounding box drawn around a group of parts in the illustration, with one callout for the whole assembly.
- Indented lines in the parts list: the assembly first, and its components beneath it, indented.
- Notes such as "includes 8, 9" on the assembly line, or "included in 7" on the component lines.
- "Not serviced separately" on a component that appears in the drawing but can only be bought as part of the assembly.
These notes save customers money and save technicians time. If the customer only needs a guide pin boot, there is no need to sell a whole caliper; if the component is not serviced separately, the parts technician says so at once rather than searching for a part number that does not exist.
Worked problem
Assembly or components?
Wen needs to replace both front guide pin boots on a left caliper whose piston and body are in good condition. The parts list shows the caliper assembly at 168 dollars, and a guide pin kit, with two pins and two boots, at 24 dollars. The boots are not sold separately. What should Talia sell, and what does it save compared with a caliper?
Show solution
- Boots are only available in the guide pin kit:
- \[1\ \text{kit} = 24\ \text{dollars}\]
- Saving compared with the caliper:
- \[168 - 24 = 144\ \text{dollars}\]
Answer: One guide pin kit, saving 144 dollars over a new caliper. Prices are sample values. If the caliper had been leaking, the assembly would have been the right choice, which is why the parts technician asks why a part is being replaced.
Left, right, front and rear
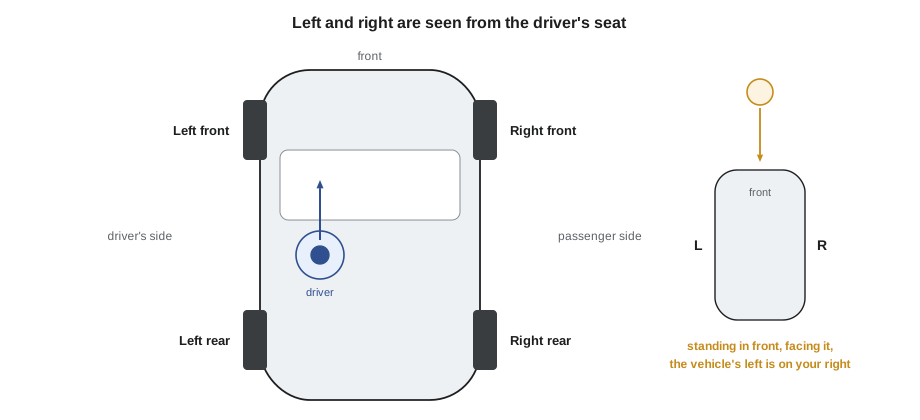
In North American catalogs, left and right are always taken from the driver's seat, facing forward. The left side is the driver's side on vehicles with the steering wheel on the left, and the right side is the passenger side. This is true no matter how the illustration is drawn, and it is the most important convention in parts lookup. A customer standing in front of the car, facing it, sees the vehicle's left side on their right, which is how most wrong-side parts are sold.
Catalogs mark side-specific parts with L and R, LH and RH, or "left" and "right". Some use "driver" and "passenger". Front and rear are equally clear on a car, but on equipment the front may be the end with the operator's controls or the bucket, so equipment catalogs define it in their introduction.
Some parts are the same on both sides, and the catalog shows one part number with a quantity of 2, as for the rotor in the table above. Others look the same but are mirror images, like the brackets. And some are the same part fitted in either position, but with a direction of rotation, such as directional tires or some cooling fans. The notes tell which is which.
Common symbols and conventions
Catalog illustrations use a small set of conventions, which differ slightly between manufacturers but are easy to learn:
- Dashed outlines or gray shading show parts that belong to another illustration, drawn only to show position. They have no callout on this page.
- A circled detail with a letter, such as "A", is shown enlarged elsewhere on the page, for small parts such as clips and seals.
- Arrows with words such as "FRONT" or "UP" show the orientation of the assembly.
- Fastener callouts may give the thread size and length in the description, such as "BOLT, M10 × 1.25 × 35". Lesson 8 explains how to read them.
- Asterisks, letters or symbols next to callouts refer to footnotes, such as "use with gasket kit" or "replace when removed".
- Two illustrations for one assembly often show a production split; the illustration's caption gives the date or VIN range.
Each catalog explains its own conventions in a legend or help page. Imani made Talia read the Tessaro EPC's legend on her first day with the catalog, "because nobody else will tell you what the little triangle means." In the Tessaro EPC, the little triangle means the part has a service bulletin attached.
Reading the illustration with the technician
Exploded views are one of the best tools for talking with technicians and customers. A technician can point at the part on the screen, and the parts technician can show a customer exactly what is being sold and what comes with it. Printing the illustration, or sending it with the parts, helps a wholesale customer's technician check the delivery before installing anything.
When a technician's description and the illustration do not match, the illustration helps find out why. Wen once asked for a "lower hose" that did not appear in the cooling illustration at all; the hose he wanted turned out to be part of the transmission cooler, two groups away. The parts technician who knows the illustrations well can move between groups as easily as the technician moves around the engine bay.
Worked problem
Counting clips from an illustration
Wen needs the clips that hold the bottom edge of a rear door trim panel. The illustration shows callout 7 at each of 6 positions along the bottom edge, and the parts list says quantity 6. Two clips broke. The shop's habit is to replace broken clips and add one spare for every two, because more clips often break on reinstallation. How many clips should Talia sell?
Show solution
- Broken clips:
- \[2\]
- Spares at one for every two:
- \[2 \div 2 = 1\]
- Total:
- \[2 + 1 = 3\]
Answer: Three clips. The quantity of 6 on the parts list is the number used on the panel, not the number to sell. Clips are cheap and an extra one saves a second trip to the counter.
Illustrations in aftermarket and equipment catalogs
Aftermarket catalogs use illustrations less than manufacturers' catalogs, and they are often photographs of the part rather than exploded views of the assembly. They usually rely on attributes instead: rotor diameter, number of bolt holes, hose length, connector shape. Equipment catalogs, by contrast, are often more illustration-heavy than car catalogs, with page after page of exploded views for hydraulic valves, gearboxes and attachments, organized by serial number range.
In every catalog, the same habits apply: identify the assembly, find the illustration, trace the callout, read the line and its notes, and confirm against the old part or the technician's description.
Hardware and small parts in illustrations
The small parts in an illustration cause more lookup mistakes than the large ones. Bolts, nuts, clips, washers, seals and brackets are easy to overlook, and many of them are sold separately from the assembly they hold together. A parts technician reading an illustration checks every callout around the part being replaced and asks three questions:
- Is it single use? Many bolts, nuts, gaskets and seals must be replaced whenever they are removed. Catalog notes such as "single use" or "replace when removed" say so.
- Is it included? The parts list may show that a clip comes with the pad set or that a seal comes with the pump. Ordering it separately would double it up.
- How many are needed? The quantity in the parts list is usually per vehicle or per assembly. A job on both sides may need twice as many.
Worked problem
Ordering the hardware for a brake job
A technician is replacing the front brake caliper brackets on both sides of a Vela. In the parts list for the illustration, the caliper bracket bolts (callout 4) are marked single use, quantity 2 per side, and the pad clips (callout 6) are included with the pad set. How many bracket bolts are needed, and should pad clips be ordered separately?
Show solution
- Bolts per side:
- \[2\]
- Both sides:
- \[2 \times 2 = 4\]
Answer: Four bracket bolts, because they are single use. The pad clips are included with the pad set, so they are not ordered separately unless the technician is reusing the old pads.
Talia added a step to her own routine after this: before closing an illustration, scan every callout touching the part being sold and check its notes. It took a few seconds and saved several return trips to the counter in her first weeks.
Common mistakes
MistakeReading a callout number as a part number.
InsteadUse the callout only to find the line in the parts list on the same page.
MistakeFollowing a leader line by eye in a busy illustration.
InsteadTrace it all the way to the part and confirm with the description.
MistakeTaking left and right from the customer's position in front of the car.
InsteadTake them from the driver's seat, facing forward.
MistakeSelling an assembly when only a component is needed.
InsteadCheck for kits and components, and ask why the part is being replaced.
MistakeMeasuring a part from the illustration.
InsteadExploded views are not to scale; measure the old part instead.
Summary and key terms
- An exploded view shows an assembly pulled apart along its disassembly directions, with each part numbered.
- Callouts link parts in the drawing to lines in the parts list on the same page; they are not part numbers.
- Assemblies and components are shown with brackets, indented lines and notes such as "included in".
- "Not serviced separately" means the part can only be bought as part of an assembly.
- Left and right are taken from the driver's seat, facing forward.
- Each catalog has a legend explaining its symbols, footnotes and detail views.
- Exploded views are not to scale and are best used with the old part or the technician's description.
- Exploded view
- A drawing of an assembly pulled apart, showing each part in position with a callout.
- Callout
- A number in an illustration linking a part to its line in the parts list.
- Leader line
- The thin line joining a callout number to its part.
- Assembly
- A group of parts sold together as one unit.
- Component
- An individual part of an assembly, sometimes sold separately.
- Not serviced separately
- A catalog note meaning a part can only be bought as part of an assembly.
- Detail view
- An enlarged drawing of a small area of an illustration, marked with a letter.
Practice problems
Work each problem on paper first, then reveal the answer to check.
Are exploded views drawn to scale?
Show answer
No; small parts are drawn large enough to recognize, so they show shape and position, not size.
A customer standing in front of a car points to the headlight on their left. Which side of the vehicle is it?
Show answer
The vehicle's right side.
What does "included in 7" mean on a line?
Show answer
The part comes as part of the assembly with callout 7.
Why is a caliper bracket listed as side-specific when the rotor is not?
Show answer
The brackets are mirror images; the rotor is the same on both sides.
A parts list says quantity 6 for a clip and four are broken. How many do you sell with one spare for every two broken?
Show answer
Six: four plus two spares.
Lesson quiz · 5 questions
Score 60% or more to complete this lesson.
Create a free account to save your progress, take quizzes and earn a certificate.