
APP-310 · Lesson 6 of 12 · 23 min
Food waste disposers
▶ Video coming soon A video version of this lesson is on the way.
Bertram Okwuosa called on Thursday, September 3, because his disposer in Linden "just hums and then shuts off." Dee asked him on the phone to switch it off and leave it alone until she arrived. Under the sink she found the wall switch off, but she still switched off the disposer's circuit at the panel and proved the cord's receptacle dead before she reached for anything. With a flashlight she could see a peach pit wedged between the turntable and the grind ring. She fitted the hex wrench into the socket in the center of the disposer's base and worked it back and forth until the turntable turned freely, lifted the pit out with tongs, pressed the red reset button, restored the power and ran the disposer with cold water. It ran normally. "The motor's thermal protector did its job," she said. "It stopped the motor before it burned. Our job is to free the jam, find what caused it, and teach the customer what not to put down there."
This lesson explains how food waste disposers work, the two feed types, how they are mounted and connected to the sink, the dishwasher and the electrical supply, the common faults and how to fix them safely, and the advice that keeps a disposer working. Installing a disposer is covered with other built-ins in lesson 11.
How a disposer works
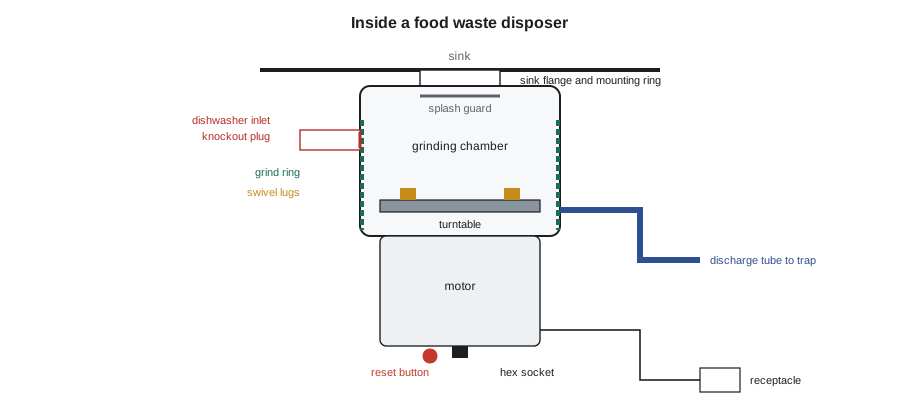
A food waste disposer, often called a garbage disposal, mounts under the sink drain opening. Food scraps fall through a rubber splash guard into the grinding chamber. At the bottom of the chamber, a turntable or flywheel driven by the motor spins at high speed. Two or more swivel lugs, sometimes called impellers, are riveted loosely to the turntable. Centrifugal force throws the food against a stationary grind ring with sharp-edged slots around the chamber wall, and the lugs push it around the ring. The food is ground into small particles, which pass through the ring's slots with the running water, into the lower chamber and out through the discharge tube to the sink trap.
A disposer has no blades in the sense of knives; the grinding happens between the lugs, the turntable and the grind ring. That is why spoons and bottle caps cause loud rattles but rarely cut anything, and why hard, dense objects such as fruit pits and bones can wedge between the turntable and the ring and stall the motor.
Motors and protection
Disposers are rated by motor output, commonly from about 1/3 to 1 horsepower (typical). Most use an induction motor running at about 1,725 to 2,800 rpm, or a permanent-magnet motor running faster; the rating plate gives the voltage and current. The motor has a thermal overload protector that opens if the motor overheats, for example when it is stalled by a jam. On most models the protector is a manual reset: a red button on the bottom of the unit that the customer or technician presses after the motor has cooled. Some models also have automatic reversing or jam-clearing features.
Worked problem
Estimating a disposer motor current
A disposer has a motor rated 1/2 horsepower at 120 V. If the motor converts about half of its electrical input into mechanical output when grinding (an approximate value for small motors), about what current does it draw? Use 746 W per horsepower.
Show solution
- Output power:
- \[0.5 \times 746 = 373 \text{ W}\]
- Input power at about half efficiency:
- \[373 \div 0.5 \approx 746 \text{ W}\]
- Current:
- \[I = \frac{746}{120} \approx 6.2 \text{ A}\]
Answer: About 6 A when grinding, less when running empty, and several times more for a moment when the motor starts or stalls. The rating plate gives the actual figure. This matters when a disposer shares a circuit with a dishwasher, as lesson 11 explains.
Continuous feed and batch feed
A continuous-feed disposer runs whenever its wall switch is on, and food can be added while it runs. It is the most common type. A batch-feed disposer runs only when its special stopper is placed in the sink opening and turned; a switch in the disposer's top senses the stopper. Batch-feed units need no wall switch and cannot run with a hand in the opening, which makes them popular in some households; they grind one load at a time.
Both types should be run with a strong flow of cold water during grinding and for a short time after, so the particles are carried through the trap and into the house drain. Cold water keeps any fats solid so they are ground and carried away rather than coating the pipes. Hot water melts fat that then sets again further down the drain.
Worked problem
How much water to flush after grinding
A use and care guide advises running cold water at about 2 gal per minute for 30 seconds after grinding stops. How much water is that?
Show solution
- Volume:
- \[2 \times 0.5 = 1 \text{ gal}\]
Answer: About 1 gal, enough to carry the ground particles through the trap and into the main drain line.
Connections to the sink and dishwasher
The disposer hangs from a mounting assembly clamped to the sink flange, which is sealed to the sink with plumber's putty or a gasket as the instructions say. A twist-lock ring lets the disposer be removed and refitted without disturbing the sink seal. The discharge tube connects the disposer outlet to the sink's trap with a gasket and flange. The disposer's weight and vibration can loosen these joints over time.
Most disposers have a dishwasher inlet on the side of the upper chamber. A new disposer comes with that inlet sealed by a knockout plug, a thin disc molded into the inlet. If a dishwasher's drain hose is to be connected, the plug must be knocked out with a screwdriver and hammer, and the loose disc removed from the grinding chamber, before the hose is fitted. A new disposer with its plug still in place is one of the commonest reasons a dishwasher will not drain after a kitchen renovation or a disposer replacement. The dishwasher's drain hose still needs its high loop or air gap (lesson 3).
The disposer's electrical supply is either a cord and plug into a receptacle under the sink, controlled by the wall switch, or hard-wired into a junction box on the unit. Many disposers come without a cord, and the maker sells a cord kit. Connecting a disposer to an existing switched receptacle or an existing circuit as the instructions describe is appliance work; adding a new circuit, switch or receptacle is work for a licensed electrician.
Common faults
| Symptom | Likely cause | What to do |
|---|---|---|
| Hums, does not turn | Jam between turntable and grind ring | Power off at the panel; free with hex wrench; remove object with tongs; reset |
| Silent, nothing happens | Overload tripped, no power, failed switch or motor | Press reset after cooling; check receptacle and switch with meter |
| Runs but drains slowly | Clogged trap or drain line, too little water used | Clear trap; advise more cold water |
| Loud rattling | Metal object in chamber | Power off; remove with tongs |
| Water under sink, from top | Sink flange seal or mounting loose | Reseat and seal the flange |
| Water from side | Dishwasher inlet clamp or discharge gasket | Tighten clamp; replace gasket |
| Water from bottom or body | Internal seal failed, housing corroded | Replace the disposer |
| Bad smell | Food residue under splash guard and in chamber | Clean guard; grind ice and citrus peel per guide |
A disposer that leaks from its body or bottom has usually failed internally: water has got past the shaft seal into the motor, or the grinding chamber has corroded through. Those units are replaced, not repaired. A disposer that trips the breaker or a GFCI may have water in its motor; it is unplugged and replaced.
Working safely on a disposer
A disposer is a motor with a grinding chamber at hand height, controlled by a switch that anyone in the house might flip. Dee's rules for Kiran:
- Never put a hand into the grinding chamber, even with the switch off. Use tongs or long pliers, and a flashlight to look.
- Switch off the circuit at the panel, or unplug the disposer, and prove it dead before working on or under it. The wall switch alone is not enough.
- Free jams with the hex wrench in the base socket, never by reaching in to turn the turntable.
- Wait for the motor to cool before pressing the reset button, and find out why it tripped.
- When removing a disposer, support its weight: it can drop suddenly when the mounting ring is released.
Customers sometimes try chemical drain cleaners in a disposer. These are caustic, can damage the disposer and the pipes, and make the water in the chamber dangerous to touch. The technician asks before working on a blocked disposer whether any chemical has been used, wears gloves and eye protection, and does not reach into the water.
Advice for customers
Most disposer service calls could be prevented, and good advice is part of the job. The use and care guide lists what not to put down the disposer, and the lists are similar: grease and oil; large bones; fruit pits; stringy, fibrous scraps such as celery, corn husks and onion skins, which wrap around the turntable; large amounts of starchy food such as pasta, rice and potato peels, which make a paste; and anything that is not food. Customers should run cold water before, during and after grinding, feed scraps gradually rather than all at once, and run the disposer for a few seconds after the grinding sound stops. Homes on a septic system may need a disposer designed for septic use, or none, as the maker and the septic system's designer advise.
Disposer motors, sound and air switches
Disposers come with two kinds of motor. Induction motors run at a steady speed set by the supply frequency, are heavy, and are quiet in tone but slow to start. Permanent-magnet motors start faster with high torque, which helps them clear a jam before it stalls the motor, and are lighter. Higher-priced units add sound insulation around the grinding chamber, rubber mounts and a multi-stage grind that takes food finer, which reduces drain blockages. A customer comparing a new unit with the old one may notice the difference in sound and grind and think something is wrong; it is usually just a different design.
Some kitchens control the disposer with an air switch: a push button on the counter or sink deck connected by a thin air tube to a switch box plugged in under the sink. Pressing the button pushes air down the tube and toggles the switch, so no electrical wiring reaches the wet counter. When an air switch disposer will not start, the technician checks that the tube is attached at both ends and not cracked, that the switch box has power, and that the box clicks when the button is pressed, before suspecting the disposer.
Smells, maintenance and drain lines
Disposer smells usually come from food trapped under the rubber splash guard and in the upper chamber, and sometimes from a slow drain line beyond the trap. Most use and care guides suggest cleaning the splash guard by hand with the power off, grinding ice cubes to scour the chamber, and grinding a little citrus peel to freshen it. Chemical drain cleaners are not a maintenance product; lesson 6's safety rules apply.
A disposer does not replace the house drain's own capacity. Ground food has to be carried by water through the trap and the branch drain to the main stack. In older houses with long, flat or partly blocked kitchen drains, heavy disposer use can make blockages more frequent. A technician who finds a slow drain beyond the trap tells the customer it needs a plumber or a drain cleaning service, because the drain itself is not part of the appliance. Homes on a septic system follow the septic designer's advice on whether a disposer is suitable, as lesson 6 noted.
Common mistakes
MistakeReaching into the grinding chamber to free a jam.
InsteadUse the hex wrench in the base and tongs to remove objects.
MistakeRelying on the wall switch for safety.
InsteadSwitch off at the panel or unplug, and prove dead.
MistakeConnecting a dishwasher hose without removing the knockout plug.
InsteadKnock out the plug and remove the disc from the chamber first.
MistakeRepairing a disposer that leaks from its body.
InsteadAn internal leak means replacement.
MistakeAdvising hot water while grinding.
InsteadCold water keeps fats solid so they are carried away.
Summary and key terms
- Disposers grind food between swivel lugs on a turntable and a stationary grind ring.
- Jams stall the motor and trip its manual-reset thermal protector.
- Free jams with the hex wrench in the base, never by hand.
- Continuous-feed units run on a wall switch; batch-feed units run only with the stopper in place.
- Cold water should run during grinding and for a short time after.
- The dishwasher inlet's knockout plug must be removed before connecting a drain hose.
- Leaks from the body mean replacement; leaks at the top or side are usually seals or clamps.
- New circuits, switches and receptacles are an electrician's work.
- Food waste disposer
- An appliance under the sink that grinds food scraps into the drain.
- Turntable
- The spinning plate at the bottom of the grinding chamber.
- Swivel lug
- A loose lug on the turntable that pushes food against the grind ring.
- Grind ring
- The stationary slotted ring that grinds food in a disposer.
- Knockout plug
- The disc sealing a new disposer's dishwasher inlet.
- Batch feed
- A disposer that runs only when its stopper is in place.
- Continuous feed
- A disposer that runs whenever its wall switch is on.
- Thermal overload protector
- A device that stops the motor if it overheats.
Practice problems
Work each problem on paper first, then reveal the answer to check.
A disposer hums but does not turn. What is the likely cause?
Show answer
A jam between the turntable and the grind ring.
What is the hex socket in the base of a disposer for?
Show answer
Turning the turntable with a wrench to free a jam.
Why must a new disposer's knockout plug be removed before connecting a dishwasher?
Show answer
Otherwise the dishwasher cannot drain into the disposer.
Why use cold water when grinding?
Show answer
Fats stay solid and are carried away instead of coating the pipes.
A disposer leaks from its bottom. What is the usual repair?
Show answer
Replace the disposer.
Lesson quiz · 5 questions
Score 60% or more to complete this lesson.
Create a free account to save your progress, take quizzes and earn a certificate.