
APP-310 · Lesson 5 of 12 · 21 min
Dishwasher controls and fault codes
▶ Video coming soon A video version of this lesson is on the way.
At the second water night, on Friday, November 6, Dee put Penfold's training dishwasher into its diagnostic mode while Kiran watched the acrylic door. A sequence of button presses from the tech sheet, taped inside the toe-kick, made the machine run each part in turn: the drain pump buzzed, the inlet valve opened, the diverter clicked, the wash pump started and the spray moved from the lower arm to the upper arms, the heater warmed the water, the detergent cup popped open, and the rinse aid dispenser released its dose. The display showed a number for each step. "This is the most useful five minutes on any dishwasher call," Dee said. "The control tests its own parts, and you watch. If one step doesn't happen, you know where to put your meter." She reminded him of the APP-120 call of Thursday, October 29, when that test had shown the inlet valve receiving voltage but not opening.
This lesson covers the electrical control of a dishwasher: the door switch and latch, the control board and user interface, the actuators that open the dispensers, the sensors that report to the control, and how to read fault codes and use diagnostic modes. APP-320 goes deeper into control boards, communication between boards and electronic diagnosis; this lesson covers what a technician needs to diagnose a dishwasher from its schematic and its codes.
The door switch and latch
Every dishwasher has a door switch in its latch assembly that tells the control the door is closed and, on most machines, breaks power to the pumps, valve and heater when the door opens. Some machines have two switches in the latch. If the door switch fails open, the machine will not start or stops when the customer closes the door firmly; if it fails closed, the machine could run with the door open, which is why a technician never defeats it. The latch also has a mechanical catch whose strike must line up with the tub; a dishwasher that is out of square in its opening may latch poorly. APP-110 recorded a call on Thursday, October 22, where broken console clips let the control panel sag and the latch misalign.
The control board and user interface
Older dishwashers used an electromechanical timer: a small motor turned a cam stack that opened and closed switch contacts in sequence. Most current machines use an electronic control board that switches each load with relays or triacs and reads the sensors, with a separate user interface board for the buttons and display, often in the top edge of the door. The control's program decides the cycle steps, times, temperatures and fill amounts. It also watches for faults: a fill that takes too long, a drain that does not empty the sump, a heater that does not warm the water, a thermistor that reads open, or a flood switch that trips.
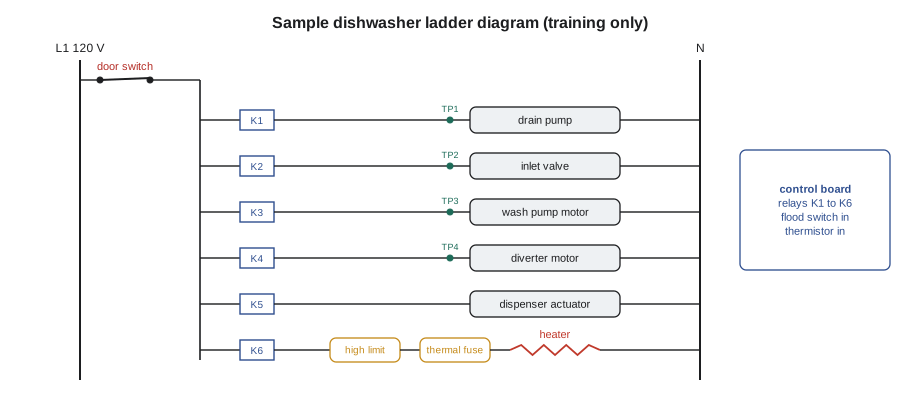
Reading the schematic follows APP-120's method. Find the load that does not work, find what must be closed for it to run (the door switch, its relay on the control, any limit or fuse), and check voltage at the load during the step when it should run. Voltage present at the load but no action means the load is faulty; no voltage means the fault is upstream, in the control's output, the wiring or a switch.
Actuators and dispensers
The detergent dispenser and rinse aid dispenser are opened by a small actuator in the door. Many use a wax motor: a small heater warms a capsule of wax, which expands and pushes a pin that releases the detergent lid and pumps a dose of rinse aid. Wax motors are slow, taking several seconds to act. Others use a solenoid or a bimetal actuator. A lid that does not open may have a failed actuator, an open circuit to the door, caked detergent sticking the lid, or a dish blocking it. If the cup opens but detergent stays in it, the spray is not reaching the door, which points back to the spray arms or loading.
Other actuators include the diverter motor (lesson 2), a vent actuator that opens a drying vent, the door-opening actuator on machines that open themselves at the end, and, on some, a small fan. Each appears in the diagnostic test, so the technician can see whether it acts.
Sensors
The control reads several inputs:
- The thermistor (lesson 4) for water temperature.
- The flood switch (lesson 3) for leaks.
- A float switch, pressure sensor or flow meter (lesson 3) for the water level or volume.
- A turbidity sensor on many current machines: an optical sensor in the water path that shines light through the water and measures how much reaches a detector. Dirty water lets less light through. The control uses the reading to decide whether to add a pre-wash, lengthen the main wash or skip a rinse, which is why the same cycle can take different times on different loads.
- The diverter position switch, the rinse aid level sensor and the door switch.
A turbidity sensor coated with scale or grease may make every load look dirty, so the machine always runs its longest cycle; cleaning it as the tech sheet describes can restore normal times. A customer who complains that the cycle time varies is usually seeing the sensor at work, and the use and care guide says so.
Fault codes
When the control detects a fault, it stops or changes the cycle and stores a fault code. Some machines show the code on the display; others flash a light a set number of times; others show nothing until the technician enters service mode and reads the fault history. The tech sheet lists the codes and what to check for each. Codes name a symptom the control detected, not necessarily the failed part: a drain code means the water did not leave in time, which could be the pump, the hose, the air gap, the disposer or the house drain.
| Code (sample) | What the control detected | Likely causes to check |
|---|---|---|
| E1 | Fill too slow or no water | Supply valve closed, low pressure, clogged inlet screen, open inlet valve coil, flow meter |
| E2 | Drain too slow | Filter, drain pump jammed or open, hose kinked, air gap or disposer blocked |
| E3 | Heating too slow | Heater open, heater relay, cool supply water, thermistor reading wrong |
| E4 | Thermistor open or shorted | Thermistor, connector, harness |
| E5 | Flood switch tripped | Leak in the machine, suds, stuck float |
| E6 | Door or latch fault | Door switch, latch alignment |
| E7 | Diverter position not found | Diverter motor, position switch, harness |
Worked problem
How a control decides a heating fault
A sample control expects the tub water to rise at least 2 °F per minute while the heater is on, after allowing for the tub and dishes, and sets code E3 if it rises less than 9 °F in 15 minutes. During a call, the water rose from 106 °F to 111 °F in 15 minutes. What does the control do, and what should the technician check?
Show solution
- Rise: 111 − 106 = 5 °F in 15 minutes.
- Rate: 5 ÷ 15 ≈ 0.33 °F per minute, below the 2 °F per minute expected.
- The rise is less than 9 °F, so the control sets E3.
Answer: The control logs E3. The technician checks the heater resistance and its limits, whether the heater relay switches on in the diagnostic test, and the thermistor against a thermometer. Lesson 4 showed that a good heater should warm the water much faster than this.
When a code points to a part, the technician still confirms the fault with a measurement before ordering, because the code only describes what the control saw. After the repair, the fault history is cleared as the tech sheet says, and the machine is run through a cycle or the diagnostic test to make sure the code does not return.
Service and diagnostic modes
Most current dishwashers have hidden service modes entered by a button sequence or by holding certain buttons while switching the power on. They typically offer a component test, which runs each part in turn, a fault history, a sensor display that shows the thermistor temperature or turbidity reading, and sometimes a quick cycle for checking the repair. The sequence and what each step does are printed on the tech sheet, often stored in a pocket behind the toe-kick or inside the door panel. Some brands also connect to the maker's service app over the customer's Wi-Fi; APP-320 covers connected appliances.
Kiran practiced entering the service mode on the training machine until he could do it without looking at the sheet. Dee's rule is to write down the fault history before clearing it, because a pattern of old codes often tells the story of the failure.
Power problems and resets
Electronic controls can lock up after a power interruption, a surge, or water reaching a board. Many tech sheets suggest a power reset: switch off the breaker for a minute or two, then restore it. A reset that cures the problem once is not a repair if the fault returns; the technician looks for the cause, such as a loose supply connection at the junction box, water reaching the user interface from a leaking door gasket, or a failing board. On machines that share a circuit with a disposer, lesson 11 explains why the circuit matters.
Wiring harnesses and connectors
A dishwasher's wiring harness runs from the control in the door top, down through the door hinge area, across the base and up the side of the tub. Every time the door opens, the harness flexes at the hinge. Over years, wires can break inside their insulation there, giving faults that come and go as the door moves: a machine that works with the door half open but not closed, or a display that flickers when the door is opened. Connectors in the base sit close to any leak, and water or detergent residue can corrode their terminals, adding resistance that makes a heater, valve or sensor misbehave. When a load does not work and voltage is missing at the load, the technician measures at the control's output connector and then along the harness, flexing it at the hinge while watching the meter, before blaming the control.
Many current machines send low-voltage signals between the user interface and the main control, and between the main control and a motor board. A broken signal wire or a corroded connector there can make the machine look dead or show communication codes. APP-320 covers communication between boards and how to test it; for now, the technician checks the connectors are seated, clean and dry, and that no wire is chafed or crushed by a bracket.
User interface faults
The user interface, the buttons and display, is usually a membrane or touch panel on a small board in the door top or front. Keys that stop working, a display with missing segments, or a panel that beeps but will not start can come from the interface board, its ribbon cable, moisture from a leaking door gasket or a failed main control. The service mode often has a key test that shows whether each button press reaches the control. A control lock or child lock is a normal feature that customers sometimes switch on by accident by holding a button; the use and care guide explains how to switch it off, and checking for it saves a wasted call.
Electromechanical timers
Older machines with electromechanical timers are still in service. The timer's motor turns a cam stack through each step of the cycle, closing contacts in sequence. Diagnosis uses the timer chart on the tech sheet: the technician advances the timer to the step in question and checks with a meter, power off, whether the contacts for that load are closed. A timer whose motor has stopped leaves the machine stuck in one step, often filling or draining endlessly. Replacement timers for old machines can be hard to find, and the age and condition of the machine may make replacement the better advice; lesson 12 and APP-410 discuss repair-or-replace decisions.
Common mistakes
MistakeOrdering the part named next to the code without measuring.
InsteadConfirm the fault with a measurement; codes describe symptoms.
MistakeClearing the fault history before reading it.
InsteadWrite down the history first; old codes show patterns.
MistakeDefeating the door switch to test a load.
InsteadUse the diagnostic mode with the door closed.
MistakeTreating varying cycle times as a fault.
InsteadTurbidity sensing changes the cycle; explain it.
MistakeAccepting a power reset as the repair.
InsteadFind why the control locked up if the fault returns.
Summary and key terms
- The door switch breaks power to the loads when the door opens and must never be defeated.
- Control boards switch loads with relays or triacs and read sensors.
- Detergent and rinse aid dispensers are opened by wax motors, solenoids or bimetal actuators.
- Turbidity sensors measure how dirty the water is and change the cycle.
- Fault codes describe what the control detected, not always the failed part.
- Service modes offer a component test, fault history and sensor readings.
- Read and record the fault history before clearing it.
- Confirm every coded fault with a measurement before ordering parts.
- Door switch
- A switch in the latch that tells the control the door is closed and breaks power to the loads.
- Control board
- The electronic board that runs the cycle and switches the loads.
- Wax motor
- An actuator in which heated wax expands to push a pin.
- Turbidity sensor
- An optical sensor that measures how cloudy the water is.
- Fault code
- A code the control stores when it detects a problem.
- Fault history
- The list of past fault codes stored by the control.
- Component test
- A service-mode test that runs each part in turn.
- Power reset
- Switching off the supply briefly to restart the control.
Practice problems
Work each problem on paper first, then reveal the answer to check.
What does a drain fault code tell the technician?
Show answer
That the water did not leave the tub in the time allowed, not which part failed.
How do many detergent dispensers open?
Show answer
A wax motor heats and pushes a pin that releases the lid.
Why might the same cycle take different times on different loads?
Show answer
The turbidity sensor adjusts the cycle to how dirty the water is.
What should be done before clearing a fault history?
Show answer
Write it down.
Voltage is present at the inlet valve during the fill step, but it does not open. What has failed?
Show answer
The inlet valve.
Lesson quiz · 5 questions
Score 60% or more to complete this lesson.
Create a free account to save your progress, take quizzes and earn a certificate.