
APP-210 · Lesson 7 of 12 · 21 min
Thermostats, sensors and electronic boards
▶ Video coming soon A video version of this lesson is on the way.
On the November 10 Tuesday night, Hiro set out two control systems side by side: a 1998 top-freezer's cold control, a knob on a capillary thermostat with a coiled tube and a bulb, and a 2021 bottom-freezer's main board with its wiring harness and four thermistors on short leads. "Both of these do the same job," he said. "They decide when the compressor runs. One does it with a bellows and a spring. The other does it with numbers. You test them differently, but you ask the same question: is the control seeing the right temperature, and is it doing the right thing about it?" He handed Kiran the tech sheet for the board and a glass of ice water.
The control system decides when the compressor, fans, damper and defrost heater run. In older refrigerators it is a handful of electromechanical parts: a cold control, perhaps a mechanical damper control and a defrost timer. In most current refrigerators it is a main control board reading thermistors and driving relays and low-voltage outputs. This lesson covers both, how to tell whether a control or its sensor has failed, and how to work safely with boards. APP-120 covered thermostats and thermistors as parts; APP-320 goes further into board electronics, communication and diagnostics.
The cold control
The cold control is the thermostat that starts and stops the compressor in a refrigerator without a board. It is a capillary thermostat: a sealed bulb and tube filled with a small charge of refrigerant or other fluid, connected to a bellows or diaphragm inside the control body. As the bulb cools, the pressure of the fill falls, the bellows contracts and, at the set temperature, a snap-action switch opens and stops the compressor. As the bulb warms, the pressure rises and the switch closes again. The knob changes the spring tension against the bellows, which moves the temperatures at which the switch opens and closes.
The capillary of a cold control is usually clipped to the evaporator or placed in the air stream returning to it, and its exact position matters. A sensing tube moved an inch or two during a repair can change the temperatures noticeably. The tube must not be kinked, cut or allowed to touch a defrost heater. A cold control fails in a few ways: the switch contacts burn or weld, the fill leaks so the bellows can no longer close the switch, or the mechanism drifts. A cold control that has lost its fill usually stays open, so the compressor never runs. To test one, check its continuity in the warm position at room temperature, where it should be closed, and watch whether it opens when the bulb is cooled in ice water or a freezer.
A useful trick for a no-cooling call on a cold-control refrigerator is to turn the knob to its warmest and coldest positions and listen. A click as the switch closes, and the compressor starting, shows the control and the circuit through it are working. No click at any setting suggests the control has lost its fill or its switch has failed open.
Thermistors in refrigerators
Board-controlled refrigerators use NTC thermistors: small sensors whose resistance falls as their temperature rises. A typical refrigerator has a fresh food thermistor in the air stream of the fresh food section, a freezer thermistor in the freezer, a defrost or evaporator thermistor clipped to the evaporator and, on many models, ice maker and ambient room thermistors. Many use 10 kΩ sensors, meaning they read 10 kΩ at 77 °F, but the values vary between makers, and the tech sheet gives the table for each one.
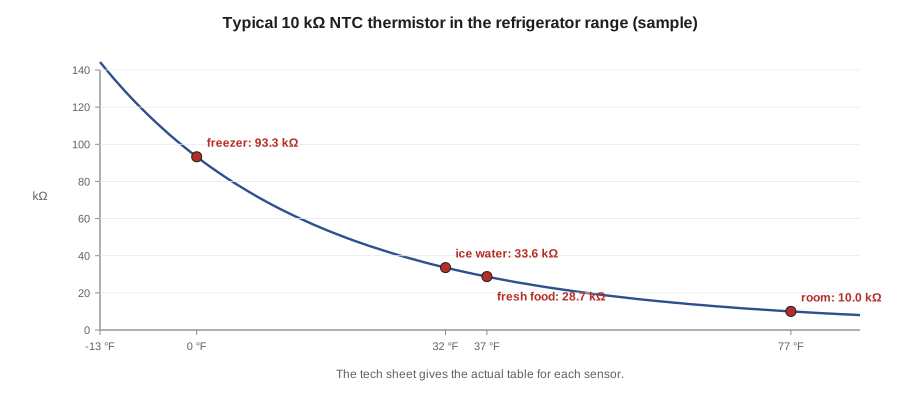
To test a thermistor, unplug the refrigerator, disconnect the sensor's connector at the board, and measure its resistance at a known temperature. The easiest known temperature is a glass of ice water, which is very close to 32 °F; let the sensor sit in it for a minute and stir. Compare the reading with the tech sheet. A sensor that reads open, shorted or well away from the table for its temperature has failed. A sensor that reads correctly but sits in the wrong place, out of the air stream, behind a food package or with its clip broken, can give the board a false picture without being faulty.
Worked problem
Checking a fresh food thermistor
On the 2021 board from Hiro's bench, the fresh food thermistor's table lists 33.6 kΩ at 32 °F and 28.7 kΩ at 37 °F. Kiran puts the sensor in a glass of ice water and reads 33.4 kΩ. Later, with the sensor at room temperature on the bench, Hiro gives him a second sensor that reads 27.6 kΩ in the same ice water. Are the two sensors good?
Show solution
- Sensor 1 in ice water: 33.4 kΩ against 33.6 kΩ expected, a difference of under 1 in 100. It is good.
- Sensor 2 in ice water: 27.6 kΩ against 33.6 kΩ expected, about 18 in 100 low.
- On the sample curve, 27.6 kΩ corresponds to about 39 °F, so sensor 2 tells the board that 32 °F water is nearly 39 °F.
- A board reading sensor 2 would think the fresh food section was warmer than it is, and would overcool it by roughly 7 °F, freezing food.
Answer: Sensor 1 is good. Sensor 2 has drifted and would make the refrigerator freeze food in the fresh food section; it should be replaced.
What the main board does
A main control board reads its thermistors, the door switches and the user's settings, and drives the loads: the compressor, through a relay or through an inverter board on a variable-speed model; the evaporator and condenser fans, often as DC outputs; the damper motor; the defrost heater, through a relay; the lights; the ice maker and water valves; and, on many models, a display and user interface board connected by a cable. The board's software runs the defrost logic, the fan speeds and any alarms. On many current models it also logs fault codes when a sensor reads out of range or a load fails to respond.
The board is powered from the line, and contains a power supply that makes the low voltages its electronics and DC loads need, commonly 5 V and 12 V DC, sometimes others. Relay outputs switch 120 V to the loads. Testing a board therefore means checking that it has power coming in, that its low-voltage supply is correct, that it is receiving correct sensor readings and that it puts out the right voltage to a load when it should. The tech sheet's connector diagram lists the pins and the expected readings.
| Check | How | What it tells you |
|---|---|---|
| Line power to the board | Voltage at the board input connector | Whether the board can work at all |
| Low-voltage supply | DC voltage at the test points on the tech sheet | Whether the board power supply is good |
| Sensors | Resistance at the board connector, unplugged, against the table | Whether the board sees the right temperatures |
| Outputs | Voltage to the load when it is commanded on in service mode | Whether the board drives the load |
| Load | Resistance or current of the load itself | Whether a load with voltage has failed |
| Fault codes | Display or service mode readout | What the board has detected; a starting point, not a verdict |
Service modes and fault codes
Most board-controlled refrigerators have a service or diagnostic mode, entered by a button sequence printed on the tech sheet. In it, the technician can read each thermistor's temperature as the board sees it, run each load on command and read stored fault codes. The service mode is the single most useful tool on a modern refrigerator, because it removes the guesswork about whether a fan is off because it has failed or because the board has chosen to turn it off. It also lets the technician force a defrost, as lesson 6 described.
A fault code points to where the board has seen a problem, but it is not a diagnosis. A code for an open freezer sensor may mean the sensor has failed, its wiring is broken, its connector is corroded or the board's input has failed. The technician confirms with measurements: read the sensor at the board connector; if it reads correctly there, the board input is suspect; if it reads open there but correctly at the sensor, the wiring is at fault. APP-320 covers fault codes and manufacturer tools in detail.
Before replacing a board, check what fed it. A board that has failed may have been damaged by a shorted load, such as a defrost heater shorted to its sheath, a seized fan motor or water from a leaking ice maker. Replacing the board without finding and fixing that cause usually destroys the new board too.
Handling boards
Boards are damaged easily by static electricity, by bending and by moisture. Handle them by their edges, keep them in their anti-static bags until they are fitted, touch a grounded metal part of the appliance before touching a board, and use a wrist strap where the tech sheet calls for one. Unplug the refrigerator before connecting or disconnecting any board connector; making or breaking a connector with power applied can damage the board's outputs. Look at the board before condemning it: burned spots, swollen capacitors, a cracked solder joint or corrosion from water are visible clues, and water damage nearly always has a source that must be fixed first.
Replacement boards may need to be set up for the model, by moving jumpers, entering a model code or running a setup routine described in the instructions that come with the board. A replacement board that has not been set up may run the wrong defrost interval or the wrong fan speeds, or may not run the ice maker at all.
A refrigerator's main board runs on line voltage and its relays switch 120 V loads. The appliance technician works on the refrigerator and its controls, which is the work of the trade; any fault in the house wiring, the receptacle or the branch circuit is for a licensed electrician, as APP-110 explained.
Where controls fit in a diagnosis
Controls sit between every other part of the refrigerator, so a fault anywhere can look like a control fault, and a control fault can look like a fault anywhere else. A compressor that never starts may have failed, may have a failed start relay or may simply never be asked to run because the cold control or the board is not calling for cooling. A fan that does not run may be dead or may not be powered. The rule is to find out whether the load is being commanded and whether it responds. If the control is calling and voltage reaches the load but the load does nothing, the load has failed. If voltage does not reach the load, the fault is in the control or the wiring between them.
On a cold-control refrigerator, that check is done with a meter across the control's terminals while it should be closed: close to 0 V across a closed control, the full supply across an open one. On a board-controlled refrigerator, it is done in service mode by commanding the load on and reading the voltage at its connector. In both cases, a few minutes with the tech sheet's schematic, tracing the path from the supply through the control to the load and back, shows exactly where to put the meter leads, as APP-120 explained.
Many control complaints turn out to be settings. A customer who has turned the controls to their coldest because the refrigerator seemed warm after a power cut, or a child who has pressed buttons on a display, can produce a refrigerator that freezes the milk or runs constantly. Before testing anything, check the settings and any special modes, such as a vacation mode, a showroom or demo mode in which the cooling is switched off while the lights and display work, or a Sabbath mode. A refrigerator left in showroom mode after delivery has been the whole cause of more than one no-cooling call.
Common mistakes
MistakeCondemning a board because of a fault code.
InsteadConfirm with measurements at the sensor, the connector and the load first.
MistakeTesting a thermistor while it is connected to the board.
InsteadUnplug the unit and the connector, then measure at a known temperature such as ice water.
MistakeMoving or kinking a cold control's capillary during a repair.
InsteadPut the sensing tube back exactly where it was, undamaged.
MistakeReplacing a board without finding what damaged it.
InsteadCheck for shorted loads, seized motors and water leaks first.
MistakePlugging or unplugging connectors with power on.
InsteadUnplug the refrigerator before handling board connectors.
MistakeSkipping the setup steps on a replacement board.
InsteadFollow the board's instructions for jumpers or model codes.
Summary and key terms
- The cold control is a capillary thermostat whose fill pressure opens and closes a switch.
- A cold control that has lost its fill usually stays open, so the compressor never runs.
- Board-controlled refrigerators use NTC thermistors; many read 10 kΩ at 77 °F.
- Test a thermistor unplugged, at a known temperature such as ice water, against the tech sheet table.
- A drifted sensor makes the board control to the wrong temperature without any fault code.
- The board reads sensors and switches, and drives the compressor, fans, damper, heater and valves.
- Service modes let the technician read sensors and run loads on command.
- Fault codes are a starting point; confirm with measurements and fix the cause before replacing a board.
- Cold control
- The capillary thermostat that starts and stops the compressor in a refrigerator without a control board.
- Fill
- The fluid sealed in a capillary thermostat's bulb and tube, whose pressure changes with temperature.
- Thermistor
- A temperature sensor whose resistance changes with temperature; NTC types fall as they warm.
- Main control board
- The electronic board that reads a refrigerator's sensors and switches its loads.
- User interface board
- The board behind the display and buttons, connected to the main board by a cable.
- Fault code
- A code stored or displayed by a board when it detects a problem.
- Electrostatic discharge
- A spark of static electricity that can damage electronic parts.
- Ice water test
- Placing a sensor in stirred ice water, near 32 °F, to check its reading.
Practice problems
Work each problem on paper first, then reveal the answer to check.
What makes a cold control's switch open?
Show answer
The fill pressure falls as the bulb cools, and the bellows contracts against the spring.
A cold control gives no click at any knob setting. What is a likely cause?
Show answer
It has lost its fill, or its switch has failed open.
How should a thermistor be tested?
Show answer
Unplugged, at a known temperature such as stirred ice water, against the tech sheet table.
A fresh food thermistor reads too low a resistance for its temperature. What will the refrigerator do?
Show answer
It will think it is warmer than it is and overcool the section.
Why must the cause be found before replacing a board?
Show answer
A shorted load or water leak that damaged the old board will damage the new one.
Lesson quiz · 5 questions
Score 60% or more to complete this lesson.
Create a free account to save your progress, take quizzes and earn a certificate.