
APP-110 · Lesson 3 of 12 · 25 min
Lifting, moving and installing appliances
▶ Video coming soon A video version of this lesson is on the way.
On Wednesday, October 21, Fenna gave Dee and Kiran two installation jobs before lunch. The first was a new freestanding electric range in a bungalow kitchen in Clintonville. The second was a replacement refrigerator for a basement apartment off Indianola Avenue, down a narrow staircase with a turn at the bottom. "This is where your delivery years pay off," Dee said in the van. "But we do it my way: measure first, protect everything, never lift what two people or a dolly should lift, and the anti-tip bracket goes on every range, every time."
Back injuries, crushed fingers and feet, and strains from awkward lifts are among the most common injuries in appliance work. Damage to floors, walls, door frames and the appliance itself costs money and customers. And an appliance that is installed badly, such as a range without its anti-tip bracket, a washer with its shipping bolts still in, or a refrigerator that is not level, can cause injuries and service calls long after the technician has left. This lesson covers how to plan a move, how to lift and carry safely, how to use dollies and straps, and the key steps in setting an appliance in place.
Know the weight
Appliances are heavy, and their weight is not always where you expect it. The weights below are typical ranges; the installation instructions or the specification sheet give the actual weight of each model.
| Appliance | Typical weight | Where the weight is |
|---|---|---|
| Full-size refrigerator | 200 to 350 lb | Compressor low at the back; tall, top-heavy when doors are full |
| Freestanding range | 120 to 200 lb | Oven cavity and glass; heavier at the front with the door |
| Front-load washer | 150 to 220 lb | Concrete counterweights on the tub; shifts if shipping bolts are out |
| Top-load washer | 100 to 150 lb | Motor and transmission low in the cabinet |
| Dryer | 100 to 140 lb | Drum and motor; fairly even |
| Dishwasher | 65 to 100 lb | Low, at the pump and base |
A refrigerator full of food can weigh much more than an empty one, and a washer with water in the tub can weigh tens of kilograms more. Empty refrigerators, remove loose shelves and bins, tape doors closed, and drain washers before moving them.
Lifting and carrying safely
OSHA has no single legal weight limit for one worker; employers must keep the workplace free of recognized hazards, which includes manual handling injuries. A widely used benchmark is the lifting equation of the National Institute for Occupational Safety and Health (NIOSH), which sets 51 lb as the recommended limit for one person under ideal conditions: the load close to the body, at waist height, lifted straight up, with no twisting and a good grip. Every condition that is worse than ideal lowers the limit. Penfold's rule is that any appliance over 51 lb is moved with a dolly or by two people.
Almost every household appliance is over that limit, so almost every appliance moves on a dolly or with two people. When you must lift:
- Plan the route first: measure doors and turns, move rugs and furniture, and open doors fully.
- Get close to the load, feet apart, bend at the knees and hips, keep your back straight, and lift with your legs.
- Keep the load close to your body and avoid twisting; turn with your feet.
- Agree on signals with your partner before you lift: one person calls the lift, the set-down and any stop.
- Wear safety-toe footwear and gloves that grip; keep fingers out from under the load and away from door frames.
Worked problem
Sharing the load
Dee and Kiran carry an empty dishwasher of 84 lb up three steps into a kitchen, one at each end. About how much does each carry, and is it within the NIOSH ideal limit for one person?
Show solution
- Each person carries about half: 84 lb ÷ 2 = 42 lb.
- 42 lb is below 51 lb, but the steps, the reach and the grip on a smooth cabinet are not ideal, so the real limit is lower.
Answer: About 42 lb each, close to the practical limit once the conditions are counted. A dolly would be better on a longer flight of stairs.
Dollies, straps and stair climbing
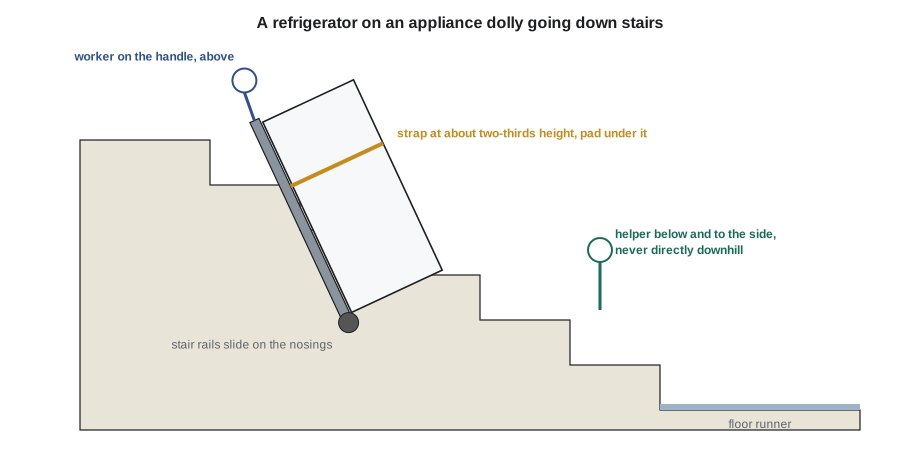
The appliance dolly is the most important lifting tool in the van. Unlike an ordinary hand truck, it has a tall frame, a ratchet strap that wraps around the appliance and pulls it tight to the frame, and, on most models, stair-climbing rails or belts that let it slide down or up stair edges. Some companies use powered stair-climbing dollies for refrigerators. To move an appliance on a dolly:
- Slide the toe plate fully under the appliance from the side that will rest against the frame, usually the side or the back, never the door side of a refrigerator.
- Wrap the strap around the appliance at about two-thirds of its height and ratchet it tight; protect the finish with a pad under the strap.
- Tilt the dolly back slowly until the weight balances over the wheels, with one person on the handle and, on stairs, a second person below guiding the load.
- On stairs, take one step at a time, with the person below never standing directly downhill of a load that could get away.
Floors need protecting too. Penfold technicians lay down hardboard or plastic runners over finished floors, use corner guards on door frames, and slide appliances into place on an appliance glide sheet rather than dragging them across vinyl or hardwood. A refrigerator dragged across a vinyl floor can tear it, and the cost of a new floor can be many times the price of the call.
Worked problem
Will it fit?
The new refrigerator for the basement apartment is 36 in wide, 70 in tall and 29 in deep without its doors and handles. The narrowest door on the route is 32 in wide when fully open, with 31 in of clear space between the door stop and the open door. Can the refrigerator go through, and how?
Show solution
- Width: 36 in is more than 31 in, so it will not go through face first.
- Depth without doors and handles: 29 in is less than 31 in, with 2 in to spare.
- So remove the doors and handles and take it through sideways, depth first, on the dolly.
Answer: Yes, sideways with the doors and handles off. Measure every door, hallway and turn on the route before carrying anything, and remember the dolly adds to the depth.
In the basement apartment that morning, the measurement paid off. Dee and Kiran removed the refrigerator doors in the driveway, carried the cabinet down sideways on the dolly with Kiran guiding from the side, and refitted the doors at the bottom. Kiran later wrote in his notebook: measure the turn at the bottom of the stairs, not just the doorway.
Refrigerators: upright, and wait
Refrigerators should be moved upright whenever possible. Laid on its side or back, a refrigerator can let compressor oil run into the refrigerant lines; if it is started too soon after being stood up, the compressor can be damaged or the refrigerator may not cool properly. Manufacturers' instructions say what to do if a unit has been on its side; a common instruction is to let it stand upright for at least as long as it was lying down, and some manufacturers ask for several hours. Penfold follows the manufacturer's instruction for each model and, if there is none, waits at least four hours. Tell the customer before you plug it in so they know when to expect it to start cooling, and that a new refrigerator can take most of a day to reach its set temperature.
Ranges and the anti-tip bracket
A freestanding or slide-in range can tip forward if weight is put on its open oven door, for example by a child standing on it or a heavy roasting pan pulled out on the rack. A tipping range can pour boiling liquid from the cooktop onto whoever is in front of it and can crush a child. Since 1991, ranges sold in North America have been required by their safety standards to come with an anti-tip device, usually a steel bracket screwed to the floor or wall behind the range that captures one of the rear leveling legs. US Consumer Product Safety Commission records include dozens of deaths from range tip-overs, about half of them young children.
The bracket only works if it is installed and the range is pushed back into it. Ranges are often pulled out for cleaning or repair and not pushed fully back, and some installers never fit the bracket at all. Penfold's rule is that every range a Penfold technician installs or pulls out for service is checked for an engaged anti-tip device before the technician leaves. To check, follow the instructions in the range's installation guide; for most models you grip the rear of the cooktop and gently try to tilt the range forward. If it is engaged, the range will not tip more than a little. If the bracket is missing, fit the one supplied with the range or a matching replacement kit, and fasten it into the floor or wall exactly as the instructions say, with the right fasteners for wood, concrete or tile.
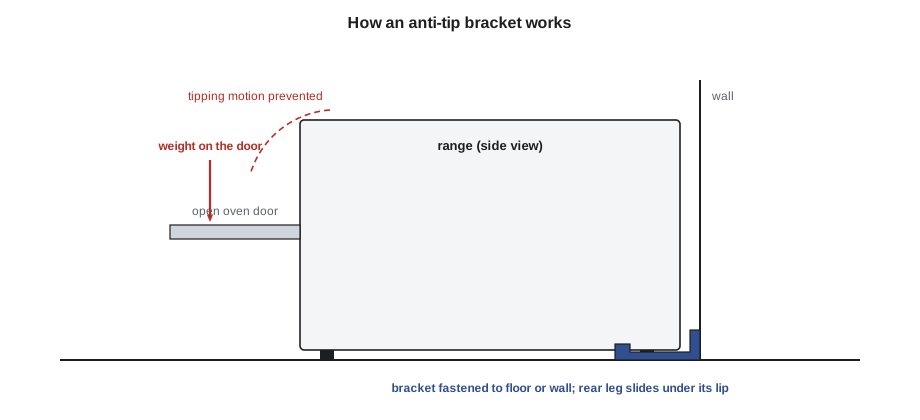
At the Westdale bungalow, the old range had no bracket at all. The new range came with one. Kiran fastened it to the plywood subfloor with the supplied screws, slid the range back until the rear leg was under the bracket lip, and checked it by trying to tilt the range forward. It barely moved. Dee asked him to show the customer the bracket and explain why it mattered, then wrote on the work order that it had been installed and tested.
Setting an appliance in place
Once an appliance is in position, the installation instructions decide what comes next, but most installations share some steps:
- Remove all packing, shipping bolts and transit supports. A front-load washer has shipping bolts through the back that hold the tub still in transit; if they are left in, the washer will shake violently on its first spin and can be damaged. Keep the bolts for any future move.
- Level the appliance with a spirit level side to side and front to back, adjusting the leveling legs and tightening their lock nuts. A washer that is not level and solid on all four feet walks across the floor; a refrigerator that is not level may have doors that do not close by themselves.
- Many refrigerators are set slightly higher at the front so that the doors swing closed. The instructions give the amount.
- Check the clearances to walls and cabinets that the instructions require for air flow and service (lesson 9).
- Make the connections the job allows: plugging in, water to an existing shutoff valve, venting a dryer, with any gas connection done by a certified or authorized gas technician (lessons 9 and 10).
- Test the appliance through a full cycle or check that it starts and runs, and show the customer how it works.
Worked problem
Leveling a refrigerator
A refrigerator's instructions say to raise the front so that the cabinet tilts back by about 1/4 in across its depth. The cabinet is 29 in deep. What slope is that, and how many turns of the front leveling legs are needed if each turn raises the leg by 1/16 in?
Show solution
- Slope: 0.25 ÷ 29 ≈ 0.009, or about 1/8 in per foot.
- Turns: 1/4 in ÷ 1/16 in = 4 turns on each front leg.
Answer: About four turns on each front leg, then check that both doors swing closed from half open.
Reversing doors and fitting handles
Customers often ask for refrigerator or dishwasher doors to swing the other way, or for handles fitted after delivery. The installation instructions show the steps for each model: which hinge covers come off, where the hinge pins and stops move to, and how to transfer the door switch, the closer cam and any wiring in the hinge for a door with a display or a water dispenser. Work with the doors supported, never let a door hang on one hinge, keep every screw and spacer in order, and check the door seal all the way around afterwards with the paper strip test from lesson 12. A door that is not square leaks cold air and makes the refrigerator run constantly.
Common mistakes
MistakeLifting an appliance alone because it is only a short distance.
InsteadUse a dolly or two people for anything over the NIOSH benchmark, which is almost every appliance.
MistakeMeasuring the doorway but not the turn at the bottom of the stairs.
InsteadMeasure every door, hall and turn on the route, allowing for the dolly.
MistakePlugging in a refrigerator right after it was laid on its side.
InsteadFollow the manufacturer's standing time before starting the compressor.
MistakeLeaving a range without an engaged anti-tip bracket.
InsteadInstall the bracket and test it on every range installed or pulled out.
MistakeLeaving the shipping bolts in a front-load washer.
InsteadRemove all shipping bolts and transit supports before the first run.
MistakeDragging an appliance across a finished floor.
InsteadUse floor runners and a glide sheet, and lift or roll rather than drag.
Summary and key terms
- Know the weight; most household appliances weigh more than one person should lift.
- Plan the route, measure doors and turns, protect floors and walls, and use a strapped appliance dolly.
- Move refrigerators upright, and follow the manufacturer's standing time if one has been on its side.
- Every range must have an engaged anti-tip device; install it and test it on every job.
- Remove shipping bolts, level appliances, check clearances and test before leaving.
- Appliance dolly
- A tall hand truck with a ratchet strap and stair rails for moving appliances.
- NIOSH lifting equation
- A method from the US National Institute for Occupational Safety and Health for setting a safe lifting limit; its ideal-conditions limit is 51 lb.
- Anti-tip bracket
- A bracket fastened behind a range that captures a rear leg so that the range cannot tip forward.
- Shipping bolts
- Bolts that hold a front-load washer's tub still in transit and must be removed before use.
- Leveling legs
- Adjustable feet used to level an appliance and set it solid on the floor.
- Glide sheet
- A slippery sheet placed under an appliance to slide it into place without damaging the floor.
Practice problems
Work each problem on paper first, then reveal the answer to check.
What is the NIOSH ideal-conditions lifting limit for one person?
Show answer
51 lb.
Why is a range tipping forward so dangerous?
Show answer
It can spill boiling liquid onto a person and crush a child.
How do you check that a range's anti-tip bracket is engaged?
Show answer
Follow the installation guide; usually try to tilt the range forward gently at the rear of the cooktop.
What happens if a front-load washer's shipping bolts are left in?
Show answer
It shakes violently on its first spin and can be damaged.
Why are refrigerators moved upright?
Show answer
Laying them down can let compressor oil run into the lines; starting too soon can damage the compressor.
Lesson quiz · 5 questions
Score 60% or more to complete this lesson.
Create a free account to save your progress, take quizzes and earn a certificate.