
VIS-110 · Lesson 5 of 12 · 24 min
Direction and contrast
Quality tells us how sharp the shadows are; direction tells us where they fall, and contrast tells us how dark they are compared with the lit areas. Together, the three describe almost any lighting situation, from the noon sun to a candlelit dinner scene. Direction shapes how a face or object is modelled, what texture shows, where the viewer's attention goes and what mood the image carries. Contrast decides whether shadows are open and gentle or deep and mysterious, and whether the scene fits within the recording range of the camera. This lesson covers the main lighting directions and their effects, classic portrait lighting patterns, the roles of key, fill and back lights, lighting ratios and how to calculate them, scene contrast and dynamic range, ways to control contrast, and the high-key and low-key styles.
Lighting directions
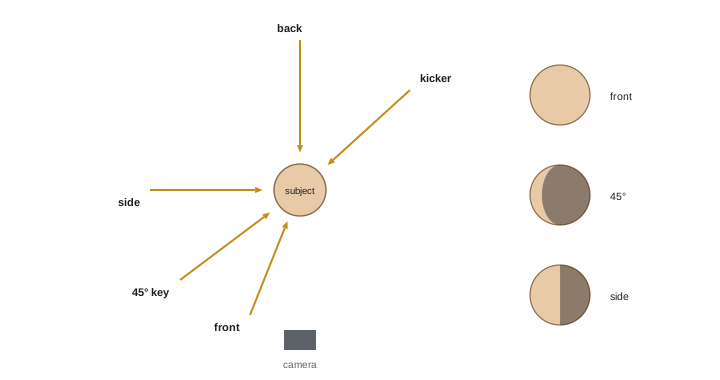
Picture the subject at the centre of a clock face seen from above, with the camera at six o'clock. The light can come from anywhere around and above or below:
- Front light (from near the camera): fills the subject evenly, minimizes shadows and texture, and flattens form. Useful for documentation, flattering beauty light from slightly above, and reducing the appearance of wrinkles, but often dull.
- Three-quarter or 45° light (about 30° to 60° to the side and somewhat above): the classic portrait key position, modelling the face with a pleasing balance of light and shadow.
- Side light (90°): lights one half of the subject and leaves the other in shadow, strongly emphasizing texture and form and giving a dramatic, divided look.
- Backlight (from behind the subject toward the camera): creates rim light outlining hair and shoulders, separates the subject from the background, makes translucent subjects glow, and can cause lens flare and silhouettes.
- Top light (from directly above): creates deep eye sockets and shadows under the nose and chin, typical of midday sun and overhead office lights; often unflattering, but useful for mood and certain products.
- Under light (from below): unnatural for daylight, so it reads as eerie or theatrical, the "campfire story" look, although low bounce from a table or snow can add natural-looking fill.
Classic portrait lighting patterns
Portrait photographers name patterns by the shadow the nose casts on the face:
- Butterfly (Paramount) lighting: the key light is high and directly in front, creating a small butterfly-shaped shadow under the nose; glamorous and flattering for many faces.
- Loop lighting: the key moves slightly to one side and above, so the nose shadow forms a small loop toward the cheek; the most common, natural-looking pattern.
- Rembrandt lighting: the key is about 45° to the side and above, so the nose shadow joins the cheek shadow, leaving a small triangle of light on the shadow-side cheek; moody and painterly.
- Split lighting: the key is at 90°, lighting exactly half the face; dramatic and stark.
Broad lighting places the key on the side of the face turned toward the camera, making faces look wider; short lighting places it on the side turned away, which slims the face and adds depth. Cinematographers often favour short side lighting, lighting from the side of the face away from the camera, because it models the face and keeps the near side in partial shadow.
Key, fill and back light
The three-point lighting model, though only a starting point, gives names to the roles lights play:
- The key light is the main light that establishes direction, quality and exposure.
- The fill light reduces the depth of the key's shadows, controlling contrast. It is usually softer and weaker than the key, often near the camera on the opposite side. Fill can be a light, a reflector, ambient bounce from the room, or the sky.
- The back light (rim, hair or kicker light) comes from behind to outline the subject and separate it from the background.
Additional lights might light the background, add a kicker on the cheek, or create practical motivation, such as a lamp visible in the frame. Modern cinematography often starts from motivated light: the light appears to come from a believable source such as a window or lamp, and is designed to feel natural rather than to follow a formula.
Lighting ratios
The lighting ratio compares the brightness of the lit side of a subject, which receives key plus fill, with the shadow side, which receives fill only. In practice it is found by measuring both sides with an incident meter and expressing the difference in stops: each stop of difference doubles the ratio. Typical ratios:
| Ratio (lit : shadow) | Stop difference | Effect |
|---|---|---|
| 2 : 1 | 1 stop | Soft, open, bright commercial look |
| 3 : 1 | About 1.6 stops | Natural portrait modelling |
| 4 : 1 | 2 stops | Noticeable drama |
| 8 : 1 | 3 stops | Strong drama, deep shadows |
| 16 : 1 or more | 4 stops or more | Low-key, film noir, near silhouette |
Worked problem
Calculating a lighting ratio
An incident meter reads f/8 on the lit side of a face (key and fill) and f/4 on the shadow side (fill only). What is the ratio? How could it be reduced to 2 : 1?
Show solution
- From f/4 to f/8 is two stops (f/4 → f/5.6 → f/8).
- Two stops is a factor of 2² = 4, so the ratio is 4 : 1.
- For 2 : 1, the shadow side must be one stop below the lit side: increase the fill so the shadow side reads f/5.6.
- Doubling the fill light (or moving a reflector closer) brightens the shadow side by about a stop; the lit side also rises slightly, so re-meter both sides.
Answer: The ratio is 4 : 1 (two stops). Raising the fill by about one stop gives roughly 2 : 1.
Scene contrast and dynamic range
Scene contrast is the ratio between the brightest and darkest areas that matter in a scene, often measured in stops with a spot meter (Lesson 11). A face in soft window light might span three or four stops; a sunlit street with deep shadows and bright sky can span fifteen stops or more. Cameras record only a limited range, their dynamic range: many current cinema cameras capture about 13 to 17 stops in log modes, smartphones fewer per frame (though they combine multiple frames), and display and print media show fewer still (a print might reproduce only six to seven stops). When scene contrast exceeds what the camera can capture, highlights clip to pure white or shadows block up to black, so the image maker must choose what to sacrifice or reduce the contrast.
Controlling contrast
- Add fill: reflectors, bounce boards or fill lights raise the shadows.
- Reduce highlights: diffuse or scrim bright sunlight, add neutral density gels to windows, or move the subject into shade.
- Change timing or position: shoot when the sun is lower, in shade or under cloud (Lesson 6), or reframe to exclude the brightest sky.
- Use negative fill to increase contrast in flat light (Lesson 4).
- Use the camera's capabilities: log or raw recording captures more range, and techniques such as high dynamic range (HDR) bracketing combine several exposures for still images.
Contrast is a creative choice as well as a technical constraint: high contrast tends to feel dramatic, tense or harsh; low contrast feels gentle, calm or dreamlike.
High key and low key
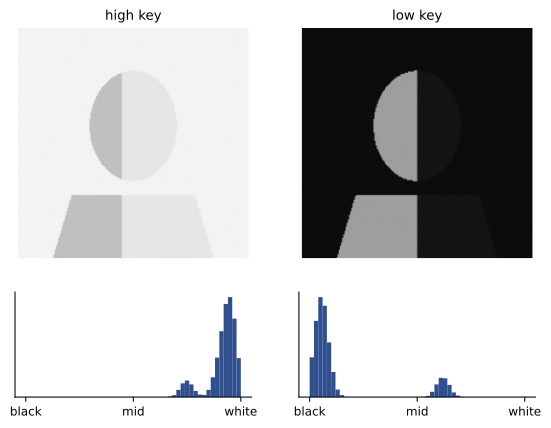
High-key images are dominated by light tones, with low lighting ratios, bright backgrounds and few deep shadows: common in comedy, commercials, beauty, medical and children's imagery, conveying optimism and openness. Low-key images are dominated by dark tones, with high ratios, dark backgrounds and selective pools of light: common in thrillers, horror, film noir and dramatic portraits, conveying mystery, tension or intimacy. High key does not mean overexposed, nor does low key mean underexposed; both require careful exposure so that important tones fall where intended.
Direction in moving images
In film and video, subjects and cameras move, so direction must work across a whole shot and a whole scene. A key light placed for an actor's first position may become frontal or backlit as the actor walks. Cinematographers often light areas rather than single positions, choose key directions that work for several camera angles, and use the convention of keeping the key on the far side of the face relative to the camera (short side lighting) for both sides of a conversation, so each actor is modelled attractively in their close-up. Consistent direction from shot to shot also preserves the audience's sense of where the light sources are in the scene.
Developing an eye for direction
Studying paintings is an excellent way to learn direction and contrast. Painters such as Caravaggio and Rembrandt used strong side and top light with deep shadows, while Vermeer favoured soft window light from the side. Many cinematographers cite these painters as influences, and the names of lighting patterns come from them. Analyzing where the light comes from in a painting, a film still or a photograph, and how dark the shadows are, builds a vocabulary that can be applied directly when lighting.
Another useful exercise is to rotate a subject slowly in front of a single fixed light while photographing or observing it every 45°. The changes from front light to side light to backlight, and the way the face is modelled differently at each step, make the abstract categories of direction concrete and memorable.
Contrast also changes with the medium. A scene that looks moderately contrasty in a camera's log recording may become dramatic after grading, and a print typically shows less range than a screen. Experienced image makers learn how their cameras and delivery formats translate the measured lighting ratio into the final image, and adjust their lighting accordingly, often lighting with slightly lower contrast than intended and adding contrast in post-production, where it is easier to add than to remove.
Measuring direction and contrast consistently, and recording the results, also helps when shots must be matched on different days or in different locations, a common challenge in film production and in commercial photography series.
Contrast and genre
Different genres have different conventions for contrast and direction. News and corporate interviews typically use moderate ratios of about 2 : 1 to 3 : 1 with soft key light, conveying openness and credibility. Romantic comedies and commercials favour bright, low-contrast, high-key lighting. Thrillers, crime dramas and horror use higher ratios, hard side light and darker backgrounds. Documentary often accepts the contrast of available light. Knowing these conventions lets image makers meet expectations, or deliberately break them for effect.
In short, decide the key direction first, then set contrast with fill and negative fill, and check the result against the camera's range and the story's mood.
Practise reading direction and contrast in every image you see, and both will soon become second nature.
Common mistakes
MistakeAlways using flat front light.
InsteadMove the key to the side to model form.
MistakeFollowing three-point lighting as a fixed formula.
InsteadStart from motivated light and the mood of the scene.
MistakeJudging contrast by eye alone.
InsteadMeasure ratios with a meter or camera tools.
MistakeLetting scene contrast exceed the camera's range unknowingly.
InsteadMeasure and add fill, reduce highlights or choose what to clip.
MistakeTreating low key as underexposure.
InsteadExpose so important tones fall where intended.
Summary and key terms
- Direction shapes modelling, texture and mood: front, 45°, side, back, top and under light.
- Portrait patterns include butterfly, loop, Rembrandt and split; broad and short lighting change face shape.
- Key, fill and back lights describe roles; motivated light grounds modern cinematography.
- Lighting ratios compare lit and shadow sides; each stop doubles the ratio.
- Scene contrast must fit the camera's dynamic range or something will clip.
- Fill, scrims, timing, negative fill and log recording control contrast.
- High-key and low-key styles use contrast and tone to set mood.
- Key light
- The main light setting direction and exposure.
- Fill light
- Light that lifts shadows and controls contrast.
- Back light
- Light from behind that outlines the subject.
- Rembrandt lighting
- A pattern with a triangle of light on the shadow cheek.
- Short lighting
- Key on the side of the face turned away from camera.
- Motivated light
- Light that appears to come from a believable source.
- Lighting ratio
- The ratio of lit-side to shadow-side brightness.
- Dynamic range
- The range of brightness a camera or medium can record.
- Clipping
- Loss of detail where highlights or shadows exceed range.
- Low key
- A style dominated by dark tones and high contrast.
Practice problems
Work each problem on paper first, then reveal the answer to check.
What does side light emphasize?
Show answer
Texture and form, with a dramatic divided look.
Why is top light often unflattering?
Show answer
It creates deep shadows in eye sockets and under the nose.
Describe Rembrandt lighting.
Show answer
Key at about 45°, leaving a triangle of light on the shadow cheek.
How does short lighting change a face?
Show answer
It slims the face and adds depth.
What is the role of fill?
Show answer
To lift shadows and control contrast.
Lit side reads f/11, shadow side f/5.6. What is the ratio?
Show answer
Two stops, 4 : 1.
How many stops is an 8 : 1 ratio?
Show answer
Three.
What happens when scene contrast exceeds dynamic range?
Show answer
Highlights clip or shadows block up.
Name three ways to reduce contrast outdoors.
Show answer
Reflectors, scrims, shade, timing.
Is high key the same as overexposure?
Show answer
No; it is a deliberate tonal style with correct exposure.
Lesson quiz · 5 questions
Score 60% or more to complete this lesson.
Create a free account to save your progress, take quizzes and earn a certificate.