
SMW-210 · Lesson 7 of 12 · 18 min
Offset and oblique square-to-round transitions
Real duct rarely lines up as neatly as the Ashgrove air handler. A round duct leaving a rectangular plenum often has to sit to one side, to clear a beam, line up with a roof opening or meet a fan inlet that is not centred on the box. A square-to-round whose round end is shifted off the centre of the square is an offset square-to-round. If the round end is also tilted, so that it is not parallel to the square end, the fitting is oblique. Both are developed by the same triangulation as Lesson 6, but the symmetry that made the on-centre fitting so quick is gone, and every line has to be found on its own. This lesson works through an offset fitting at the Brine & Ember restaurant and then the extra steps for an oblique one.
The Brine & Ember hood collar
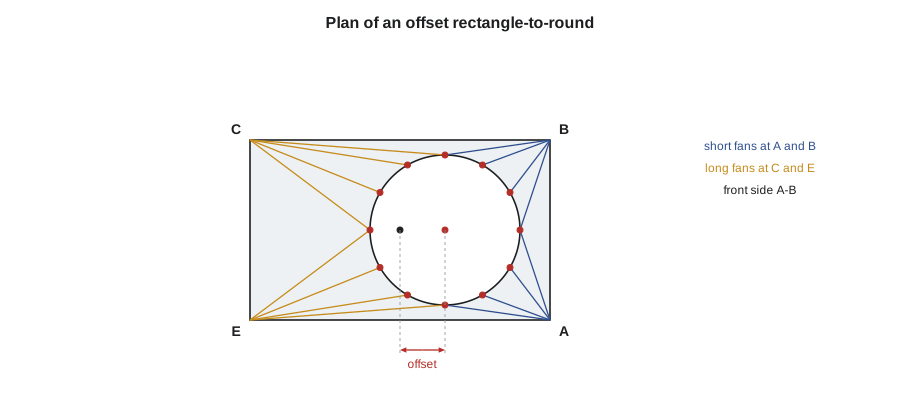
The kitchen hood at Brine & Ember had a rectangular exhaust opening near the back of the hood's top, 500 mm from front to back and 300 mm across. The grease duct above it was round, 250 mm in diameter, and to line up with the roof curb it had to sit 75 mm farther toward the front of the hood than the centre of the opening. The transition was 300 mm high. It was a grease duct fitting, so under the code that SMW-410 covers it would be made of heavier steel with welded, liquid-tight seams rather than the lock seams of ordinary duct. For this course, its pattern was the point.
An offset of this kind is common at kitchen hoods, where the hood maker sets the collar position and the duct route sets the roof penetration, and the two rarely agree. Sean's field measurement of the roof curb against the hood had confirmed the offset before the fitting went to the layout bench, which Aggie insisted on for every offset fitting: an offset measured from the drawings alone is an offset waiting to be wrong.
What changes when the round moves
Moving the round end off centre does three things to the fitting.
- The corner fans are no longer alike. The corners on the side the round moves toward get short, steep fans; the corners on the far side get long, shallow ones.
- The flat triangles change shape. The triangle on the near side becomes steep and short; the one on the far side becomes long and leans back. The triangles on the other two sides tilt toward the offset.
- Every line has its own true length. On the on-centre fitting there were three lengths; on an offset fitting with a rectangular end and 12 spaces, there are up to 16 different fan lines, plus the seam lines.
The method itself does not change. The plan is drawn, the round is divided, every corner is joined to its share of round points, the true-length diagram or a calculation gives every length, and the pattern is built triangle by triangle in order. The only real difference is the amount of bookkeeping, and with it the chance of picking up the wrong length. That is why careful labelling, from Lesson 5, matters even more here.
Dividing the round and assigning the points
On an on-centre fitting, each corner fans to exactly one quarter of the round. On an offset fitting, the dividing points between one corner's fan and the next, the points at the tops of the flat triangles, are not always at the quarter points. The correct dividing point for each side is the round point that the flat triangle on that side runs to, and it is found in the plan. For a side parallel to the offset, the dividing point stays at the middle of that side's quarter. For the side the round moves toward and the side it moves away from, the flat triangle's top is still the round point nearest the middle of that side, as long as the round stays inside the rectangle in the plan.
For the Brine & Ember collar, the offset was small enough that the dividing points stayed at the quarter points, 0, 3, 6 and 9 when the round is numbered from the side facing corner B. Corner A fanned to points 9, 10, 11 and 0, corner B to 0, 1, 2 and 3, corner C to 3, 4, 5 and 6, and corner E to 6, 7, 8 and 9. With a large offset, a corner can take more than its quarter and the next corner less; Aggie's test was to check in the plan that every fan line ran inside the fitting's outline and none crossed another.
The true lengths
The script below calculates every fan line for the collar. The rectangle is 500 by 300 mm, the round 250 mm in diameter, the height 300 mm, and the round's centre is moved 75 mm toward the front side A-B. Each corner's four lines are printed in order around the fitting.
# Offset square-to-round: the round end is moved off centre, so every line is different
import math
W, L, D, H, off = 500, 300, 250, 300, 75   # mm       # rectangle width and length, round diameter, height, offset of the round
r = D / 2
corners = {'A': (W/2, -L/2, 0), 'B': (W/2, L/2, 0), 'C': (-W/2, L/2, 0), 'E': (-W/2, -L/2, 0)}
ctr = (off, 0)                  # round centre moved toward side A-B
rp = [(ctr[0] + r*math.cos(math.radians(30*k)), ctr[1] + r*math.sin(math.radians(30*k)), H) for k in range(12)]
fan = {'A': [9, 10, 11, 0], 'B': [0, 1, 2, 3], 'C': [3, 4, 5, 6], 'E': [6, 7, 8, 9]}
for c, ks in fan.items():
    row = ", ".join(f"{c}-{k}: {math.dist(corners[c], rp[k]):.1f}" for k in ks)
    print(row)
print(f"short side lines are near {min(math.dist(corners['A'], rp[k]) for k in fan['A']):.1f} mm, "
f"long side lines near {max(math.dist(corners['C'], rp[k]) for k in fan['C']):.1f} mm")A-9: 348.2, A-10: 323.1, A-11: 319.5, A-0: 339.1 B-0: 339.1, B-1: 319.5, B-2: 323.1, B-3: 348.2 C-3: 443.0, C-4: 400.8, C-5: 380.3, C-6: 390.5 E-6: 390.5, E-7: 380.3, E-8: 400.8, E-9: 443.0 short side lines are near 319.5 mm, long side lines near 443.0 mm
The near corners, A and B, have fan lines from about 320 to 348 mm; the far corners, C and E, from about 380 to 443 mm. The fitting is still symmetrical left to right, because the offset runs along the fitting's centre line, so A matches B and C matches E in mirror image. That symmetry halves the work, and it allows the fitting to be made in two mirror-image halves, though not two identical ones.
On a fitting that is offset in both directions, toward one side and toward one end at once, there is no symmetry at all, and each of the four corners has four different lines. The method is the same, but the pattern is drawn as two different halves, each worked out in full. Kai's notes after this lesson included the rule he wrote at the top of his true-length table for every offset job: one line per row, every row labelled, and no lengths copied from another row unless the plan proved they were equal.
The seams and the halves
With the round moved toward the short front side A-B, the seams on the Brine & Ember collar went up the middle of the two long sides, the flat triangles on sides B-C and E-A, which run front to back. Those triangles are mirror images of each other, so the two halves of the fitting are mirror images too. One half pattern is drawn and the other is the same pattern turned over. Turning a pattern over is a trap for the unwary: the allowances must be added after turning, so that pockets and flanges still end up on the correct faces of the metal.
Some layout people prefer to put the seams on the other pair of sides, on the flat triangles of A-B and C-E, because those triangles are each symmetrical in themselves. The two halves are then different, a near half and a far half, and each needs its own pattern. Either choice works; what matters is that the seam lines are drawn as straight lines on flat triangles and that the shop drawing shows which choice was made.
Developing the half pattern
The half pattern is built exactly as for the on-centre fitting, starting from a flat triangle and working out to the seams. For the Brine & Ember collar, Kai started with the flat triangle on the short front side, A-B to round point 0. He drew A-B at its plan length, 300 mm, swung A-0 from A and B-0 from B, and located point 0. He then worked around corner B with B-1, B-2 and B-3, each swung from B, with the step-off from the last round point, then laid the flat triangle B-C-3 with B-C at 500 mm and C-3 from the table. He finished corner C's fan to point 6 and the half-side of the far side, which ended at the seam. The other half was the mirror image.
Two things went wrong on Kai's first try, both instructive. He swung C-4 as 400.8 mm when the table gave it as the line from C to point 4, but he had labelled point 4 on the pattern where point 5 should have been, so the length went to the wrong place. And he took the wrong crossing of two arcs on the far flat triangle, which folded the pattern back on itself. The first error he caught when the round edge would not take a smooth curve; the second was obvious as soon as he stepped back and looked.
Oblique transitions
An oblique square-to-round has its round end tilted, so that it is not parallel to the square end. Hoods, plenums and fittings that turn a corner as they change shape are often oblique. In an oblique fitting, the round points are no longer all at the same height. The round end, seen in the plan, is an ellipse, and each round point has its own height above the square end.
The development changes in one way: each line's rise is different, so the true-length diagram cannot use a single vertical. Each line needs its own rise, measured in the elevation from the square end to the height of its round point. Some layout people draw a separate small diagram for each rise; others use a diagram with several verticals, one per rise, along a common base. On a calculator, the right triangle handles each line with its own plan length and its own rise without any extra trouble, which is one reason oblique fittings are now often developed by calculation or by pattern software, the subject of Lesson 11.
The round end of an oblique fitting must be divided correctly. The divisions must be equal around the true circle, not around its elliptical plan view. The usual method is to draw the round end in its own true view, square to its tilt, as a full circle, divide it there into equal spaces, and project the points back into the plan and elevation. Dividing the ellipse in the plan into equal spaces, a tempting shortcut, gives unequal spaces on the real round and a round end that will not fit its collar.
Field checks
Because offset and oblique fittings depend so heavily on measurements, Keelson checked them twice: once at the bench, and once against the field before final assembly. The bench check is the same as for any triangulated pattern, edge lengths against the true perimeters of both ends. The field check is to set the formed fitting on its square end and measure the offset from the square's centre to the round's centre in both directions, and the height. For the Brine & Ember collar, Sean also checked that the round end lined up with the roof curb by stretching a line from the hood collar to the curb before the duct went in.
Common mistakes
MistakeCopying fan lengths from one corner to another on an offset fitting.
InsteadEvery line is different unless the plan proves two are equal; calculate or construct each one.
MistakeTurning a half pattern over and keeping its allowances.
InsteadTurn the net pattern over first, then add the allowances so pockets and flanges fall on the right faces.
MistakeUsing one rise for all lines on an oblique fitting.
InsteadEach line on an oblique fitting has its own rise; find each one in the elevation.
MistakeDividing the elliptical plan of a tilted round end into equal spaces.
InsteadDivide the true circle in its own view, then project the points into the plan and elevation.
MistakeBuilding an offset fitting from drawing dimensions without a field check.
InsteadConfirm the offset on site before layout, and check the formed fitting before assembly.
Summary and key terms
- Moving the round end off centre makes every corner fan and flat triangle different, and every line needs its own true length.
- The method is still triangulation in order from a flat triangle out to the seams; the extra work is bookkeeping.
- Each flat triangle runs to the round point nearest the middle of its side; check in the plan that no fan line crosses another.
- A fitting offset along one centre line can be made in two mirror-image halves; one offset in both directions needs two different halves.
- An oblique fitting has a tilted round end; each line has its own rise, and the round is divided in its true view.
- Offsets are confirmed in the field before layout and checked on the formed fitting.
- Offset square-to-round
- A square-to-round whose round end is shifted off the centre of the square end.
- Oblique transition
- A transition whose two ends are not parallel.
- Mirror-image halves
- Two halves of a fitting that are the same pattern turned over.
- Dividing point
- The round point at the top of a flat triangle, where one corner fan ends and the next begins.
- True view
- A view square to a surface, showing its real shape, such as a tilted round end seen as a full circle.
Practice problems
Work each problem on paper first, then reveal the answer to check.
On an offset square-to-round, which corner fans are shorter?
Show answer
The fans at the corners on the side the round moves toward.
How many different fan lines can a rectangle-to-round with 12 spaces have if it is offset in both directions?
Show answer
Up to 16, four at each corner, plus the seam lines.
Why must the round end of an oblique fitting be divided in its true view?
Show answer
The plan shows it as an ellipse, and equal spaces on the ellipse are unequal on the real circle.
A line on an oblique fitting has a plan length of 300 mm and a rise of 400 mm. What is its true length?
Show answer
500 mm.
Lesson quiz · 5 questions
Score 60% or more to complete this lesson.
Create a free account to save your progress, take quizzes and earn a certificate.