
SMW-210 · Lesson 1 of 12 · 19 min
Radial line principles and true length
In SMW-120, Kai learned that a pipe or a prism develops by parallel lines because its element lines all run the same way. Many of the most common fittings in the trade are not like that. A reducer between a large and a small round duct, a conical rain cap, the copper cap on a church turret and the hopper under a dust collector all taper. Their element lines are not parallel; they all point at one spot. This course is about the two methods that develop tapering shapes: radial line development, for shapes that are part of a cone or a pyramid, and triangulation, for everything else. This first lesson sets out the idea behind radial line work and the one skill both methods depend on, finding the true length of a line.
Kai was now a second-year apprentice at Keelson. Walt had moved him from the straight duct line to the layout bench beside Aggie, where the shop's odd fittings were drawn and cut. Two jobs set the work for the term. At Ashgrove Elementary the retrofit had reached the mechanical room, where the new air handler needed transitions and reducers to tie into the duct mains Kai had helped build. And at St. Brendan's Church, the conservation architect had approved a new copper cap for the small bell turret over the west door, a cone that Aggie meant to use as a teaching job from start to finish.
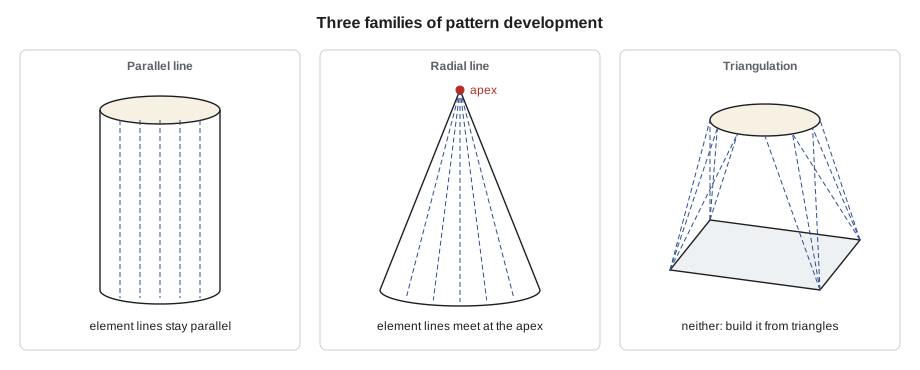
Three families of development
Every sheet metal fitting that can be made from a flat sheet is a developable surface: a surface that can be unrolled flat without stretching or tearing. There are three ways to develop one, and the shape decides which to use.
- Parallel line development, from SMW-120, is used when the element lines are parallel: prisms, pipes, elbows, tees and offsets.
- Radial line development is used when the element lines all meet at one point, the apex: cones, pyramids and any part of them, such as a reducer, a rain cap or a hopper.
- Triangulation is used when the element lines neither stay parallel nor meet at one reachable point: square-to-round transitions, offset reducers, boots and most twisted or oblique fittings.
The Red Seal occupational standard for the trade lists the three as separate skills under pattern development, alongside simple straight line layout and computer pattern development, and the provincial apprenticeship exams test all of them. Triangulation can develop any shape the other two methods can, and some layout people use it for nearly everything. Radial line development is faster and more accurate where it applies, so a pattern maker learns to recognize a cone, or part of one, at a glance.
The idea of radial line development
A right cone is the shape traced when a line pivots around an axis while one end stays fixed at the apex. Every element line of the cone runs from the apex to the base circle, and on a right cone they are all the same length, the slant height. When the cone is unrolled, the apex stays put, every element line lies flat as a radius from it, and the base circle becomes an arc at the slant height. The pattern is a sector of a circle, a shape like a slice of pie, whose radius is the slant height and whose arc is the length of the base circumference.
That is the whole principle. Every radial line pattern is drawn from one centre, the apex, using lines that radiate from it. A reducer is a cone with its tip cut off, so its pattern is the band between two arcs drawn from the same centre. A cone cut by a sloping plane has element lines of different lengths, so its pattern is a sector with a wavy edge, each element line cut to its own length along its own radius. A pyramid's corner lines also meet at an apex, so its faces develop around a centre in the same way, with straight edges instead of arcs.
The catch is that each element line must be laid on the pattern at its true length, and on most drawings the element lines are not shown at their true length. That is the skill this lesson builds.
Views and true length
SMW-120 explained that a line appears at its true length only in a view where it is parallel to the picture plane. A line seen at an angle appears shorter, foreshortened, and a line seen end-on appears as a point. On a cone drawn in the usual plan and elevation, the two outside element lines in the elevation, the ones forming the outline of the cone, are parallel to the picture plane and appear at their true length, the slant height. Every other element line slopes away from or toward the viewer and appears shorter than it really is. In the plan view, every element line appears as a radius of the base circle, foreshortened even more, because the plan does not show its rise at all.
For a right cone this causes no trouble, because all element lines are the same length and the outline shows that length. It becomes important as soon as the cone is cut by a sloping plane, made oblique, or replaced by a fitting that is not a cone at all. Then each element line has its own length, and the pattern maker has to find each one before the pattern can be drawn.
True length by revolution
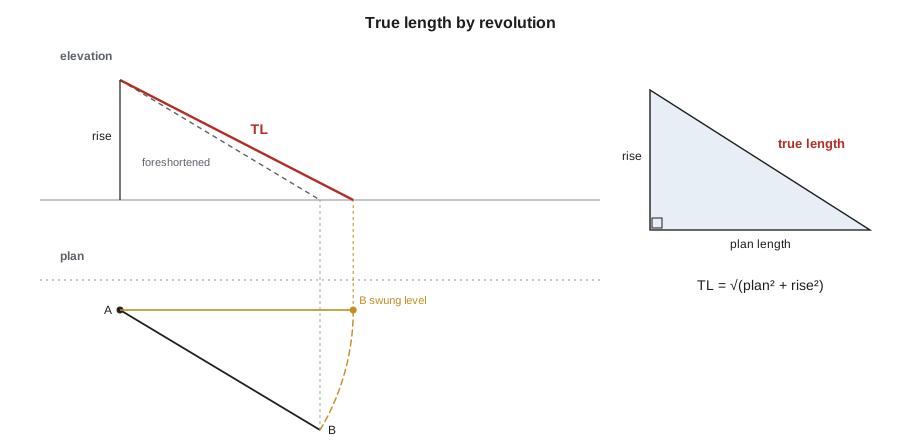
The oldest and still the most useful way to find the true length of a line is to revolve it. Imagine the line pivoting around a vertical axis through one of its ends, like a door swinging on its hinge. As it swings, its length and its rise do not change. Swing it until it is parallel to the picture plane, and in that position the elevation shows it at its true length.
On the drawing, the method takes three moves. In the plan view, swing the line around its end, with a compass, until it lies parallel to the elevation's base line. Project the swung end straight up into the elevation, to the height of the line's lower end. Join that projected point to the upper end of the line in the elevation. The joining line is the true length. The method works for any line, whether it is an element of a cone, a hip of a pyramid or a line in a transition.
True length by the right triangle
Revolution is a drawing method, but the geometry behind it is a right triangle. The plan length of a line is its horizontal run. The difference in height between its two ends is its rise. The true length is the hypotenuse of the right triangle with those two sides. Every true length in this course can be found this way, on paper or with a calculator.
Pattern makers use the right triangle so often that they draw it as a separate small diagram called a true-length diagram. A vertical line is drawn equal to the rise of the fitting. Each plan length is measured from the plan view and laid along a horizontal base line from the foot of the vertical. The distance from the top of the vertical to each mark is the true length of that line. A true-length diagram replaces a dozen separate revolutions with one quick construction, and Lesson 5 develops it in full for triangulation.
Aggie showed Kai the idea on the turret cap. The cone was to be 1,200 mm across at its base and 900 mm high. In the plan, any element line was a radius, 600 mm long. Its rise was the full height of the cone, 900 mm. The true length was the square root of 600 squared plus 900 squared, 1,081.7 mm, which matched the outline element measured on the full-size elevation. That one number, the slant height, would be the radius of the whole pattern.
The script below works out true lengths from plan length and rise for three lines from this course: the hip line of the turret cap, and two of the lines in the square-to-round transition that Kai would develop later in the term. It shows how much longer the true length is than the plan length. A pattern laid out from plan lengths would be far too small.
# True length of a line by its plan length and its rise (revolution or Pythagoras)
import math
lines = [("hip of turret cap", 600, 900), ("square-to-round A-1", 309.2, 450), ("square-to-round A-2", 215.0, 450)]   # mm      # (name, plan length, rise)
for name, plan, rise in lines:
    true = math.hypot(plan, rise)
print(f"{name}: plan {plan} mm, rise {rise} mm -> true length {true:.1f} mm ({true - plan:+.1f} mm longer)")hip of turret cap: plan 600 mm, rise 900 mm -> true length 1081.7 mm (+481.7 mm longer) square-to-round A-1: plan 309.2 mm, rise 450 mm -> true length 546.0 mm (+236.8 mm longer) square-to-round A-2: plan 215.0 mm, rise 450 mm -> true length 498.7 mm (+283.7 mm longer)
The lesson in those numbers is that foreshortening is not a small correction. On a steep fitting, the true length can be nearly twice the plan length. Kai's first attempt at a hopper pattern on scrap, before this lesson, had used plan lengths for the corner lines. The hopper came out less than half the size it should have been, which was a quick and memorable way to learn the point.
Lines that are already true length
Not every line on a fitting needs a true-length construction. A line that lies in a horizontal plane, such as an edge of the square end of a transition or a chord of the round end, appears at its true length in the plan view, because its rise is zero. A line that lies in a vertical plane parallel to the elevation appears at its true length in the elevation. Experienced layout people check each line before constructing anything, and they only build true lengths for lines that slope in both views. The BCcampus open textbook on pattern development states the rule neatly for transitions: lines running from a number to a letter, from the round end to the square end, need a true length; lines from number to number or letter to letter are already true in the plan.
The apex and why it matters
Radial line development needs the apex, because every arc on the pattern is drawn from it. For a cone, the apex is part of the drawing. For a reducer, the apex is where the two sloping sides of the elevation would meet if extended, and on a steep reducer it is close by. On a gentle reducer, the sides are nearly parallel and meet far away, sometimes many metres off the bench. Lesson 3 covers what to do then: either find the radius by calculation and swing it with a trammel or a string, or abandon the arcs and plot the pattern by points. Lesson 9 shows that some reducers, the eccentric ones with one side straight, are not part of a right cone at all and need triangulation.
The apex is also where accuracy is lost or kept. A small error in locating the apex, a millimetre or a sixteenth of an inch on a full-size drawing, becomes a larger error on the pattern at the far end of a long radius. Aggie's habit was to find the apex by calculation as well as by drawing, and to trust the calculation when the two disagreed by more than the thickness of a scriber line.
Material thickness on radial line patterns
SMW-120 showed that the stretchout of a pipe is taken at the mean diameter, the middle of the metal thickness. The same rule applies to a cone or reducer: the base circumference that the pattern arc must equal is measured at the mean diameter. For thin sheet, such as the 16-ounce copper of the turret cap, about 0.55 mm (0.0216 in) thick, the difference is a fraction of a millimetre over the whole cone and can be ignored. For galvanized duct reducers specified to an outside diameter, the difference is worth including, and Lesson 3's calculation does so. For heavy plate, the mean-line rule matters a great deal, and the plate shop works it into every pattern.
Checking a radial line pattern
Every radial line pattern has a simple check: the length of the arc on the pattern must equal the circumference of the base at the mean diameter. A pattern maker who measures the arc with a flexible rule, or calculates it from the radius and the sector angle, can catch an error in the slant height, the sector angle or the apex before the metal is cut. Kai learned to write the check on the pattern itself: the expected arc length, the measured arc length, and his initials.
Common mistakes
MistakeLaying out a cone or transition with plan lengths instead of true lengths.
InsteadFind the true length of every sloping line by revolution, a true-length diagram or the right triangle.
MistakeAssuming every element line on a drawing is shown at its true length.
InsteadOnly lines parallel to the picture plane show at true length; check each line before using it.
MistakeBuilding true lengths for lines that are already true.
InsteadHorizontal lines are true in the plan; lines parallel to the elevation are true in the elevation.
MistakeLocating the apex by drawing alone on a gentle taper.
InsteadCalculate the apex too, and trust the calculation when they disagree.
MistakeSkipping the arc-length check.
InsteadMeasure or calculate the pattern arc and compare it with the mean circumference before cutting.
Summary and key terms
- Shapes with parallel element lines develop by parallel lines; shapes whose element lines meet at an apex develop by radial lines; other shapes develop by triangulation.
- A right cone unrolls into a sector whose radius is the slant height and whose arc equals the base circumference.
- Lines are shown at true length only when parallel to the picture plane; most element lines are foreshortened.
- True length can be found by revolution, by a true-length diagram, or as the hypotenuse of plan length and rise.
- Every radial line pattern is drawn from the apex, so the apex must be located accurately.
- The pattern arc must equal the mean circumference of the base, which is the standard check.
- Radial line development
- A method of pattern development for cones and pyramids, drawn with lines radiating from the apex.
- Apex
- The point where all the element lines of a cone or pyramid meet.
- Slant height
- The true length of an element line of a right cone, from apex to base.
- True length
- The actual length of a line, as seen in a view parallel to it.
- Foreshortened
- Appearing shorter than its true length because the line is seen at an angle.
- Revolution
- Finding a true length by swinging a line around an axis until it is parallel to the picture plane.
- True-length diagram
- A right-triangle construction that gives many true lengths from their plan lengths and rises.
- Developable surface
- A surface that can be unrolled flat without stretching or tearing.
Practice problems
Work each problem on paper first, then reveal the answer to check.
A cone is 800 mm across its base and 600 mm high. What is its slant height?
Show answer
The square root of 400 squared plus 600 squared, about 721.1 mm.
A line in a transition has a plan length of 250 mm and a rise of 400 mm. What is its true length?
Show answer
About 471.7 mm.
Which method would you use for a square-to-round transition?
Show answer
Triangulation, because its element lines are neither parallel nor meeting at one apex.
Why does the arc of a cone pattern have to equal the base circumference?
Show answer
Because the arc becomes the base edge when the pattern is rolled up.
Lesson quiz · 5 questions
Score 60% or more to complete this lesson.
Create a free account to save your progress, take quizzes and earn a certificate.