
SMW-210 · Lesson 3 of 12 · 18 min
Frustums and concentric reducers
Cut the top off a right cone with a plane square to its axis and what is left is a frustum: a cone with a flat top. In duct work, a frustum is a concentric reducer, the fitting that joins a large round duct to a smaller one on the same centre line. It is the most common radial line fitting in the trade by far. On architectural work, a frustum is the body of a conical roof stopped at a finial ring, a rain cap, a collar or a flared downspout head. This lesson develops frustums by the apex method, then shows what to do when the apex is too far away to reach, which on gentle reducers is most of the time.
The frustum pattern
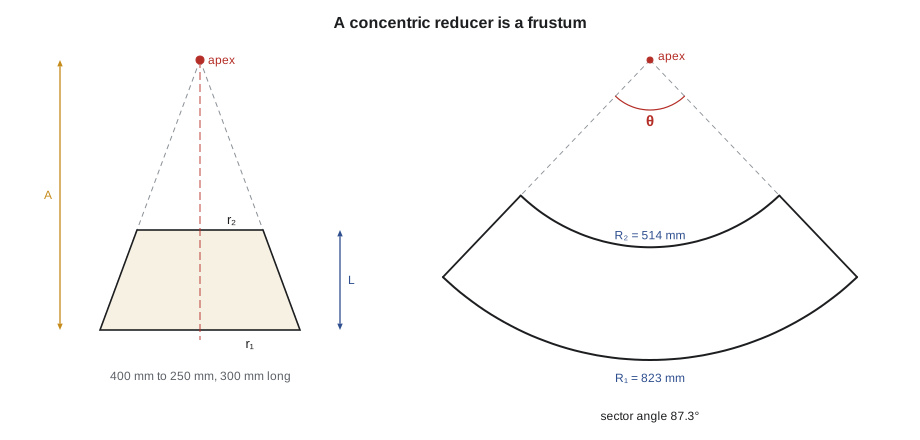
Because a frustum is part of a cone, its pattern is part of a cone's pattern. The full cone develops into a sector of radius s. The small cone cut off the top, which is also a right cone with the same apex, develops into a smaller sector of the same angle with radius s₂. Remove the small sector from the large one, and what is left is the frustum's pattern: a band between two concentric arcs, cut off by two radial lines. Every frustum pattern has this shape, sometimes called a fan or a curved band.
To draw it, all that is needed is the two pattern radii and the sector angle. The large radius R₁ is the slant height from the apex to the large end. The small radius R₂ is the slant height from the apex to the small end. The sector angle is the same as for the full cone, 360 times the large mean radius over R₁. Because the two ends are similar circles on the same cone, R₂ is R₁ scaled by the ratio of the small radius to the large.
Here L is the length of the reducer along its axis, r₁ and r₂ are the mean radii of the large and small ends, and A is the height of the apex above the large end, found by similar triangles: the radius shrinks by r₁ minus r₂ over the length L, so it reaches zero at A.
The Ashgrove reducers
In the Ashgrove mechanical room, the new air handler's supply ran out in a 400 mm round main that dropped to 250 mm branches for the classrooms on the second floor. Lin's drawings called for concentric reducers 300 mm long, in 0.70 mm galvanized steel, specified to their outside diameters. Kai's job was to develop the pattern, check it, and cut a set of six.
He drew the elevation first, full size on a sheet of scrap: the large end, the small end, the length between them, and the two sloping sides. He extended the sloping sides upward until they met at the apex, then measured from the apex to each end along a side to find the two pattern radii. Then, as Aggie insisted, he calculated them as well. The script below is the calculation, with the mean diameters taken from the outside diameters less one thickness.
# Concentric reducer (frustum of a cone) by the apex method
import math
d_large, d_small, length, t = 400, 250, 300, 0.70   # mm   # outside diameters, length, thickness
r1, r2 = (d_large - t) / 2, (d_small - t) / 2    # mean radii
apex = length * r1 / (r1 - r2)                   # apex height above the large end
R1 = math.hypot(r1, apex)                        # pattern radius, large end
R2 = R1 * r2 / r1                                # pattern radius, small end
theta = 360 * r1 / R1
print(f"apex {apex:.1f} mm above the large end")
print(f"pattern radii {R1:.1f} and {R2:.1f} mm, slant length {R1 - R2:.1f} mm")
print(f"sector angle {theta:.2f} degrees")
print(f"check: large arc {math.radians(theta) * R1:.1f} = pi x mean dia {math.pi * 2 * r1:.1f} mm")apex 798.6 mm above the large end pattern radii 823.2 and 513.9 mm, slant length 309.2 mm sector angle 87.31 degrees check: large arc 1254.4 = pi x mean dia 1254.4 mm
The apex was about 800 mm above the large end, which was easy to reach on the bench, and the drawn radii agreed with the calculated ones within a millimetre. Kai swung the two arcs, 823 mm and 514 mm, from a centre punched into a scrap block, stepped off the large arc by calculating its length, and drew the two radial edges. Then he added the allowances: a Pittsburgh lock or a grooved seam along one radial edge and its mate along the other, following SMW-130, and at each end the allowance for the end joint, a crimp on the small end and a bead and slip on the large.
Allowances on a frustum are added in a particular way. Seam allowances along the radial edges are drawn parallel to those edges. End allowances are added as arcs concentric with the pattern arcs, swung from the same apex with the radius increased or reduced by the allowance. An end allowance drawn as a straight line across the end of the band, a common beginner's error, makes the end of the reducer uneven.
When the apex is out of reach
On a steep reducer the apex is close and the method above is quick. As a reducer gets gentler, the sides become closer to parallel and the apex moves away fast. A reducer that drops only a little in diameter over its length, such as a 600 to 550 reducer, has its apex far off the bench, and swinging an arc from it is impractical.
There are three ways to deal with a remote apex, and Aggie made Kai try all of them on a set of gentle gym reducers.
- Use a long trammel, tape or rigid strip, with the centre on the floor or on a second bench lined up with the first. This works up to a few metres if the shop has room, but accuracy falls off with every metre.
- Plot the arcs by points: calculate the chord of each arc and the offset from the chord to the arc at several stations, mark the points on the sheet, and join them with a flexible batten. This is the calculated method, and it needs no centre at all.
- Develop the reducer by triangulation, treating it as a transition between two circles, as Lesson 9 does for eccentric reducers. This always works but takes more steps.
The calculated method is the one Aggie preferred, because it is accurate, quick with a calculator, and checks itself. For each arc, the chord is twice the radius times the sine of half the sector angle, and the rise from the middle of the chord to the arc is the radius times one minus the cosine of half the angle. At any distance x from the middle of the chord, the offset to the arc is the square root of R squared minus x squared, less R times the cosine of half the angle.
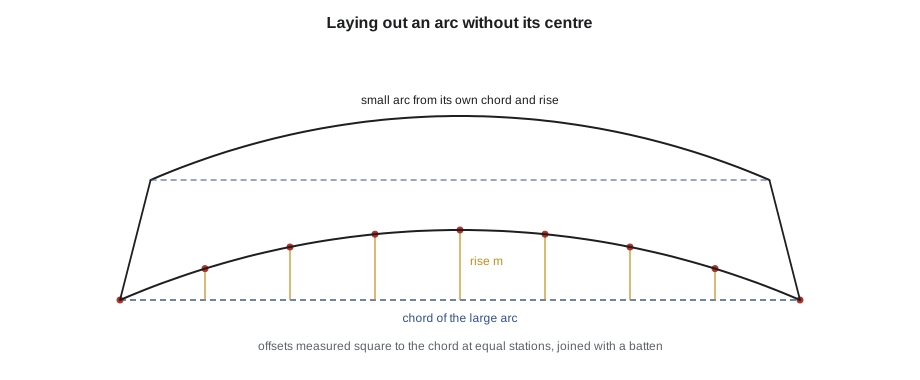
A gentle reducer of this kind is often made in two halves, with two seams, because the full band is too long for the sheet. The script works out the half pattern of a 600 to 550 reducer 150 mm long, with mean diameters for simplicity: the radii, the chord and middle rise of each arc, and the offsets at quarter points along the large arc.
# Calculated layout when the apex is out of reach: a reducer made in two halves
import math
d_large, d_small, length = 600, 550, 150   # mean diameters and length, mm
r1, r2 = d_large / 2, d_small / 2
apex = length * r1 / (r1 - r2)
R1 = math.hypot(r1, apex); R2 = R1 * r2 / r1
half = math.radians(360 * r1 / R1) / 2          # angle of one half pattern
print(f"apex {apex:.1f} mm away: pattern radii {R1:.1f} and {R2:.1f} mm")
for name, R in (("large edge", R1), ("small edge", R2)):
    chord = 2 * R * math.sin(half / 2)
    rise = R * (1 - math.cos(half / 2))
    print(f"{name}: chord {chord:.1f} mm, rise at the middle {rise:.1f} mm")
R = R1
chord = 2 * R * math.sin(half / 2)
print("offsets from the large-edge chord:")
for k in range(0, 5):
    x = chord / 2 * k / 4                     # distance from the middle of the chord
    y = math.sqrt(R * R - x * x) - R * math.cos(half / 2)
print(f" {x:>7.1f} mm from the middle: {y:.1f} mm")apex 1800.0 mm away: pattern radii 1824.8 and 1672.8 mm
large edge: chord 932.0 mm, rise at the middle 60.5 mm
small edge: chord 854.4 mm, rise at the middle 55.5 mm
offsets from the large-edge chord:
0.0 mm from the middle: 60.5 mm
116.5 mm from the middle: 56.8 mm
233.0 mm from the middle: 45.6 mm
349.5 mm from the middle: 26.7 mm
466.0 mm from the middle: 0.0 mmThe apex of that reducer is 1.8 m away, and the pattern radii are over 1.6 m. With the chord and offsets, though, Kai could lay out each half on a sheet with a tape, a square and a batten, and the half pattern fit within a 1,220 mm sheet with room for the allowances.
Checking a reducer pattern
A reducer pattern has three checks, and Kai wrote them on every pattern he made.
- The large arc equals the mean circumference of the large end, and the small arc equals the mean circumference of the small end.
- The straight distance between the arcs, measured along a radial edge, equals the slant length of the reducer: the square root of the length squared plus the difference in radii squared.
- The two radial edges, when brought together, are the same length and meet without twist.
The second check is the easiest to do and catches the most common error, an apex located in the wrong place. On the Ashgrove reducers, the slant length was the square root of 300 squared plus the radius difference squared, which the script's output confirmed. Measured along the edge of Kai's pattern, it was right on.
Forming reducers
Reducers are rolled on the slip roll with the rolls set out of parallel, as for a cone in Lesson 2, or formed on a cone roller. A reducer with a small difference in diameter rolls almost like a pipe and is not difficult. One with a large difference, such as the Ashgrove 400 to 250, needs care to stop the sheet walking sideways, and some shops brake-form steep reducers in narrow facets, called break lines or bump forming, and then round them by hand. Many shops buy standard reducers from a fitting manufacturer and make only the odd sizes; Keelson made its own for the Ashgrove job because the branches had been specified to a size the supplier did not stock.
Spiral duct systems use pressed or welded reducers made on dedicated machines, with standard lengths and angles. Field changes to a spiral system are often made with a site-made reducer, which must match the spiral duct's outside diameter and connect with the same slip couplings as the rest of the system.
Reducer angle and air flow
The length of a reducer is not arbitrary. Air slowing down as it passes from a small duct into a large one, in an expanding fitting, separates from the walls if the walls flare too quickly, which wastes pressure and makes noise. Air speeding up in a contracting fitting is far more forgiving. Duct design guides recommend a gentle included angle for expanding fittings, often in the range of 15 to 30 degrees total, and allow much steeper contractions. A reducer drawn steeper than the design called for, to save metal or fit a tight space, can measurably raise the fan's pressure, and the balancer may later find a starved branch. That is why Lin's drawings gave the reducer lengths and Kai did not shorten them.
The included angle is twice the angle of one side to the axis, and the side's angle is the arc tangent of the radius difference over the length. For the Ashgrove 400 to 250 over 300, the side angle is about 14 degrees and the included angle about 28 degrees, at the steep end of the common range but acceptable for a reducer in which the air speeds up.
Common mistakes
MistakeSwinging the end allowance as a straight line across the band.
InsteadSwing end allowances as arcs from the same apex, concentric with the pattern arcs.
MistakeUsing outside diameters for the pattern arcs.
InsteadUse mean diameters, the outside diameter less one thickness.
MistakeTrying to swing a very long radius with a string.
InsteadUse the calculated method: chords and offsets, joined with a batten.
MistakeShortening a reducer to fit a tight space without asking.
InsteadCheck with the detailer; a steeper fitting can starve a branch and add noise.
MistakeLocating the apex by drawing only.
InsteadCalculate the apex height and pattern radii, and check the slant length on the pattern.
Summary and key terms
- A frustum, or concentric reducer, develops into a curved band between two concentric arcs from the cone's apex.
- The apex height is L times r1 over r1 minus r2; the pattern radii follow from it, and the sector angle is 360 times r1 over R1.
- Seam allowances run parallel to the radial edges; end allowances are concentric arcs.
- When the apex is too far away, lay out each arc by its chord and offsets, or triangulate.
- Check that each arc equals its mean circumference and that the edge length equals the slant length.
- Reducer angle affects air flow; expanding fittings need gentle angles, so keep the specified length.
- Frustum
- The part of a cone between its base and a plane cut parallel to the base.
- Concentric reducer
- A fitting joining two round ducts of different size on the same centre line.
- Pattern radius
- The distance from the apex to an end of the fitting, measured along an element line.
- Calculated method
- Laying out an arc from its chord and offsets instead of from its centre.
- Slant length
- The length of a reducer measured along its side, from one end to the other.
- Included angle
- The total angle between the two sides of a reducer, twice the side angle.
- Bump forming
- Bending a curved shape on a brake in many small facets, then rounding it by hand.
Practice problems
Work each problem on paper first, then reveal the answer to check.
A reducer is 500 mm to 300 mm mean diameter and 400 mm long. Where is its apex?
Show answer
A = 400 times 250 over 100 = 1,000 mm above the large end.
For that reducer, what is the large pattern radius?
Show answer
The square root of 250 squared plus 1,000 squared, about 1,031 mm.
What is its sector angle?
Show answer
360 times 250 over 1,031, about 87.3 degrees.
What is its slant length?
Show answer
The square root of 400 squared plus 100 squared, about 412 mm.
Lesson quiz · 5 questions
Score 60% or more to complete this lesson.
Create a free account to save your progress, take quizzes and earn a certificate.