
SMW-210 · Lesson 4 of 12 · 18 min
Oblique and truncated cones
So far every cone in this course has been cut square to its axis, so every element line has had the same length and every pattern edge has been a clean arc. Real fittings are not so tidy. A cone that passes through a sloping roof is cut by the roof plane. A cone that meets a pipe at an angle is cut by the curved surface of the pipe. And a cone whose apex is not over the centre of its base, an oblique cone, has element lines of different lengths from the start. This lesson develops all three, still by radial lines, because in each case the element lines still meet at one apex. The new skill is finding the true length of each element line separately and laying each one off along its own radius.
The sacristy flue collar
Behind St. Brendan's, a new high-efficiency boiler in the sacristy needed a flue through the sloped copper roof, which pitched at 8 in 12. The conservation architect wanted the flue hidden inside a copper storm collar shaped as a cone, wide at the roof and narrow where it met the flue, so that rain running down the flue would be shed onto the roof. The collar was part of a full cone 300 mm across its base and 600 mm high, with the roof plane cutting it at 450 mm below the apex measured down the axis.
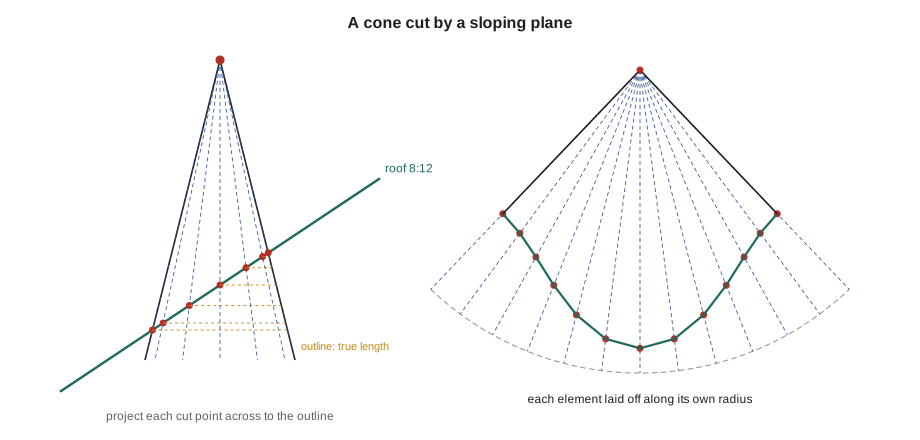
Because the roof slopes, the cut is not square to the cone's axis. On the uphill side of the flue the roof is higher, so the element lines there are shorter; on the downhill side they are longer. The pattern is still a sector drawn from the apex, but its outer edge is not an arc. It is a curve, each point of which lies at the true length of one element line from the centre.
Developing a cone cut by a plane
The method follows directly from Lesson 2.
- Draw the elevation of the full cone with the roof line cutting across it at its true slope, so that the elevation is square to the roof's slope.
- Draw a half plan of the cone's base and divide it into equal spaces, numbered from the uphill side. Project each division up into the elevation as an element line running from the base to the apex.
- Mark where each element line crosses the roof line. These crossing points are the ends of the element lines on the finished collar.
- Find the true length of each element line, from the apex to its crossing point. The two outline elements are already true. For the others, project each crossing point horizontally across to an outline element of the cone; the distance from the apex along the outline to that point is the true length, because every point at the same height on a right cone is the same slant distance from the apex.
- Draw the full cone's pattern sector, divide its arc into the same number of spaces, and draw radial lines to each division. Along each radial line, measure the true length of the matching element from the apex. Join the points with a smooth curve.
The fourth step is the heart of it. Projecting horizontally to the outline is a quick form of revolution: swinging an element around the axis to the outline position keeps its height, and the outline shows it at its true length. On the drawing board, it turns twelve revolutions into twelve straight lines with a square.
The collar by numbers
The cut edge can also be calculated. For a right cone with half-angle β, the angle between an element line and the axis, and a cutting plane sloped at α, the distance from the apex to the cut along the element at angle φ around the cone is the distance down the axis divided by a simple combination of the two angles. The script prints that distance for each of 12 element lines, and the angle at which each lies on the pattern, which is φ times the sine of β.
# A cone cut by a sloping plane: true length of each element from the apex
import math
r, height = 150, 600    # mm               # base radius and height of the full cone
h_axis = 450   # mm                  # apex to the cutting plane, measured down the axis
slope = math.degrees(math.atan(8 / 12))   # roof slope of the cutting plane
slant = math.hypot(r, height)
sb, cb = r / slant, height / slant          # sine and cosine of the half-angle
spaces = 12
print(f"half-angle {math.degrees(math.asin(sb)):.1f} deg, cutting plane at {slope:.1f} deg")
for k in range(spaces + 1):
    phi = 2 * math.pi * k / spaces          # 0 = uphill side of the roof
    t = h_axis / (cb + sb * math.cos(phi) * math.tan(math.radians(slope)))
print(f"element {k:>2}: {t:.1f} mm from the apex, at {math.degrees(phi * sb):.1f} deg on the pattern")half-angle 14.0 deg, cutting plane at 33.7 deg element 0: 397.6 mm from the apex, at 0.0 deg on the pattern element 1: 405.3 mm from the apex, at 7.3 deg on the pattern element 2: 428.2 mm from the apex, at 14.6 deg on the pattern element 3: 463.8 mm from the apex, at 21.8 deg on the pattern element 4: 506.0 mm from the apex, at 29.1 deg on the pattern element 5: 542.1 mm from the apex, at 36.4 deg on the pattern element 6: 556.6 mm from the apex, at 43.7 deg on the pattern element 7: 542.1 mm from the apex, at 50.9 deg on the pattern element 8: 506.0 mm from the apex, at 58.2 deg on the pattern element 9: 463.8 mm from the apex, at 65.5 deg on the pattern element 10: 428.2 mm from the apex, at 72.8 deg on the pattern element 11: 405.3 mm from the apex, at 80.0 deg on the pattern element 12: 397.6 mm from the apex, at 87.3 deg on the pattern
The element lines run from about 398 mm on the uphill side to about 557 mm on the downhill side, and the whole pattern sector spans about 87 degrees, the same as for the full cone. The collar's top, where it meets the flue, is cut square to the axis and so is a plain arc from the apex, swung at the slant height where the flue diameter fits. Kai laid out the bottom curve from the 13 true lengths, swung the top arc, and added the allowances: a hem along the bottom curve to lock onto the roof flashing and a groove seam along the radial edges.
Where the seam goes matters here as it did for cut pipe in SMW-120. Aggie put the seam on the downhill side, the longest element, where it would be hidden from the street and where water running down the collar would cross the seam the shortest distance. On a collar where appearance did not matter, she would have put it on the uphill side, the shortest element, to save metal.
Oblique cones
An oblique cone has its apex off to one side of the centre of its base. It still has a single apex and straight element lines meeting there, so it still develops by radial lines, but its element lines are all different lengths, even before it is cut. An oblique cone is the shape of a fitting that tapers and offsets at the same time, such as a reducer with one side vertical or a hood that narrows toward a flue set off to one side. It is also the basis of Lesson 9's eccentric reducers when their apex can be reached.
To develop an oblique cone:
- Draw the plan and elevation, with the apex located in both views. Divide the base circle in the plan into equal spaces and draw plan lines from the apex's plan position to each division.
- Find the true length of each element line. Its plan length is measured in the plan, and its rise is the full height of the apex above the base. Build a true-length diagram with one vertical line equal to the apex height and each plan length laid along the base from its foot, or calculate each one with the right triangle.
- Draw the pattern by triangles. Start with the shortest or longest element as a straight line from the apex. From its base end, swing an arc with radius equal to one base space, the chord of the base division. From the apex, swing an arc with radius equal to the next element's true length. Where the arcs cross is the next point on the base edge. Repeat around the cone.
That third step is the first real triangulation in this course: each new point is found from two known points by two distances. Every element line and every base chord forms a narrow triangle with its neighbour, and the pattern is built triangle by triangle. Lesson 5 develops the method in general. The base edge of an oblique cone's pattern is not an arc, because the elements are different lengths, and its shape is a smooth curve through the triangulated points.
A cone meeting a pipe
When a cone meets a cylinder, for example a conical branch joining a round main or a tapered hopper ending in a round spout set at an angle, the line where they meet is a space curve, not a plane cut. It cannot be read straight off the elevation as the roof line could. It has to be found first, and then the cone can be developed to it.
The usual way is the cutting plane method. Imagine a series of horizontal planes cutting through both shapes. Each plane cuts the cone in a circle, which shows in the plan as a circle of known radius, and cuts the pipe in a pair of straight lines or an ellipse, depending on the pipe's direction. Where the cone's circle and the pipe's section cross in the plan are points on the line of intersection. Project those points back into the elevation at the plane's height, and enough planes give enough points to draw the intersection curve. A second set of planes through the apex, each containing one element line of the cone, gives the same points along the element lines, which is usually more convenient because each point then sits on an element whose pattern line is known.
Once the line of intersection is drawn in the elevation, the cone develops exactly as the sacristy collar did: project each element's end at the intersection across to the outline, read its true length, and lay it off along its radius on the pattern. The pipe's hole is developed separately, by parallel lines as in SMW-120, from the same intersection points.
For most duct work, a branch taking off a round main is a tee or a lateral and is made from pipe, not a cone. Cone-on-pipe intersections turn up in conical tees and boot tees, in dust collection hoods and hoppers, and in architectural work such as a copper cone meeting a round roof turret. Kai's only exercise was a classroom one, a small cone meeting a pipe at right angles, but he learned that the method works for any angle.
Accuracy in cut cones
Two habits made Kai's cut cones fit. First, he drew the elevation square to the cutting plane wherever possible, so that the cut appeared as a true straight line; a roof drawn in a view where its slope was foreshortened would give wrong heights everywhere. Second, he used more divisions where the cut changed fastest. On the sacristy collar, the element lengths changed slowly near the uphill and downhill sides and quickly at the sides, so 12 divisions were enough, but on a steeper roof or a flatter cone he would have used 16 or 24.
A cut cone also has a check. Rolled up, the cut edge must lie flat on the cutting plane, which for the collar meant sitting on a board set at the roof pitch without rocking. Kai's trial collar in galvanized scrap rocked on the board at first, by about 3 mm (1/8 in) at one side, because he had joined the points with a curve that cut a corner between two of them. He redrew the curve with a batten through every point, and the second trial sat flat.
Common mistakes
MistakeMeasuring cut element lengths from a foreshortened elevation.
InsteadProject each cut point across to the outline element, which is at true length, or calculate it.
MistakeDrawing the roof cut in a view that does not show its true slope.
InsteadDraw the elevation square to the cutting plane so the cut is a true line.
MistakeTreating an oblique cone like a right cone with one radius.
InsteadFind each element's true length separately and build the pattern by triangles.
MistakeTrying to read a cone-and-pipe intersection straight off the elevation.
InsteadFind the intersection first with cutting planes, then develop the cone to it.
MistakeJoining pattern points with straight segments or a careless curve.
InsteadUse a batten through every point, and check the rolled edge on the cutting plane.
Summary and key terms
- A cone cut by a sloping plane develops as a sector whose outer edge is a curve through each element's true length.
- Each cut element's true length is found by projecting its cut point across to the outline element.
- An oblique cone has its apex off centre; every element has its own true length, found from a true-length diagram.
- An oblique cone's pattern is built by triangles from the apex: each new base point is found from two distances.
- A cone meeting a pipe needs its line of intersection found first, usually by cutting planes.
- Cut cones are checked by setting the rolled edge on the cutting plane; it must sit flat.
- Truncated cone
- A cone with its top or bottom cut off, square or at an angle.
- Oblique cone
- A cone whose apex is not directly above the centre of its base.
- Cutting plane
- An imaginary plane used to find points where two surfaces meet.
- Line of intersection
- The curve where two surfaces meet, such as a cone and a pipe.
- Half-angle
- The angle between an element line of a right cone and its axis.
- Storm collar
- A collar around a flue or pipe that sheds water over the roof flashing.
Practice problems
Work each problem on paper first, then reveal the answer to check.
A right cone has a slant height of 500 mm. A cut point lies at the same height as a point 380 mm from the apex along the outline. What is that element's true length?
Show answer
380 mm; points at the same height are the same slant distance from the apex.
Why are the sacristy collar's element lines longer on the downhill side?
Show answer
The roof is lower there, so the elements run farther from the apex before reaching it.
An oblique cone's apex is 400 mm high and an element's plan length is 300 mm. What is its true length?
Show answer
500 mm.
What is the cutting plane method used for?
Show answer
Finding the line of intersection between two surfaces, such as a cone and a pipe.
Lesson quiz · 5 questions
Score 60% or more to complete this lesson.
Create a free account to save your progress, take quizzes and earn a certificate.