
SMW-130 · Lesson 6 of 12 · 18 min
Architectural seams: flat lock, standing and batten seams
Duct keeps air in. A roof keeps weather out, for fifty or a hundred years, while the sun heats it, the winter freezes it and the wind tries to peel it off. The seams used on metal roofs, wall panels, gutters and flashings are built for that life. They are designed less around strength in the duct sense and more around three things: shedding water, allowing the metal to move, and holding the panels down without making holes through them. This lesson covers the three main families of architectural seam, the cleats that fasten them, and how they are laid out and formed, using Keelson's work on St. Brendan's Church as the example. SMW-320 covers roofing systems in full; this lesson is about the joints.
The problem: water and movement
Every metal roof expands and contracts with temperature. SMW-110 showed that a copper panel moves about 0.017 mm per metre per degree Celsius (about 0.0000094 in per inch per degree Fahrenheit), and on a dark roof in sun the metal can range over 80 °C (140 °F) or more between a winter night and a summer afternoon. A roof panel 6 m (20 ft) long can grow and shrink by several millimetres every day. If the panels are nailed or screwed through the face, every cycle works the fastener holes larger until they leak, and the metal itself can fatigue and crack. Architectural seams solve this by joining panels to each other with folded seams and holding them to the roof with cleats hidden in the seams, which let the panels slide.
Water is the other problem. A seam on a steep roof sheds water by gravity; the water runs past it without ever standing on it. A seam on a low-slope roof, or a flat gutter, may sit under standing water or under snow and ice melting and refreezing. Seams for low slopes must therefore be watertight, not just water-shedding, which on copper and other solderable metals means soldering them. The slope decides which seam can be used.
The flat lock seam
The flat lock seam joins two panels with hooks folded on their edges, hooked together and flattened down onto the roof surface. Each panel edge is folded back on itself by the lock width, one up and one down, and the panels are hooked and flattened with a mallet. The result is a low, flat seam that lies in the plane of the roof. Cleats, short strips of the same metal, are hooked into the seam as it is formed and nailed to the roof deck, holding the panels down while allowing them to slide in the seam.
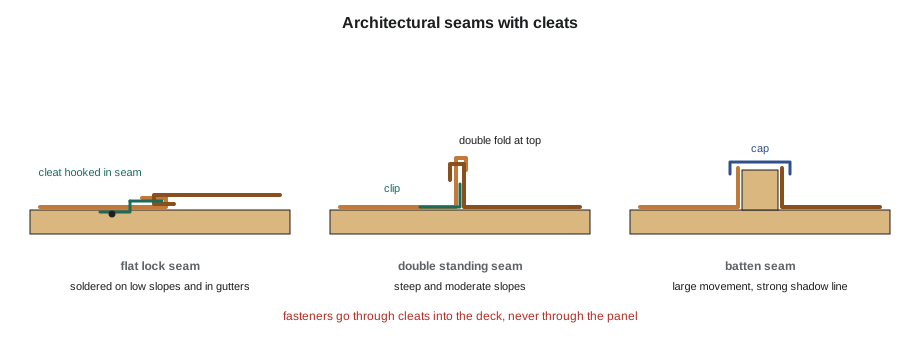
On a steep roof, flat lock seams shed water and can be left unsoldered. On low slopes, in gutters, on built-in gutters and on flat roofs, flat lock seams are soldered, which makes them watertight. St. Brendan's had low-slope copper roofs over the side aisles, laid in small flat-lock panels, and those were the seams that had failed at the 1980s repairs. The SMACNA test study of soldered copper flat lock seams that Aggie showed Kai found that the solder had to be sweated through all three legs of the lock for the seam to reach the long service life expected of copper; seams soldered only at the visible edge failed far sooner. Lesson 8 covers how that is done.
Flat lock panels are usually small, often around 450 by 600 mm (18 by 24 in) for copper, because small panels have small movement and lie flat. The panels are laid like shingles, each course lapping the one below, with the seams staggered so that four corners never meet at one point. The width of the lock varies by metal and by source; widths of 12 to 20 mm (1/2 to 3/4 in) are common for copper, and the specification for the job sets the width to use.
The standing seam
The standing seam joins two panels with their edges turned up at right angles to the roof and folded together into an upright fin. A single standing seam is folded once; a double standing seam is folded twice, which makes it tighter and stronger. The seam stands above the water running down the roof between seams, so it is well suited to steep and moderate slopes, and with a double lock it can be used on fairly low slopes without soldering. Standing seams run up the slope, from eave to ridge, and the panels between them can be long, because the seam and the cleats allow movement along the length.
Traditional standing seams are formed by hand. One panel edge is turned up to a set height, the mating edge turned up a little higher, and the taller edge folded over the shorter, then the pair folded again for a double seam. The tools are hand seamers, tongs and, for long runs, hand-operated or electric seaming machines that walk along the seam closing it. Modern roll-formed standing seam panels are formed on a roll former, often on site, and their seams are closed with a power seamer. Some snap-together profiles need no seaming at all.
Cleats or clips for standing seams are hooked into the seam as it is closed. Fixed clips hold the panel at one point, usually near the ridge or the middle of the run, so the panel cannot slide down the roof. Sliding or expansion clips along the rest of the length let the panel move. On St. Brendan's steep nave roof, the old copper standing seams were in good condition; Keelson's work there was mostly at flashings, valleys and the low-slope aisles.
The batten seam
The batten seam, or batten roll, places a wood or metal batten between the panels. Each panel edge is turned up the side of the batten, and a cap is folded over the top and locked to the panel edges. The batten seam is the traditional seam on many older copper and lead roofs, including the apse roof at St. Brendan's. It handles large movement well because the panel edges can slide against the batten, and its rounded or square ribs give a strong shadow line that architects like. It takes more material and more labour than a standing seam.
When Kai and Aggie took a section of the apse roof apart to see why one cap had lifted, they found the cleats inside had corroded where someone had used galvanized steel instead of copper. The steel had corroded in contact with the copper, as SMW-110 warned, the cleat had failed, and the wind had lifted the cap. Every new cleat on the church was copper, nailed with copper nails.
Cleats and clips
Cleats are the fasteners of architectural sheet metal. They are short strips, usually of the same metal as the panels or a compatible one, folded at one end to hook into the seam and nailed or screwed at the other end to the deck. The fastener goes through the cleat, never through the panel. Cleats hold panels down against wind uplift; they must be numerous enough, and strong enough, for the wind on that part of the roof, which is highest at the edges and corners.
The spacing of cleats is set by the architectural standard, the panel manufacturer or the specification, and is closer at eaves, rakes, ridges and corners. The script below lays out cleats along a seam using a field spacing and a closer spacing for a zone at each end. The spacings in it are illustrative values for teaching, not values from any standard or specification.
# Lay out cleats along a seam: closer spacing in the end zones, wider in the field (illustrative values)
import math
length = 6000       # seam length, mm
end_zone = 900      # length of each end zone, mm
s_end, s_field = 200, 300  # cleat spacing in the end zones and in the field, mm
field = length - 2 * end_zone
n_end = math.ceil(end_zone / s_end)
n_field = max(0, math.ceil(field / s_field) - 1)
total = 2 * n_end + n_field + 1
print(f"end zones: {n_end} cleats each at about {end_zone / n_end:.0f} mm")
print(f"field: {n_field} cleats at about {field / (n_field + 1):.0f} mm")
print(f"cleats on this seam: {total}")end zones: 5 cleats each at about 180 mm field: 13 cleats at about 300 mm cleats on this seam: 24
Expansion clips and fixed clips on long standing seam panels follow the same idea: one fixed point per panel, chosen so the panel moves equally either way from it, and sliding clips everywhere else. A panel with two fixed points, one at each end, has nowhere to go when it expands, and buckles or tears its clips.
Laying out architectural seams
Architectural seams take allowances like duct seams, but more of them, because both edges of each panel are folded and the seam height or lock width is visible and must be consistent. A standing seam panel needs an allowance on each edge for the turned-up flange, with the overlapping edge a little taller. A flat lock panel needs a lock allowance on all four edges, two folded up and two folded down. The panel's finished coverage, the width it covers on the roof, is the cut width minus the allowances on both edges.
Kai's task for the aisle roof was to cut flat lock panels from 16 oz copper to cover a set width at a set coverage. The calculation the script makes is the one he did on paper first: the finished panel size plus a lock allowance on each edge, how many panels fit across a standard sheet, and how much copper the job needs. Locks of 16 mm (5/8 in) are used here as the example.
# Flat lock panels: cut size from finished size plus lock allowances, and panels per sheet
import math
finished = (450, 600)        # finished (exposed) panel size, width x length, mm
lock = 16           # lock allowance on each edge, mm
sheet = (914, 2438)         # copper sheet size, mm
cut_w = finished[0] + 2 * lock
cut_l = finished[1] + 2 * lock
across = sheet[0] // cut_w
along = sheet[1] // cut_l
print(f"cut size {cut_w} x {cut_l} mm")
print(f"panels per sheet: {int(across)} x {int(along)} = {int(across * along)}")
area = 42           # roof area to cover, m²
panels = math.ceil(area / (finished[0] * finished[1] * 1e-6))
print(f"panels for {area} m²: about {panels}, sheets: {math.ceil(panels / (across * along))}")cut size 482 x 632 mm panels per sheet: 1 x 3 = 3 panels for 42 m²: about 156, sheets: 52
The real count includes waste for cutting around penetrations and at edges, and Aggie added ten percent before ordering. She also had Kai make a full-size paper template of one panel with its locks drawn on, checked it against the seam spacing on the roof, and only then started cutting copper.
Forming architectural seams well
- Fold with a slight radius, not a crushed fold, especially on copper and coated metals, so the metal and the coating do not crack.
- Keep lock widths consistent. A wandering lock makes a wavy seam that holds water and looks poor.
- Hook cleats fully into the seam before closing it; a cleat caught only at the edge pulls out.
- Stagger flat lock seams so four corners never meet at one point.
- On steep roofs, form standing seams from the eave up; on low slopes, lay flat lock panels from the low edge up, lapping like shingles.
- Keep the panels clean of filings and steel chips, which rust and stain copper and zinc.
Weather affects forming. Copper and zinc both become harder to fold in cold weather, and zinc in particular should not be folded tightly below about 7 °C (45 °F) without warming, because it can crack. Painted metals are also more brittle in the cold. On the church job the crew left the tightest folds for the warm part of the day.
Common mistakes
MistakeNailing or screwing through the face of a roof panel.
InsteadFasten through cleats hooked into the seams, so the panel can slide.
MistakeUsing galvanized steel cleats on a copper roof.
InsteadUse copper or compatible cleats and fasteners to avoid galvanic corrosion.
MistakeLeaving flat lock seams unsoldered on a low slope.
InsteadSolder flat lock seams on low slopes and in gutters, sweating solder through all three legs.
MistakeFixing a long panel at both ends.
InsteadFix each panel at one point and use sliding clips elsewhere.
MistakeFolding zinc or copper tightly in the cold.
InsteadWarm the metal or wait for warmer conditions before tight folds.
Summary and key terms
- Architectural seams shed water, allow thermal movement and hold panels with hidden cleats.
- Flat lock seams lie flat; they shed water on steep slopes and must be soldered on low slopes and in gutters.
- Standing seams stand up as a fin and suit steep and moderate slopes; double standing seams are tighter than single.
- Batten seams use a batten between panels with a folded cap and handle large movement.
- Cleats are fastened to the deck, never through the panel, closer at edges, eaves and corners.
- Each long panel has one fixed point; the rest of its clips must let it slide.
- Flat lock seam
- A seam of hooked edges flattened onto the roof plane, soldered on low slopes.
- Standing seam
- A seam formed by turning panel edges up and folding them together into an upright fin.
- Batten seam
- A seam with a batten between panels, the edges turned up its sides and a cap locked over the top.
- Cleat
- A short metal strip hooked into a seam and fastened to the deck, holding the panel down.
- Expansion clip
- A clip that holds a panel down while letting it slide along its length.
- Coverage
- The finished width a panel covers once its edges are folded into seams.
Practice problems
Work each problem on paper first, then reveal the answer to check.
Why are cleats used instead of nails through the panel?
Show answer
Nails through the face work loose and leak as the panel moves; cleats hold the panel while letting it slide.
Which seam is used on a low-slope copper roof, and how is it made watertight?
Show answer
A flat lock seam, soldered with solder sweated through all three legs.
Where should cleats be closest together?
Show answer
At eaves, rakes, ridges and corners, where wind uplift is highest.
What is the cut width of a flat lock panel 450 mm (18 in) finished with 16 mm (5/8 in) locks?
Show answer
482 mm (19 1/4 in): the finished width plus a lock on each edge.
Lesson quiz · 5 questions
Score 60% or more to complete this lesson.
Create a free account to save your progress, take quizzes and earn a certificate.