
SMW-130 · Lesson 11 of 12 · 17 min
Sealing duct joints
Every lesson so far has ended with the same reminder: the joint is not tight until it is sealed. This lesson is about the sealing itself. It covers why duct is sealed, the seal classes that set which joints must be sealed, the sealants, tapes and gaskets used, how to apply them, the idea of a leakage class and how allowable leakage is calculated, and what the energy codes require. SMW-310 covers leakage testing in the field in full; this lesson gives the background every apprentice needs to seal joints well in the shop and on site.
Why duct is sealed
Duct leakage wastes energy twice. Supply air that leaks into a ceiling space has been heated or cooled and moved by the fan, and is lost before it reaches the room. The fan must then move more air to deliver the design flow, using more power. Return and exhaust leakage draws in air that has not been filtered or conditioned, or pulls dust and fibres from ceiling spaces into the system. In systems carrying fumes, grease, dust or contaminated air, leakage spreads the contaminant. Studies of commercial buildings have often found leakage of ten to twenty percent of the fan's flow in poorly sealed systems, and the energy codes now treat sealing as basic good practice rather than an extra.
Leakage also affects the people who balance and commission the system. A test and balance technician cannot get the right air to every room if a large part of it disappears on the way. On Ashgrove, the classrooms at the far end of the long supply run were short of air until the three leaking joints Kai had helped install were fixed.
Seal classes
The duct construction standards sort sealing into seal classes, which say which openings must be sealed. The standard's definitions are the authority; in outline they are:
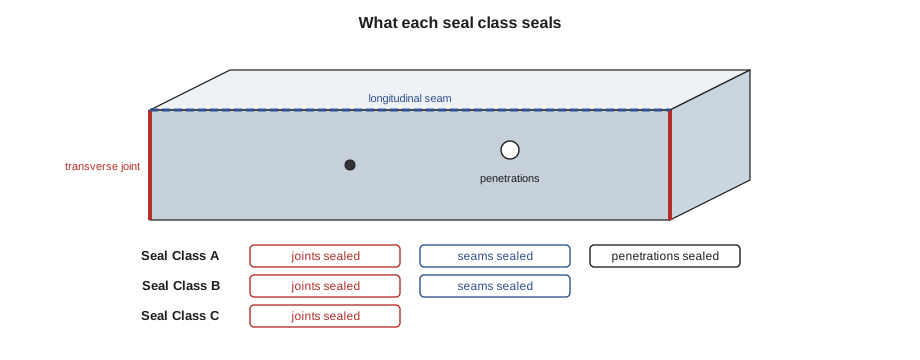
- Seal Class A: all transverse joints, longitudinal seams and duct wall penetrations sealed.
- Seal Class B: all transverse joints and longitudinal seams sealed.
- Seal Class C: transverse joints only sealed.
Penetrations are the holes in the duct wall made for screws, rods, pipes, wires, sensors and fasteners. Seal Class A asks for those to be sealed too. Earlier editions tied the minimum seal class to the duct's pressure class, with the strictest class required only at higher pressures. Recent editions recommend sealing most duct to Seal Class A whatever its pressure class, and many energy codes and project specifications now require it. Ashgrove's specification called for Seal Class A on all supply, return and exhaust duct.
Sealants
Duct sealant, often called mastic, is the main material for sealing metal duct joints. Water-based mastics are now the most common: thick, fibre-reinforced pastes that are brushed, troweled or pumped onto the joint and dry to a tough, flexible film. Solvent-based sealants cure faster and work in colder conditions but give off solvent vapours, and some jurisdictions and specifications limit their volatile organic content. Many sealants are listed to UL 181 for use on duct, have a flame spread and smoke rating suitable for use inside buildings, and state the pressure, temperature range and duct types they are suited to. Aerosol and spray-applied sealants are also used, both for sealing new seams in the shop and for internal sealing of existing duct.
A sealant works only if it bridges the gap, adheres to the metal and stays flexible enough to move with the duct. The metal must be clean, dry and free of oil; mill oil on new coil stock and dust on site are the commonest causes of sealant that peels off. Most mastics need a minimum thickness and a minimum bead width over the joint to work, which the manufacturer states, and a reinforcing fabric tape embedded in the mastic over wide gaps. Many need a curing time before the duct is pressurized or tested. Each of those numbers comes from the product data sheet, and Keelson kept the data sheets for the mastics in use pinned in the shop.
Tapes
Tapes have a mixed reputation in ductwork, earned by the cloth-backed general purpose tape that peels off within a year. Proper duct sealing tapes are a different product. Foil-backed tapes with acrylic or butyl adhesives, and butyl-mastic tapes with a foil facing, are made and listed for duct sealing. The UL 181 standards cover tapes as well as mastics and clamps. UL 181A covers closures for rigid fiberglass duct board, with marks such as 181A-P for pressure-sensitive tape, 181A-H for heat-activated tape and 181A-M for mastic. UL 181B covers closures for flexible duct, marked 181B-FX for tapes, 181B-M for mastic and 181B-C for clamps. A tape marked for one use is not automatically suitable for another.
On metal duct, codes and specifications often limit tape to certain uses or to tapes listed and applied under specific conditions, because tape adhesion to metal depends heavily on surface cleanliness and temperature. The Ashgrove specification allowed foil-butyl tape only as a reinforcement under mastic, never alone on a metal joint. Kai learned to read the specification's sealing section before reaching for the tape.
Gaskets
Gaskets seal joints that are clamped or bolted together: flange joints on rectangular duct, flanged and gasketed round fittings, access doors, and connections to equipment. Gaskets are usually closed-cell foam, butyl or rubber strips, often with an adhesive backing. They must be compatible with the temperature and contents of the duct, the right thickness for the flange system, and continuous around the joint. Lesson 4 described the commonest gasket fault, a gap at the corner of a flange joint, and Lesson 5 the commonest fault on gasketed round fittings, a gasket cut or folded by a burred pipe end.
Applying sealant well
Sealing is the last step of making a joint, and it is the step most often rushed. A few habits make sealant work.
- Seal the joint after it is fully assembled and fastened, so later work does not crack the sealant, unless the method calls for sealant inside the joint before assembly.
- Clean the metal of oil, dust and moisture. On new coil stock, wipe off the mill oil along the joint.
- Apply the sealant to the thickness and width the manufacturer states, covering the whole joint and the ends of every seam.
- Embed reinforcing tape in the mastic where the gap is wider than the mastic alone can bridge.
- Seal every corner of a transverse joint, where seams meet the joint and where cleats and drives overlap. These are the leak points.
- Seal screw heads and other penetrations where Seal Class A applies.
- Let the sealant cure for the stated time before pressurizing or testing the duct.
Kai's mistake at Ashgrove, a gap in the mastic at a corner, was the most common sealing fault there is. Aggie's habit was to finish every joint by running a gloved finger around the corners to make sure the mastic was continuous, then looking along the joint from both ends.
Leakage class and allowable leakage
Sealing reduces leakage but never removes it, so the tightness of a duct system is described by how much it leaks at a given pressure. The duct leakage test manuals express that with a leakage class. Leakage from a duct system rises with pressure, though less than in proportion, and is described well by an equation of the form
where F is the leakage rate per unit of duct surface area, P is the static pressure in the duct and C_L is the leakage class, a number describing how tight the duct is. A lower leakage class means a tighter duct. The leakage class is defined in the inch-pound units of the SMACNA test manual, with F in cubic feet per minute per hundred square feet of duct surface and P in inches of water. Typical design values for well-sealed systems are single figures, with round duct expected to reach a lower class than rectangular duct for the same sealing. The specification sets the class for each system; on Ashgrove, supply duct above the 750 Pa (3 in w.g.) class had to meet a leakage class of 4 under test.
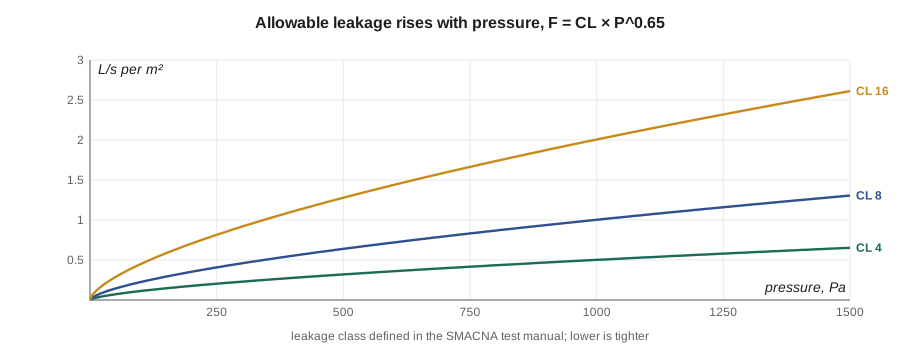
The script below calculates the allowable leakage for a duct section from its surface area, test pressure and leakage class. It works in the manual's inch-pound units and, for the metric version, converts the area and pressure into those units and the result back into litres per second.
# Allowable leakage from the leakage class: F = CL x P^0.65 (cfm per 100 ft2, P in in w.g.)
import math
CL = 4                     # leakage class
w, h, length = 1.2, 0.6, 24.0         # duct size and length, m
p_test = 750                  # test pressure, Pa
area_ft2 = 2 * (w + h) * length * 10.764             # duct surface area converted to ft2
p_inwg = p_test / 249.1                # pressure converted to in w.g.
F = CL * p_inwg ** 0.65       # cfm per 100 ft2
allow_cfm = F * area_ft2 / 100
print(f"surface area {area_ft2:.0f} ft2, test pressure {p_inwg:.2f} in w.g.")
print(f"allowable leakage: {F:.2f} cfm per 100 ft2 -> {allow_cfm:.1f} cfm in total" + f" = {allow_cfm * 0.4719:.1f} L/s")surface area 930 ft2, test pressure 3.01 in w.g. allowable leakage: 8.19 cfm per 100 ft2 -> 76.2 cfm in total = 35.9 L/s
For 24 m of 1,200 by 600 mm duct tested at 750 Pa, leakage class 4 allows about 36 litres per second. The system it belonged to moved several thousand litres per second, so the allowance was well under one percent of the flow. Most of the leakage on a real system comes from a handful of bad joints, which is why careful sealing of every corner matters so much.
The exponent 0.65 means leakage rises more slowly than pressure. Doubling the pressure increases leakage by about 57 percent, not 100 percent. That is also why a duct tested at a pressure lower than its operating pressure must have its result adjusted before it is compared with the allowance, a step covered in SMW-310.
What the energy codes require
The National Energy Code of Canada for Buildings, adopted in Nova Scotia for larger buildings, sets requirements for sealing duct and calls for leakage testing of higher pressure duct systems, with the allowable leakage expressed in the terms of the SMACNA test manual. Provincial codes for houses have their own duct sealing rules. Project specifications usually add the seal class and leakage class for each system.
The details change from code edition to code edition and from one jurisdiction to another, and the specification for the job always states what applies. What does not change is the shop and field practice: seal every joint to the class required, at every corner, with listed products applied as their makers direct, and test where the code or specification calls for it.
Estimating sealant
Sealant is a material like any other and must be ordered. An estimator works from the total length of joints and seams to be sealed, the bead width and thickness, and the coverage the manufacturer states. The script works out the volume and the number of pails for a job from those figures. The bead size is an illustrative value; the real value comes from the product data sheet.
# Sealant quantity from joint length, bead size and waste allowance (illustrative bead size)
joint_length = 1800     # total length of joints and seams to seal, m
bead_w, bead_t = 0.05, 0.001     # m # bead width and wet thickness, m
waste = 0.15            # allowance for waste and corners
vol = joint_length * bead_w * bead_t * (1 + waste) * 1000
pails = -(-vol // 11)
print(f"wet volume about {vol:.1f} L, {int(pails)} pails of 11 L")wet volume about 103.5 L, 10 pails of 11 L
In SMW-110 Kai estimated the Ashgrove mastic from the joint list as about 25 L (6.9 gal). With the seams and penetrations of Seal Class A added, the order roughly quadrupled, which surprised him until he counted the corner seams on every section.
Common mistakes
MistakeSealing a joint over mill oil or dust.
InsteadClean and dry the metal along the joint before sealing.
MistakeSkipping corners where seams meet the transverse joint.
InsteadSeal every corner continuously and close the ends of every seam.
MistakeUsing cloth-backed general purpose tape on duct.
InsteadUse listed sealants, and listed tapes only where the specification allows.
MistakePressure testing before the sealant has cured.
InsteadWait the manufacturer's curing time before pressurizing.
MistakeAssuming leakage rises in proportion to pressure.
InsteadUse F = CL × P^0.65; doubling pressure raises leakage by about 57 percent.
Summary and key terms
- Duct leakage wastes fan and conditioning energy, upsets balancing and can spread contaminants.
- Seal Class A seals transverse joints, longitudinal seams and penetrations; B seals joints and seams; C seals transverse joints only.
- Recent standards recommend, and many codes and specifications require, Seal Class A on most duct.
- Use listed mastics, tapes and gaskets for their intended uses, on clean metal, at the stated thickness and with curing time.
- Leakage is described by F = CL × P^0.65; the leakage class is set in the inch-pound units of the SMACNA test manual.
- Energy codes require sealing and leakage testing of higher pressure duct; the specification states the details.
- Seal class
- A level of duct sealing setting which joints, seams and penetrations are sealed.
- Mastic
- A thick, usually fibre-reinforced duct sealant applied over joints.
- Penetration
- A hole through the duct wall for a fastener, rod, pipe or sensor.
- Leakage class
- A number describing a duct system's tightness in the leakage equation; lower is tighter.
- UL 181
- The standards covering listed closures, including tapes, mastics and clamps, for duct.
- Curing time
- The time a sealant needs before the duct can be pressurized or tested.
Practice problems
Work each problem on paper first, then reveal the answer to check.
Which seal class requires penetrations to be sealed?
Show answer
Seal Class A.
What does the mark 181B-C on a product mean?
Show answer
A clamp listed under UL 181B for flexible duct.
By how much does leakage rise when the test pressure doubles?
Show answer
By about 57 percent, because leakage varies with pressure to the power 0.65.
Why did Kai's sealant order grow so much once Seal Class A was applied?
Show answer
Every longitudinal corner seam and penetration had to be sealed as well as the transverse joints.
Lesson quiz · 5 questions
Score 60% or more to complete this lesson.
Create a free account to save your progress, take quizzes and earn a certificate.