
SMW-130 · Lesson 2 of 12 · 19 min
Lap, grooved and corner seams
The simplest way to join two sheets is to overlap them. The next simplest is to fold their edges so they hook together. Between those two ideas lie most of the seams a sheet metal worker makes by hand: lap seams, grooved seams, double seams, corner seams and the standing seams that close the corners of boxes and duct. This lesson covers how each is laid out, formed and closed, what each is good for, and how much metal each one takes. The machine-made corner locks, the Pittsburgh and the snap lock, follow in Lesson 3.
SMW-120 gave Kai the allowances for these seams from Keelson's chart, just enough to draw a pattern. This lesson explains where those numbers come from, so that he can work out the allowance for any seam, in any gauge, rather than looking it up.
The lap seam
A lap seam is two sheets laid one over the other and fastened through the overlap with rivets, screws, solder or spot welds. It is the easiest joint to make and the easiest to understand. The overlap, or lap, is usually between 12 mm (1/2 in) and 25 mm (1 in) for riveted or screwed seams, and more for soldered seams, where the overlap is the area that carries the load.
A plain lap seam has two faults. The edge of the top sheet stands proud of the surface, which catches dirt, water and fingers, and the joint relies entirely on its fasteners or its solder for strength. An offset lap seam, in which one edge is joggled down by the thickness of the sheet so the outer surfaces are flush, fixes the first fault. A lap seam in a duct or a roof is always arranged so that the flow, air or water, passes over the edge rather than into it: the upstream sheet laps over the downstream sheet, like shingles. A lap facing the wrong way catches water and pushes air into the joint.
Lap seams are used where neatness matters less than speed: the closing seam of a pan, the joint between a hood panel and its frame, many flashings, and the sleeves and collars that join round duct to fittings. A lap seam with sealant between the sheets and rivets through them, a riveted and sealed lap, is a common and dependable joint in hoods, casings and equipment housings.
The grooved seam
The grooved seam is the oldest locked seam in the trade and still the standard longitudinal seam on round pipe, on many flat panels and on tinware. Each sheet has a single hem, or lock, folded along its edge, one folded up and the other down. The two locks are hooked together, and the joint is then grooved: a hand groover or a grooving machine presses an offset into the joint, which locks the hooks and sets the seam flush on one side.
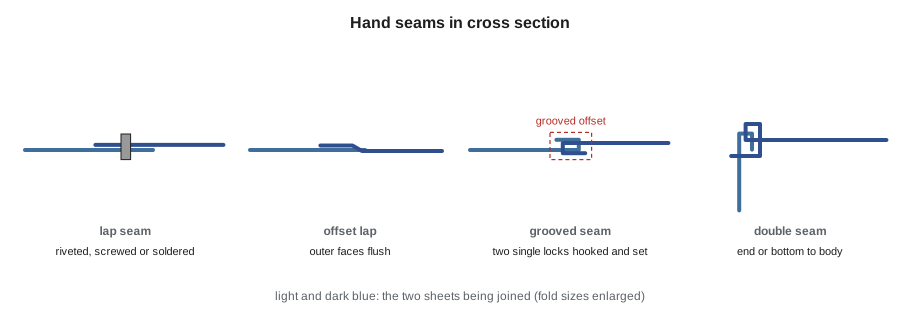
The width of a grooved seam is the width of the finished lock, the part you see as a raised band. A grooved seam for light gauge is commonly 6 mm (1/4 in) wide. To form it, each sheet needs a lock as wide as the seam, plus a little extra for the metal in the folds. That is where the Keelson chart figure of three widths of seam comes from: one width on one sheet, one on the other, and one more because the two locks overlap. For a 6 mm (1/4 in) seam, the allowances are 9 mm (3/8 in) on each edge, or a total of 18 mm (3/4 in), three times the seam width, spread across both edges.
Different shops split the total differently. Some put one and a half widths on each edge, as Keelson does. Others put one width on one edge and two on the other. What matters is that the total is right, both sides of the shop pattern agree, and the stretchout of a round pipe includes it. In SMW-120 Kai added the allowance to the stretchout of the Ashgrove branch duct; now he knew why it was three widths.
| Seam | Typical width | Allowance, edge 1 | Allowance, edge 2 | Total |
|---|---|---|---|---|
| Grooved seam, light gauge | 6 mm (1/4 in) | 9 mm (3/8 in) | 9 mm (3/8 in) | 18 mm (3/4 in) |
| Grooved seam, heavier gauge | 10 mm (3/8 in) | 15 mm (9/16 in) | 15 mm (9/16 in) | 30 mm (1 1/8 in) |
| Lap seam, riveted | 20 mm (3/4 in) lap | 20 mm (3/4 in) | none | 20 mm (3/4 in) |
| Double seam | 6 mm (1/4 in) | 6 mm (1/4 in) | 12 mm (1/2 in) | 18 mm (3/4 in) |
| Corner standing seam | 10 mm (3/8 in) | 10 mm (3/8 in) | 20 mm (3/4 in) | 30 mm (1 1/8 in) |
Forming and closing a grooved seam
Kai's first grooved seams were on a set of short 250 mm (10 in) pipe sections for the Ashgrove branch ducts. The sequence Aggie taught him was the same one she had learned.
- Mark the lock width on both edges with a scribe or set the brake or folding machine stop to it.
- Fold the first lock up and the second lock down, each to a little less than a full fold, so the hooks will slide together. On a bar folder, set the wedge to leave the hook slightly open.
- Roll or form the sheet into its pipe or panel shape, so the two locks meet.
- Hook the locks together along their whole length and close them lightly with a mallet.
- Groove the seam with a hand groover the right size for the seam, working from both ends toward the middle, then finish by setting it down with the mallet.
The hand groover is a hardened steel tool with a groove in its face slightly wider than the seam. Hit squarely, it presses the seam into an offset. Struck at an angle, it cuts the metal or leaves a crooked seam. The groover must match the seam width: a groover too wide leaves the seam loose, and one too narrow cuts it. On a round pipe, the seam is grooved over a stake or a mandrel so the pipe does not dent. In production, a grooving machine or the rolls of a seamer do the same work along the full length in one pass.
A good grooved seam is flat on the inside, offset evenly on the outside, tight along its whole length and free of cuts or cracks at the folds. If the locks were folded too wide, the seam will not close flat. If they were folded too tightly, the hooks will not slide together, and forcing them cracks galvanized coating or the metal itself. On pipe, an uneven seam shows up immediately as a pipe that will not roll round.
The double seam
A double seam wraps the edge of one sheet twice around the edge of the other. It is used where a bottom or an end is joined to a body: the bottom of a pail or a tank, the end cap of a round duct, the bottom of a sump, the end of a gutter. One piece has a single flange; the other has a flange twice as wide. The wide flange is folded over the narrow one, and then the whole seam is folded down against the body. Double seams are strong and, once soldered or sealed, tight. Their drawback is that they take skill and time to form by hand. In production they are rolled on a double-seaming machine.
Double seams were the standard joint of the tinsmith and remain the standard joint of the canning industry. In a modern sheet metal shop they appear most often on round fittings such as end caps, on gutters, on drip pans with soldered corners, and on architectural work where a neat closed corner is wanted without welding.
Corner seams
Rectangular duct, boxes and casings need corner seams, which join two sheets at a right angle. Several are made by hand.
- A plain corner lap, where one sheet is flanged and the other laps onto the flange and is riveted or spot welded. Simple but leaky unless sealed.
- A corner standing seam, where one sheet has a single upstanding flange and the other a double flange folded over it, so that the seam stands outside the corner like a fin. It is strong, stiffens the corner and is used on heavier gauge and on some kitchen and industrial work.
- A slip corner, where one edge is folded into a hook and the other edge slips into it. This is the hand version of the snap lock.
- A corner flat lock, where hooked edges are flattened against one face of the corner, used on casings and architectural boxes.
Corner seams on duct are almost always made on a machine today, as Pittsburgh locks or snap locks, because a machine makes them faster and more consistently than hands. Hand corner seams survive where the part is unusual, the gauge is heavy, the material is stainless or copper, or the quantity is too small to set up a machine.
Working out an allowance
Every hand seam allowance comes from the same reasoning: the width of each fold plus the extra metal the fold itself uses. In light gauge the extra is small and the rule of thumb of three widths for a grooved seam works. In heavier gauge, each fold uses more metal, because the metal has thickness and bends around a radius, and a careful worker adds roughly one metal thickness for each fold. The script below does that sum for a list of seams, so the allowance can be checked for any gauge. The rule it uses, one thickness per fold on top of the lock widths, is a shop rule of thumb, not a standard, and Keelson's chart rounds the results.
# Seam allowance = lock widths + about one metal thickness per fold (shop rule of thumb)
t = 0.7          # metal thickness, mm
w = 6          # seam width, mm
seams = {
    # name: (lock widths needed, number of folds)
    "grooved seam":         (3.0, 2),
    "double seam":          (3.0, 3),
    "corner standing seam": (3.0, 3),
    "offset lap":           (20, 1),
}
for name, (widths, folds) in seams.items():
    total = widths * w + folds * t if name != "offset lap" else widths + folds * t
print(f"{name:21s} allowance about {total:.1f} mm")grooved seam allowance about 19.4 mm double seam allowance about 20.1 mm corner standing seam allowance about 20.1 mm offset lap allowance about 20.7 mm
For 0.70 mm steel the grooved seam comes to about 19.4 mm, which the chart rounds to 18 mm because the two folds of a light gauge seam overlap slightly when grooved. Kai checked the result against a test seam, measured the sheet before and after, and found the seam had taken 18.5 mm. The rule of thumb is a starting point; a test seam in the actual metal is the final word.
This habit of testing is worth more than any chart. When a shop starts a new material, a new gauge or a new machine, an experienced worker forms a short test seam, measures what it took and adjusts the allowance before cutting the job. On stainless, which springs back more than mild steel, and on soft copper, which stretches, the allowance for the same seam can be noticeably different from galvanized steel.
Tools for hand seams
SMW-110 introduced most of the tools used for hand seams. The bar folder forms locks and hems along the edge of a sheet up to about 760 mm (30 in) long in light gauge. The cornice or box and pan brake forms flanges and locks on longer sheets. Hand seamers, or tongs, form short locks and close seams in awkward places. Mallets, not steel hammers, close seams without marring the metal. Hand groovers, in several sizes, set grooved seams. Stakes and mandrels support the work while it is formed. A rivet set and a dolly finish riveted seams, covered in Lesson 7.
For a hand seam, the bar folder is the most important tool. Its depth gauge sets the width of the lock, and its wedge sets whether the fold is sharp or open. Before forming a run of locks, Kai learned to fold a test strip and measure it, because the gauge marks on an old folder may no longer be accurate, and a lock that is 1 mm (1/32 in) too wide over a two-metre seam makes a pipe that will not close.
Coatings, metals and seams
Folding damages coatings less than heat does, which is one reason mechanical seams are favoured on galvanized steel. A tight fold can still crack the zinc on the outside of the bend, especially on heavier coatings or in cold weather. Folds should be made with a slight radius rather than crushed flat, and cracked coating on exposed work should be touched up with zinc-rich paint.
Different metals fold differently. Aluminum folds easily but can crack if folded tightly against the grain of some tempers. Stainless steel needs more force and springs back more. Copper in its soft temper folds very easily and is the easiest metal to seam by hand, which is one reason hand seams are still the norm in architectural copper. Coated and painted metals need folds formed with care and with clean tools, because a scratch in the paint is where corrosion begins.
Never join two different metals with a seam that will be wet without thinking about galvanic corrosion, covered in SMW-110. A galvanized steel strap seamed to copper flashing on St. Brendan's roof would corrode the steel quickly. Joints between dissimilar metals are separated with a nonconductive layer or avoided altogether, and on the church Keelson used copper cleats, copper rivets and copper-compatible solder throughout.
Common mistakes
MistakeLapping a roof or duct seam so the flow runs into the edge.
InsteadLap upstream over downstream, like shingles, so water and air pass over the edge.
MistakeGrooving with a groover the wrong width for the seam.
InsteadMatch the groover to the seam width so it locks the seam without cutting it.
MistakeFolding locks fully closed before hooking them.
InsteadLeave the hooks slightly open so they slide together, then close them.
MistakeTrusting the bar folder's depth marks on a long run.
InsteadFold and measure a test strip before forming the job.
MistakeUsing one allowance for every gauge and metal.
InsteadForm a test seam in the actual metal and adjust the allowance before cutting.
Summary and key terms
- A lap seam overlaps two sheets and relies on fasteners, solder or welds; lap it so the flow passes over the edge.
- A grooved seam hooks two single locks together and presses them into an offset; its total allowance is about three seam widths.
- A double seam wraps one edge twice around another and is used to join ends and bottoms to bodies.
- Corner seams join sheets at right angles; on duct they are now mostly machine-made Pittsburgh and snap locks.
- Allowances are lock widths plus about one metal thickness per fold, checked with a test seam in the actual metal.
- Fold coated metals with a slight radius, and keep dissimilar metals apart in wet joints.
- Lap seam
- A joint made by overlapping two sheets and fastening through the overlap.
- Grooved seam
- A seam of two hooked single locks pressed into an offset by a groover.
- Double seam
- A seam in which one edge is folded twice around the edge of another sheet.
- Hand groover
- A hardened tool used to set a grooved seam.
- Lock
- A folded edge, or hem, that hooks into another to form a seam.
- Corner standing seam
- A corner seam that stands outside the corner as a fin, stiffening it.
Practice problems
Work each problem on paper first, then reveal the answer to check.
What is the total allowance for a light gauge grooved seam 6 mm (1/4 in) wide, by Keelson's chart?
Show answer
About 18 mm (3/4 in), three seam widths, split between the two edges.
Why is a double seam used on an end cap rather than a grooved seam?
Show answer
It joins an end at right angles to a body and is stronger and tighter once sealed.
A test seam takes less metal than the chart says. What should you do?
Show answer
Use the measured allowance for that metal and gauge, and tell the foreman so the chart can be checked.
Which way should the laps run on a sloped flashing?
Show answer
The upper sheet laps over the lower one, so water runs over each edge.
Lesson quiz · 5 questions
Score 60% or more to complete this lesson.
Create a free account to save your progress, take quizzes and earn a certificate.