
PHOT-311 · Lesson 6 of 12 · 25 min
Exteriors and twilight photography
The exterior images of a building are often the ones that open a portfolio page, win an award submission or sell a property. This lesson covers practical exterior technique, from preparing the site and choosing exposure to dealing with glass, reflections, cars and trees, and then focuses on the twilight exterior: the image in which a building glows against a deep blue sky. Twilight exteriors are a signature of architectural and high-end real estate photography, and they demand careful timing.
Preparing the site
Exteriors reveal everything that is wrong with a site: bins, hoses, construction fencing, parked cars, signs, open garage doors, scaffolding and debris. Agree with the client in advance who will clear the site, and walk it before shooting. Common preparation tasks include:
- Moving vehicles away from the facade and driveway, or asking that the street be kept clear.
- Closing garage doors, straightening blinds to a uniform position and removing objects from window sills.
- Turning on every interior light and exterior light for twilight images, and replacing failed lamps.
- Sweeping paths, removing leaves from roofs and terraces, and mowing or watering landscaping.
- Removing or hiding hoses, bins, recycling boxes and seasonal decorations, unless the client wants them.
- Arranging patio furniture neatly and opening umbrellas if appropriate.
For large public buildings, coordinate with facility managers for access to roofs, balconies or neighbouring buildings with good vantage points. Permits may be needed to set up on sidewalks or streets in some cities; check local rules, especially for crews and lighting.
Exposure for daylight exteriors
Daylight exteriors usually need careful exposure but not exotic techniques. Use a tripod, base ISO and an aperture of f/8 to f/11 for depth of field and lens sharpness. Expose so that the brightest important areas, such as white render, sunlit glass or the sky near the sun, are not clipped; check the histogram and highlight warnings. Shaded parts of the facade can then be lifted in raw processing.
When dynamic range exceeds what one frame holds, such as a sunlit facade with a deep shaded entrance, take a bracketed series and blend (lesson 8). A polarizing filter darkens blue sky, reduces reflections on glass and foliage and increases saturation, but its effect varies across wide-angle frames, creating uneven sky bands; use it carefully at wide focal lengths.
Glass facades and reflections
Glass is the most common material in contemporary architecture and one of the hardest to photograph. A glass facade can appear as a mirror of the sky and neighbouring buildings, a dark void, or a transparent window into the interior, depending on lighting and angle.
- In daylight, glass usually reflects. Choose a vantage point where it reflects something attractive, such as sky, clouds or trees, rather than a parking lot or a building across the street. A slight change of angle changes reflections completely.
- Interior lights reveal the interior through glass only when the interior is bright relative to the outside, which happens at twilight and after dark.
- Curtain walls with slightly bowed panes create distorted reflections; a frontal view emphasizes this and an oblique view may hide it.
- Avoid photographing your own reflection, especially in frontal views of glass; use horizontal shift from an offset position.
Cars, people and moving things
Moving traffic and pedestrians can be removed by long exposures with neutral density filters (moving objects blur away if they cross the frame quickly enough) or by taking many frames and using a median stack, which keeps only what stays still. Parked cars that cannot be moved can be removed in post-production for design work, but in real estate images removing permanent features or changing surroundings may be prohibited (lesson 11). Light trails from traffic at twilight can add energy to urban images when used deliberately.
Wind moves trees and flags; at long twilight exposures, foliage blurs. Take a shorter exposure for the trees at a higher ISO and blend if needed.
The twilight exterior
A twilight exterior is photographed during blue hour, when the sky has turned deep blue, the building's lights glow and the brightness of the sky, the facade and the interior are roughly balanced. Before twilight, the sky is too bright and windows look dark. Too late, the sky turns black and the building floats in darkness with blown-out windows.
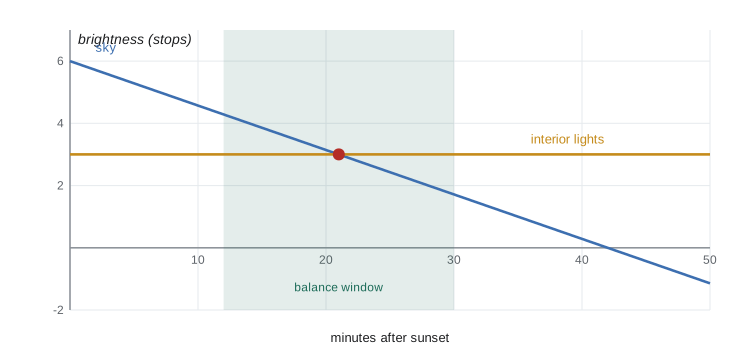
The key fact is that the sky darkens quickly while artificial lights stay constant. During blue hour, sky brightness falls by roughly one stop every five to ten minutes depending on latitude and season. Interior lights do not change. There is therefore a window, often 10 to 20 minutes long, in which the two are balanced.
Worked problem
Following the twilight exposure
At sunset, a balanced exposure for the sky is ISO 100, f/8, 1/4 s. The sky then darkens about one stop every seven minutes. What sky exposure is needed 21 and 35 minutes after sunset at the same ISO and aperture? If the interior lights need 2 s at f/8, when do sky and lights balance?
Show solution
- After 21 minutes: 21 / 7 = 3 stops darker: 1/4 s × 2³ = 2 s.
- After 35 minutes: 5 stops darker: 1/4 s × 2⁵ = 8 s.
- The interior lights need 2 s, the same as the sky after about 21 minutes, so the balance point is about 21 minutes after sunset.
- In practice, shoot from about 10 minutes before to 10 minutes after the balance point, adjusting the exposure every few frames.
Answer: About 2 s after 21 minutes and 8 s after 35 minutes. Sky and interior lights balance around 21 minutes after sunset; the most useful frames come from roughly 10 to 30 minutes after sunset.
Because conditions change by the minute, many photographers take a series: the first frames for the sky and building shape while some daylight remains, then frames for the lights at the balance point, and finally darker frames for window glow and exterior lighting. These are blended into one image that combines the best of each moment. Some add flash to light the landscape or a facade, which is light painting, either by walking around with a light during a long exposure or by firing flashes from several positions in separate frames.
Planning a twilight shoot
- Choose the facade that faces the sunset or sunrise sky if possible; the western sky after sunset has the most colour. A facade facing away from the sunset still works, with a deeper blue sky.
- Arrive at least an hour before sunset to set up, compose in daylight and take daylight base frames.
- Turn on every light, inside and out, including landscape and pool lights. Open curtains. Make sure all interior lamps are the same colour, or plan to correct them.
- Lock focus, white balance and composition. Use a remote release or a timer.
- Take a frame every minute or two through the window. Bracket exposures at each step if the scene is very contrasty.
- Watch for problems: automatic exterior lights that switch off, cars arriving, neighbours' lights, and condensation on the lens as the temperature falls.
- Have a plan for sunrise twilight as well; it works in reverse, with the window closing as the sky brightens.
White balance at twilight
At twilight the sky is very blue, around 9,000 K or more, while interior lights are warm, often 2,700 to 3,000 K. The contrast between blue sky and warm windows is the visual appeal of a twilight image. Setting white balance at about 3,500 to 4,500 K keeps windows warm but not orange and the sky blue but not purple. Shoot raw and fine-tune later. If interior lamps are mixed colours, the windows will look patchy; lesson 7 explains how to handle mixed light.
After dark
After blue hour, the sky goes black. Night images can still work for buildings with strong exterior lighting, such as museums, bridges and towers, or for urban scenes with traffic trails. The building's lighting design becomes the subject. Keep highlight clipping in check: bright lamps and signs can bloom and flare. Lenses with good flare control and clean front elements matter.
Drones and elevated views
Elevated views show the roof, the site plan and the building in its context. They can be taken from neighbouring buildings, a tall pole or a drone. Drones bring their own legal rules, covered in lesson 10.
Sky replacement and honesty
Sky replacement is common in real estate and some commercial work: a grey sky is swapped for a blue one. In design photography, many architects prefer real skies and shoot on suitable days; heavy sky replacement can look fake, especially in reflections on glass that no longer match. In real estate, adding a dramatic sky may be acceptable where it does not misrepresent the property, but rules on digitally altered listing images are tightening, as lessons 9 and 11 explain. Never use sky replacement to hide something that matters, such as a power line or a neighbouring building that a buyer would care about.
| Minutes after sunset | Sky | Windows | Typical use |
|---|---|---|---|
| 0 to 10 | Bright, colourful | Look dark | Sky and building shape |
| 10 to 25 | Deep blue | Balanced glow | Main twilight frame |
| 25 to 40 | Dark blue to black | Bright, may clip | Window and landscape light |
| After 40 | Black | Dominant | Night images of lit buildings |
Exterior lighting design
Many buildings have carefully designed exterior lighting: uplights washing a facade, lit signage, landscape lights, lit canopies and glowing stairwells. At twilight, this lighting becomes part of the architecture, and the photographer should see it as the lighting designer intended. Confirm before the shoot that timers and sensors will keep lights on, that every fixture works and that colour temperatures match. Some lighting is controlled by building management systems and needs a facility manager to override schedules.
Photographing at sunrise
Sunrise twilight has advantages: streets are quiet, there are fewer parked cars and pedestrians, the air is often clearer and the light is the same as evening twilight in reverse. The disadvantage is that the sequence runs backwards: the photographer must be set up in the dark and catch the balance window before the sky brightens too much. Plan carefully, scout the night before and arrive at least 45 minutes before the start of civil twilight.
Safety on exterior shoots
Exterior work often happens on roadsides, in car parks and at night. Wear high-visibility clothing when working near traffic, keep tripod legs out of walkways, use lights to mark equipment after dark and work with an assistant when possible. Check that roofs and balconies have guards before using them as vantage points, and follow site safety rules on construction sites, including hard hats, safety boots and vests. Never climb onto unprotected roofs or structures for a better angle.
Delivering exteriors
Exterior sets usually include at least one hero image, often the twilight view or a strong oblique in sunlight, which the client will use for the cover of a brochure, the top of a web page or an award entry. Make sure this image is technically flawless and available in landscape, portrait and square crops. Supporting images then show other facades, the entrance and the site, with consistent colour and verticals.
Common mistakes
MistakeArriving at sunset to set up a twilight shoot.
InsteadArrive an hour early, compose in daylight and be ready for the window.
MistakeLeaving some interior lights off or mismatched.
InsteadTurn on every light, replace failures and match colours where possible.
MistakePhotographing a glass facade reflecting a car park.
InsteadChoose the angle so glass reflects sky, clouds or trees.
MistakeUsing a polarizer at full strength on a very wide lens.
InsteadWatch for uneven sky bands and use partial polarization.
MistakeReplacing skies or removing features that matter to a buyer.
InsteadKeep edits honest and follow disclosure rules.
Summary and key terms
- Exteriors need careful site preparation, agreed in advance with the client.
- Daylight exteriors use a tripod, base ISO, f/8 to f/11 and careful highlight control.
- Glass facades reflect in daylight and reveal interiors only when the interior is brighter, at twilight.
- Long exposures and median stacks remove moving people and traffic.
- In blue hour the sky darkens about a stop every five to ten minutes while lights stay constant.
- The balance window is short; many photographers shoot a series and blend frames.
- Sky replacement and object removal must not misrepresent a building or property.
Practice problems
Work each problem on paper first, then reveal the answer to check.
Name three site preparation tasks before an exterior shoot.
Show answer
Move cars, close garage doors, turn on lights (also sweep, hide bins).
Why does glass look dark from outside in daylight?
Show answer
The exterior is brighter than the interior, so the glass reflects.
How can you remove passing pedestrians?
Show answer
Long exposure with ND filters or a median stack.
Sky needs 1/2 s at sunset and darkens a stop every 6 minutes. Exposure after 18 minutes?
Show answer
Three stops: 4 s.
Why do sky and windows balance only briefly?
Show answer
The sky darkens quickly while artificial lights stay constant.
When should you arrive for a twilight shoot?
Show answer
About an hour before sunset.
Suggested white balance range at twilight?
Show answer
About 3,500 to 4,500 K.
What is light painting?
Show answer
Adding light with a moving lamp or repeated flash during exposures.
Why might sky replacement look fake on a glass building?
Show answer
Reflections in the glass no longer match the new sky.
What problem appears in the lens as night falls?
Show answer
Condensation as the temperature drops.
Lesson quiz · 5 questions
Score 60% or more to complete this lesson.
Create a free account to save your progress, take quizzes and earn a certificate.