
PHOT-311 · Lesson 3 of 12 · 29 min
Tilt, shift and correcting perspective
Lesson 2 showed that a level camera keeps verticals straight but places the horizon in the middle of the frame. This lesson explains the tools that solve that problem: shift movements that slide the image without tilting the sensor, tilt movements that control the plane of focus, stitched shift panoramas that widen the view, and software corrections that straighten converging lines after capture. It also explains the price of each method, because every correction costs something in quality, coverage or time.
The image circle
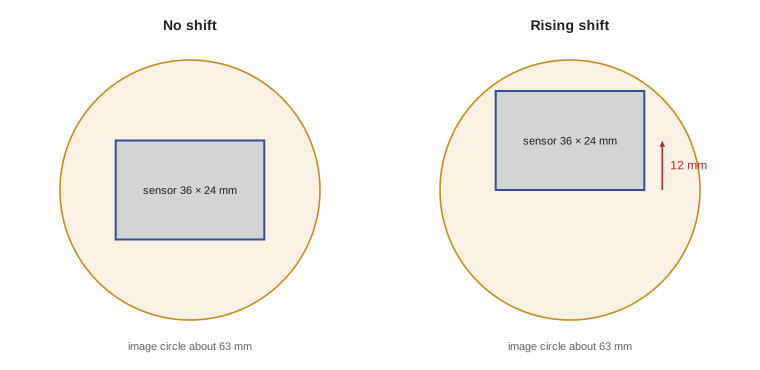
Every lens projects a circular image. An ordinary lens projects an image circle just large enough to cover its sensor's diagonal, about 43 mm for full frame. A shift lens projects a much larger circle, typically about 58 to 67 mm in diameter on full frame, so that the sensor can be moved within it, or more precisely so that the lens can be moved relative to the sensor, while still being covered. View cameras work the same way: large-format lenses project generous image circles that allow wide movements.
Moving the lens up relative to the sensor is called rise; moving it down is fall; moving it sideways is shift. On tilt-shift lenses for interchangeable-lens cameras, all three are usually called shift and the lens can be rotated so that the shift works in any direction.
Calculating the rise you need
For a level camera, a point at height \( H \) above the lens and horizontal distance \( D \) from it is imaged at a distance \( y \) above the centre of the sensor:
where \( f \) is the focal length. To include both the top and the bottom of a building, the sensor must span from the image of the base, which lies below centre if the base is below the lens, to the image of the top. The rise needed is the amount by which the middle of that span sits above the optical centre.
Worked problem
How much rise for a facade?
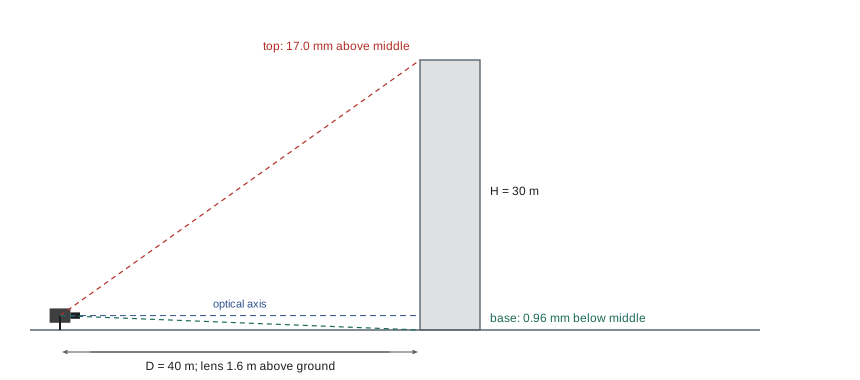
A full-frame camera in landscape orientation (sensor 24 mm high) with a 24 mm lens stands 40 m from a building 30 m tall. The lens is 1.6 m above the ground. Can a 12 mm rise include the whole building with a little margin, and how much rise is needed?
Show solution
- Top of building: H = 30 − 1.6 = 28.4 m above the lens. y = 24 × 28.4 / 40 ≈ 17.0 mm above centre.
- Base: 1.6 m below the lens. y = 24 × 1.6 / 40 ≈ 0.96 mm below centre.
- The building spans 17.0 + 0.96 ≈ 18.0 mm on the sensor, which fits in 24 mm with 6 mm to spare.
- The middle of the span is at (17.0 − 0.96) / 2 ≈ 8.0 mm above centre, so a rise of 8 mm centres the building. A rise of 9 to 10 mm leaves more sky above and less foreground.
Answer: Yes. About 8 mm of rise centres the building; 12 mm is available, so the photographer can choose how much foreground to keep. Without shift, the camera would have to tilt up, causing convergence, or be moved much further back.
If the calculation shows the building cannot fit, the options are to move back, to choose a wider lens, to turn the camera to portrait orientation (36 mm of sensor height), to raise the camera, or to stitch several frames.
Shift for the other directions
Horizontal shift solves a different problem: photographing a facade straight on when an obstacle, such as a tree, a pole or a reflection of the camera in glass, prevents standing directly in front of it. The photographer stands to one side, keeps the sensor parallel to the facade and shifts the lens sideways to centre the facade. The result is a true one-point frontal view taken from an offset position. The same technique lets a photographer photograph a mirror or a glass wall without appearing in the reflection.
Fall, moving the lens down, is useful when the camera is high, for example on a balcony or a tall tripod, and the subject is below, such as a plaza or a table setting in an interior shot from above.
Stitched shift panoramas
Because the sensor stays in the same plane while the lens shifts, two or three frames taken at different shift positions share exactly the same perspective. They can be merged in software into a single wider image without the parallax and projection problems of rotating panoramas. A full-frame camera shifted 12 mm left and 12 mm right covers an area 60 mm wide, which with a 17 mm lens corresponds to a horizontal angle of about 121°, much wider than any rectilinear lens of comparable quality. Shifting up and down as well can produce very high-resolution files from a modest camera.
For the best results, use a tripod, lock exposure and white balance, and move the camera body rather than the lens, using an adapter or tripod collar that keeps the lens's optical centre fixed; this eliminates any small parallax between frames.
Worked problem
Coverage of a stitched shift panorama
A 24 mm tilt-shift lens on a full-frame camera is shifted 12 mm left and 12 mm right, with one frame in the centre. What horizontal area and angle of view does the stitched result cover?
Show solution
- Width covered on the image plane: 36 + 12 + 12 = 60 mm.
- Angle of view: 2 × arctan(60 / (2 × 24)) = 2 × arctan(1.25) ≈ 2 × 51.3° ≈ 103°.
- For comparison, the 24 mm lens alone covers about 74°.
Answer: About 103° horizontally, roughly what a 14 mm lens covers, with the resolution of three full frames and the edge quality of a 24 mm lens.
Tilt and the plane of focus
Tilting the lens relative to the sensor rotates the plane of sharp focus. The Scheimpflug principle states that when the lens plane is tilted, the sensor plane, the lens plane and the plane of sharp focus meet along a common line. By tilting the lens forward slightly, the photographer can lay the plane of focus along a floor, a table or a landscape so that both near and far parts are sharp at a wide aperture. This reduces the need for very small apertures, which cause diffraction softening.
In architecture, tilt is used less than shift, because buildings are usually deep in all directions and wide lenses already have great depth of field. It is valuable for long tables, floors in large halls, kitchen counters photographed from close to the end, and details shot at close range. Tilt in the opposite direction can deliberately throw parts of a scene out of focus, the so-called miniature effect, which occasionally appears in editorial work.
Most architectural shooting uses apertures between f/8 and f/11 on full frame. At f/16 and smaller, diffraction begins to soften high-resolution sensors visibly. Using tilt or focus stacking is better than stopping down to f/22.
Correcting perspective in software
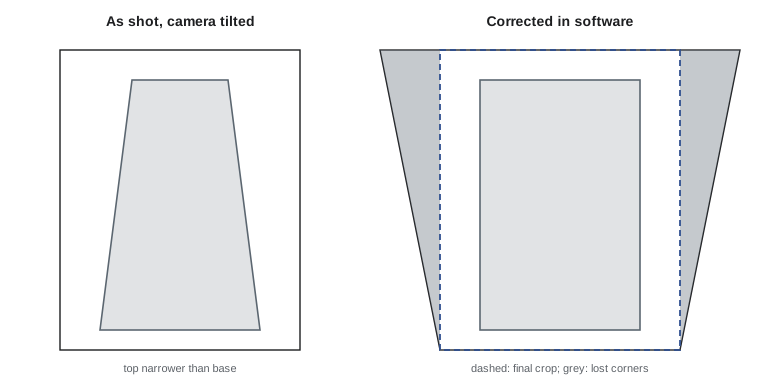
Raw processors and editing programs can straighten converging verticals after capture. Tools such as transform or upright functions apply a projective transformation that stretches the top of the image outward until vertical lines are parallel. This is useful when no shift lens is available, when a slight tilt crept in, or for drone and handheld images.
Software correction has costs:
- Resolution loss. Correction stretches the top of the frame and the corners are cropped away, so part of the original pixel count is lost and the stretched areas are interpolated.
- Coverage loss. Because the top corners are stretched outward and cropped, you must leave extra room around the subject when shooting; corrected images often lose 10 to 25 percent of the frame.
- Distorted proportions. A strong correction from a steep camera tilt makes upper floors look taller than they are, because the vertical scale is also stretched. Most software lets you adjust the aspect to compensate, but judgement is needed.
- Softness at the top. The stretched region is enlarged, so its sharpness falls, which can matter in large prints.
Worked problem
What does a keystone correction cost?
A 45-megapixel image (8,192 × 5,464 pixels) shows a building whose top is 20 percent narrower than its base because the camera was tilted up. The correction stretches the top row by 1 / 0.8 = 1.25 times. If the photographer instead crops to the width that needs no enlargement anywhere, how many pixels wide is the result, and what fraction of the original pixels remains if the height is unchanged?
Show solution
- Stretching the top by 1.25 means its detail is enlarged 25 percent; the top is interpolated rather than recorded.
- To avoid any enlargement, the final width must equal the narrowest part of the original subject, 80 percent of 8,192 ≈ 6,550 pixels.
- With height unchanged: 6,550 × 5,464 ≈ 35.8 million pixels, about 80 percent of the original 44.8 million.
- In practice photographers accept some enlargement and crop less, but the calculation shows why strong corrections reduce quality.
Answer: About 6,550 pixels wide and about 80 percent of the original pixels, or a full-width image whose top is enlarged by 25 percent. A shift lens would have avoided both losses.
How much to correct
Fully correcting verticals is the norm in architectural design work. Some photographers leave a very slight convergence, a few percent, when the camera is far below the top of a tall tower, because perfectly parallel verticals can make the top of a very tall building look wider than its base, an optical illusion caused by our expectation of seeing towers from below. This is a matter of taste; architects usually prefer full correction.
In interiors, correct both verticals and the horizontal lines of one-point views. Check the corners of the room, door frames and window mullions; even a degree of residual tilt is visible.
Workflow tips for shift lenses
- Level the camera first, then compose using shift only. Never tilt the camera to compose and then shift.
- Check that the tilt mechanism is set to zero when you only want shift; an accidentally tilted lens produces strange focus.
- Use live view magnified at the corners to focus and check sharpness, because shifted frames use the edge of the image circle where quality is lower.
- Large shifts can cause darkening at the far edge of the shifted frame. Correct it in raw processing or avoid the extreme of the range.
- Lock the shift knobs before long exposures.
- Meter in manual mode. Automatic metering through a shifted lens can be unreliable.
| Method | Advantages | Costs |
|---|---|---|
| Shift lens or camera movements | Correct perspective in camera, full resolution | Expensive, manual focus, slower |
| Move back and crop | Any lens, no stretching | Loses pixels, needs space |
| Software correction | Fast, works on any image | Stretching, cropping, softness at top |
| Stitched shift panorama | Very wide views, high resolution | Several frames, stitching time |
| Tilt | Plane of focus along floors and tables | Easy to misuse, needs practice |
Shift lenses take practice to use quickly, so rehearse the routine of levelling, shifting, focusing and locking until it becomes automatic before using it on a paid commission.
Common mistakes
MistakeTilting the camera to compose, then trying to fix it with shift.
InsteadLevel the camera first and compose using rise, fall and shift.
MistakeLeaving the tilt slightly engaged when only shift is wanted.
InsteadCheck that tilt is at zero before shooting.
MistakeFraming tightly when you plan to correct in software.
InsteadLeave extra space around the subject for the crop.
MistakeStopping down to f/22 for depth of field on a high-resolution sensor.
InsteadUse f/8 to f/11, tilt or focus stacking.
MistakeRotating the camera between frames of a shift panorama.
InsteadShift only, so every frame shares the same perspective.
Summary and key terms
- Shift lenses project large image circles so the frame can move without tilting the sensor.
- The height of a point on the sensor is \( y = fH / D \); this gives the rise needed to include a building.
- Horizontal shift gives frontal views from offset positions and avoids reflections.
- Stitched shift panoramas give very wide, high-resolution views with a single perspective.
- Tilt rotates the plane of focus by the Scheimpflug principle.
- Software correction is convenient but costs resolution, coverage and sharpness at the top.
- Level first, compose with shift, focus at the corners and correct verticals fully in design work.
Practice problems
Work each problem on paper first, then reveal the answer to check.
Why can a shift lens move the frame without vignetting?
Show answer
It projects an image circle much larger than the sensor.
A 24 mm lens, a point 20 m above the lens, 50 m away. Height on the sensor?
Show answer
24 × 20 / 50 = 9.6 mm.
When is horizontal shift useful?
Show answer
To get a frontal view from an offset position or to avoid reflections.
Width covered by a full-frame sensor shifted 10 mm each side?
Show answer
36 + 20 = 56 mm.
What does tilt control?
Show answer
The angle of the plane of sharp focus.
Name two costs of software keystone correction.
Show answer
Lost resolution and coverage, stretched proportions or soft tops.
A building top is 25 percent narrower than its base. Stretch factor to correct?
Show answer
1 / 0.75 ≈ 1.33 times.
What aperture range do architectural photographers usually use on full frame?
Show answer
About f/8 to f/11.
What must you check before shooting with only shift?
Show answer
That tilt is set to zero.
Why move the body, not the lens, in a stitched shift panorama?
Show answer
It keeps the lens's optical centre fixed and avoids parallax.
Lesson quiz · 5 questions
Score 60% or more to complete this lesson.
Create a free account to save your progress, take quizzes and earn a certificate.