
PHOT-311 · Lesson 2 of 12 · 25 min
Perspective and the architectural camera
Perspective is the single most important technical topic in architectural photography. Every decision about where to stand, which lens to use and how to hold the camera changes how a building's lines appear. This lesson explains why vertical lines converge, how vantage point and focal length interact, what kinds of cameras and lenses architectural photographers use, and how to set up a camera so that the image is level and true. Lesson 3 then explains tilt and shift movements and software correction in detail.
Why verticals converge
A camera records a scene through a lens onto a flat sensor. Lines in the world that are parallel to the sensor plane stay parallel in the image. Lines that are not parallel to the sensor converge toward a vanishing point. When you point a camera upward to fit a tall building into the frame, the sensor tilts back and is no longer parallel to the building's vertical edges. Those edges then converge toward a vanishing point above the building, and the building appears to lean backward or to fall away from the viewer.
The rule follows directly: keep the sensor vertical and vertical lines stay vertical. That is why architectural photographers level their cameras carefully. The problem is that a level camera, with the lens centred on the sensor, places the horizon in the middle of the frame. For a tall building, the top is cut off and the bottom half of the frame is filled with street or foreground. The solutions are to move further back, to use a wider lens and crop, to use a shift lens or camera movement that slides the image upward, or to correct the convergence in software afterwards.
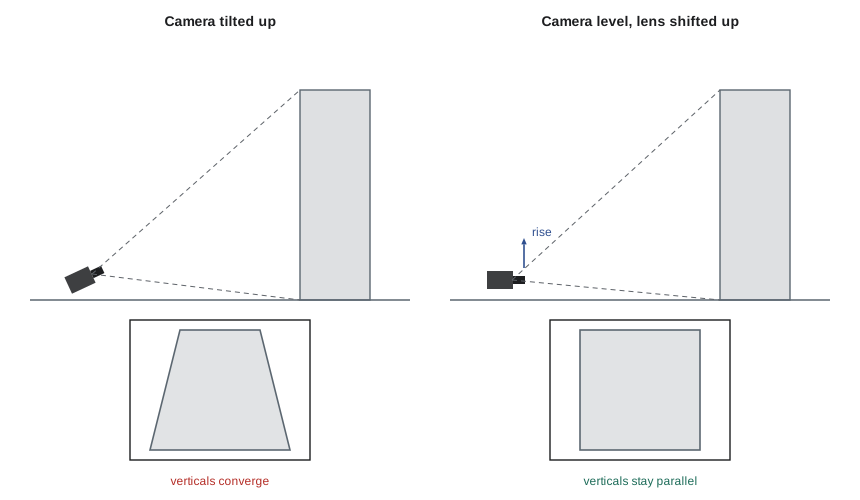
Convergence is not always wrong. A dramatic upward view of a skyscraper with strongly converging lines can be expressive, and many editorial and fine art images use it deliberately. The problem is mild, accidental convergence of a few degrees, which looks like a mistake. A useful rule is to make lines either truly vertical or obviously and intentionally converging, never in between.
Horizontal lines and one-, two- and three-point perspective
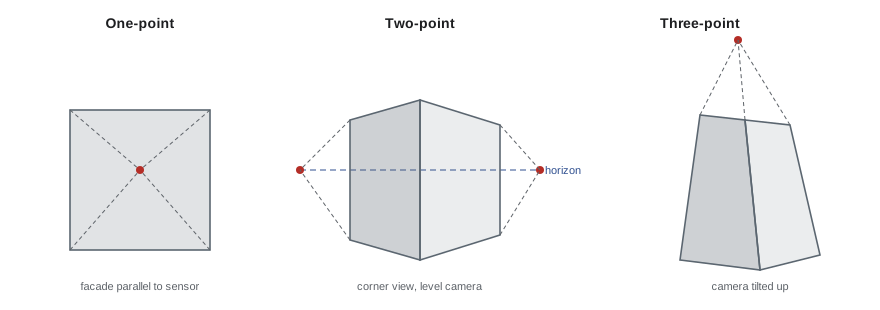
The same principle applies to horizontal lines. If the sensor is parallel to a facade, the facade's horizontal lines stay horizontal and parallel; this is a one-point perspective view, also called a frontal or elevation view. The receding lines of side walls, floors and ceilings converge to a single vanishing point, usually near the centre of the image. One-point views are formal, symmetrical and calm; they suit symmetrical rooms, corridors, facades and modern architecture with strong grids.
If the camera is turned to view a building corner, two sets of horizontal lines recede to two vanishing points on the horizon, left and right. Verticals stay vertical if the camera is level. This two-point perspective gives a sense of volume and depth and is the most common exterior view: it shows two faces of the building at once.
If the camera is also tilted up or down, verticals converge to a third vanishing point. Three-point perspective is dramatic and is usually avoided in design work except for deliberate effect.
Vantage point controls perspective; focal length controls framing
A common misunderstanding is that wide-angle lenses distort perspective and telephoto lenses flatten it. In fact, perspective, meaning the relative sizes and positions of objects in the image, depends only on where the camera stands. Focal length only decides how much of that perspective is captured. If you photograph a building from 50 m away with a 24 mm lens and then crop the centre of the frame, the result has exactly the same perspective as a photograph taken with a 70 mm lens from the same spot, just with fewer pixels.
This matters enormously in architecture. A close vantage point exaggerates the size of near objects and the depth of a space: a room photographed from a corner with a 16 mm lens looks larger and deeper than it is. A distant vantage point compresses depth and makes a building's relationship to its neighbours clearer. The choice of vantage point is therefore an ethical and aesthetic decision, not just a technical one. Real estate images taken too close with extreme wide lenses can mislead buyers about room sizes.
Once a vantage point is chosen, select the focal length that frames the subject well. Architectural photographers spend much of their time moving the tripod a metre at a time, studying how the overlaps between columns, the gap between a building and its neighbour, or the relationship between foreground and background change.
Field of view
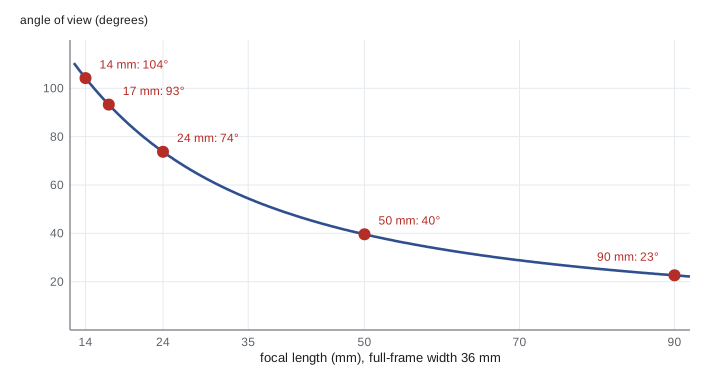
The angle of view of a lens depends on its focal length and the sensor dimension. For a sensor dimension \( d \) and focal length \( f \) (for subjects far away), the angle is:
On a full-frame sensor, 36 mm wide and 24 mm high, a 24 mm lens gives a horizontal angle of about 74°, a 17 mm lens about 93° and a 14 mm lens about 104°. Interior photographers often work between 16 and 24 mm on full frame; exterior work uses everything from 17 mm to 90 mm or longer.
Worked problem
How wide a lens does a room need?
A living room is 5.5 m wide. Standing against the opposite wall, the camera's sensor is about 6.5 m from the far wall. What horizontal angle of view is needed to include the full width of the far wall, and which full-frame focal length gives it?
Show solution
- Half the width is 2.75 m at a distance of 6.5 m. The half-angle is arctan(2.75 / 6.5) = arctan(0.423) ≈ 22.9°.
- The full angle is about 45.8°.
- Solve for focal length: \( f = d / (2 \tan(\theta / 2)) = 36 / (2 \times 0.43) \approx 42 \) mm.
- A 35 mm lens gives about 54°, which includes the far wall with some margin for side walls.
Answer: About 46°, which a lens of about 42 mm covers. A 35 mm lens includes the whole far wall with some of the side walls. Using 16 mm here would show far more floor and ceiling and make the room look larger than it is.
Distortion is different from perspective
Lens distortion is a separate issue. Barrel distortion makes straight lines bow outward from the centre; pincushion distortion makes them bow inward; complex or moustache distortion is a mixture. Distortion is a property of the lens design, not of perspective, and it is especially visible on straight architectural lines near the frame edges. Modern lens profiles in raw processors correct most distortion automatically, and architectural photographers apply these corrections to every image. Fisheye lenses deliberately have extreme barrel distortion and are rarely used in architecture except for virtual tours, as lesson 9 explains.
Wide-angle lenses also show a geometric effect called volume deformation: round or three-dimensional objects near the edges of the frame look stretched, even when the lens is perfectly rectilinear. A round table or a chair at the edge of a 16 mm frame looks elongated. Keep such objects away from the edges, or choose a less extreme focal length.
Cameras and lenses for architecture
Architectural photographers have used several kinds of equipment.
- Large-format view cameras (4 × 5 inch and larger) have a front standard holding the lens and a rear standard holding the film or digital back, joined by flexible bellows. They allow full movements: rise and fall, shift, tilt and swing. They dominated the field for most of the twentieth century and are still used by a few specialists.
- Technical cameras are compact, rigid bodies for medium-format digital backs with lenses that can be shifted, and sometimes tilted. They deliver very high resolution and movements in a portable package, at high cost.
- Tilt-shift lenses for interchangeable-lens cameras offer shift (typically about 10 to 12 mm in any direction on full frame) and tilt (about 8° to 10°). Common focal lengths include 17, 19, 24, 45 and 90 mm. They are the most common professional tool today.
- Ordinary wide-angle and zoom lenses are used with careful levelling, extra width and cropping, or with software correction. They are adequate for much real estate work.
- Smartphones and compact cameras now have very wide lenses and automatic corrections; they are used for quick documentation and some real estate work, but their small sensors limit dynamic range and quality in large prints.
Sensor resolution matters because architectural images are often cropped, corrected and printed large. Many professionals use cameras of 40 to 100 megapixels. Lenses must be sharp to the corners, because the corners of an architectural image often contain important lines.
Setting up: tripod, levelling and height
Almost all architectural photography is done on a sturdy tripod. A tripod allows precise composition, long exposures in dim interiors, identical frames for exposure blending and repeatable positions for progress work. A geared head lets the photographer adjust pitch, roll and yaw in small, independent steps; ball heads are faster but harder to adjust precisely.
Level the camera on two axes. Roll (side to side) keeps horizontal lines horizontal in frontal views and verticals vertical overall. Pitch (forward and back) keeps verticals parallel. Use the camera's electronic level, a bubble level in the hot shoe or a level on the geared head, and confirm by checking that verticals near both edges of the live view are parallel to the frame edges.
Camera height is a powerful and underused control. For interiors, a camera height around the middle of the room's height, often 1.0 to 1.4 m for residential rooms, shows floor and ceiling in balance and keeps furniture tops from looking strange. Kitchens often look best with the camera just above counter height so that counters do not appear as large blank surfaces. For exteriors, raising the camera, with a tall tripod, a pole, a nearby balcony or a drone, reduces the need for rise and shows roofs and site plans.
| Effect | Cause | Control |
|---|---|---|
| Converging verticals | Sensor tilted relative to vertical lines | Level the camera; shift; correct in software |
| Exaggerated room depth | Close vantage point | Move back; choose a moderate focal length |
| Bowed straight lines | Lens distortion | Lens profile correction; better lens |
| Stretched objects at edges | Wide-angle volume deformation | Keep round objects away from edges |
| Too much floor | Level camera at low height | Raise camera, use fall or crop |
Practising perspective control
The fastest way to learn perspective is deliberate practice. Choose a simple building and photograph it from the same spot with a level camera at several focal lengths, then crop the wide frames to match the longer ones and compare them; the perspective will be identical. Next, photograph the same facade from three distances with focal lengths chosen to keep the building the same size in the frame, and notice how the relationship between the building and its background changes. Finally, photograph a room from a corner and from the middle of a wall, at three camera heights, and compare how large and how comfortable the room appears. These exercises build an intuitive sense of how vantage point, focal length and height work together, which is the foundation of every architectural composition.
Common mistakes
MistakeTilting the camera up slightly and leaving mild convergence.
InsteadKeep verticals truly vertical, or make convergence obviously intentional.
MistakeUsing the widest lens available for every interior.
InsteadChoose a vantage point first, then the focal length that frames it honestly.
MistakeBelieving focal length changes perspective.
InsteadRemember that perspective depends on camera position; focal length only frames.
MistakeShooting interiors at standing eye height by habit.
InsteadAdjust camera height to balance floor, ceiling and furniture.
MistakeSkipping lens profile corrections.
InsteadCorrect distortion on every architectural image.
Summary and key terms
- Vertical lines stay vertical only when the sensor is vertical.
- One-point views are frontal and formal; two-point views show volume; three-point views are dramatic.
- Perspective depends on vantage point; focal length decides framing.
- The angle of view is \( 2 \arctan(d / 2f) \); wide lenses exaggerate depth from close positions.
- Lens distortion and volume deformation are separate from perspective and need their own controls.
- View cameras, technical cameras and tilt-shift lenses provide movements; ordinary lenses need careful levelling and correction.
- A tripod, geared head, careful levelling and thoughtful camera height are the foundation of good work.
Practice problems
Work each problem on paper first, then reveal the answer to check.
Why do verticals converge when you tilt the camera up?
Show answer
The sensor is no longer parallel to the vertical lines.
What kind of perspective is a straight-on facade view?
Show answer
One-point perspective.
Does a telephoto lens flatten perspective by itself?
Show answer
No. Distance does; the lens only frames.
Angle of view of a 24 mm lens across a 36 mm sensor?
Show answer
About 74°.
Angle of view of a 17 mm lens across 36 mm?
Show answer
About 93°.
Which lens fault makes lines bow outward?
Show answer
Barrel distortion.
Why keep round tables away from the edges of a wide frame?
Show answer
Volume deformation stretches them.
A good starting camera height for a residential room?
Show answer
About 1.0 to 1.4 m, near mid-height of the room.
What does a geared head make easier?
Show answer
Precise, independent adjustment of pitch, roll and yaw.
Name two ways to fit a tall building without tilting.
Show answer
Move back and crop, use a wider lens and crop, or shift the lens.
Lesson quiz · 5 questions
Score 60% or more to complete this lesson.
Create a free account to save your progress, take quizzes and earn a certificate.